HL Panther G customization diary

jeff1101
Corporal
Posts: 340
Joined: Tue Jan 03, 2012 9:08 am

Re: HL Panther G customization diary

Post by jeff1101 »

Updates 8/3/13 - Minor corrections to turret and upper hull

Corrections to cupola sighting vane
I saw hotte8487's cupola sighting vane in his Tamiya panther and realized mine was too small and out of scale. I fashioned a new one with slightly bigger dimensions.
Image
Image

Corrections to antenna base
The Heng Long antenna base is incorrect. In real panthers, the antenna base is secured with 3 bolts instead of 4.
Image

To fix this I cut off the 3 bolts.
Image

Drilled holes for the new bolts.
Image
Image

Attached new bolts using styrene rod.
Image

Antenna base with correct number of bolts.
Image
jeff1101
Corporal
Posts: 340
Joined: Tue Jan 03, 2012 9:08 am

Re: HL Panther G customization diary

Post by jeff1101 »

Updates - cont'd, smoothing out upper hull surface and recovering the details

I followed dgsselkirk's advice and decided to recover some of the details lost when the primer spray left a coarse sandpapery texture on the surface of the upper hull. I used alcohol at first but discovered this was not thinning out the tamiya primer when applied with a brush. Instead I used Tamiya lacquer thinner and brushed it on the surface of the upper hull with a technique quite like dry brushing.

First I dipped a wide brush in Tamiya lacquer thinner. Then dab the excess on dry tissue paper.
Image

And then applied it to the parts of the tank I want to smooth out.
Image
Image

I discovered that this thinned the primer that enough surface texture that I painstakingly added before was now beginning to show through again.
Image
Image
Image

Here are some pics of the turret and upper hull. This has enough of the texture retained that I am now happy with it.
Image
Image
Image
Image
Image
Image
Image
Image
Image
Image
Image
Image
Image
User avatar
hotte8487
Sergeant
Posts: 732
Joined: Thu Aug 04, 2011 6:28 am
Location: Berlin, Germany

Re: HL Panther G customization diary

Post by hotte8487 »

The Heng Long antenna base is incorrect. In real panthers, the antenna base is secured with 3 bolts instead of 4.

Hi Jeff,

I don't want to stop your thirst for action, but for me it isn't right, that the antennae foot is mounted with only three bolts. What's the source of your knowledge? I know only drawings with four bolts... :S
And; not only the Heng Long Panther had four bolts, Tamiya incidentally too...
Greeting Hotte

IG-Panzerjäger Berlin

HL Tiger I late (ElMod)
Torro Kingtiger (ElMod)
Tamiya Tiger I early (ElMod)
Tamiya Panther G (ElMod)

The thinking is allowed to all people, but many are spared. (Curt Goetz 1888-1960)
jeff1101
Corporal
Posts: 340
Joined: Tue Jan 03, 2012 9:08 am

Re: HL Panther G customization diary

Post by jeff1101 »

Hi hotte8487,

The antenna base design was not changed from Panthers D,A and G. It has always been secured using 3 bolts. Here is a picture of a panther G antenna base I scanned.
Image

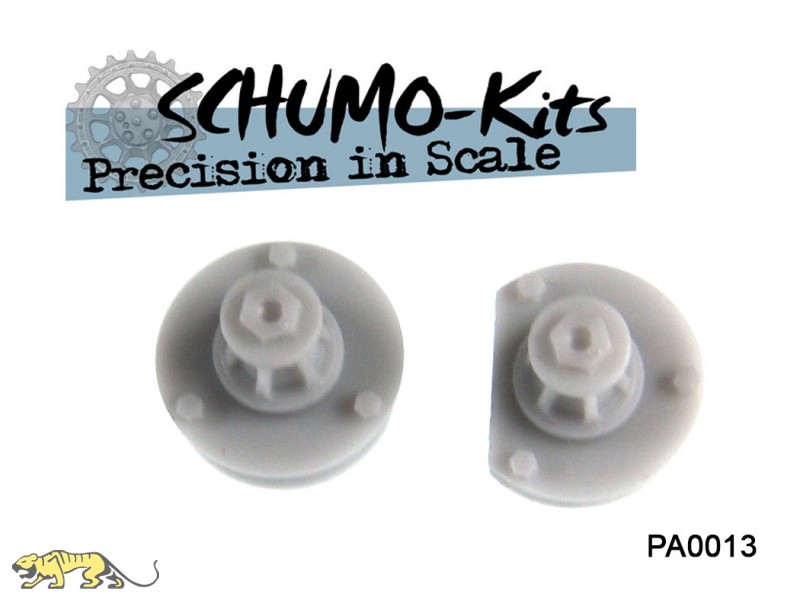
Even the replacement antenna base from Schumo Kit has 3 bolts. I didn't wan't to buy the kit since the change was easy to do.
Image
(image from http://www.axels-modellbau-shop.de/)

The Heng Long panther is a copy of the Tamiya so I think they may have copied details that may have been incorrect in the Tamiya part.
The 1/32 panther G model from DML is a newer kit that has this detail correct. See build log from Mike Roof. I drew most of my inspiration for my panther on his build.
http://www.armorama.com/modules.php?op= ... 956&page=1)
User avatar
hotte8487
Sergeant
Posts: 732
Joined: Thu Aug 04, 2011 6:28 am
Location: Berlin, Germany

Re: HL Panther G customization diary

Post by hotte8487 »

Hi Jeff,

thanks for your reply. I have also searched in my Panther books and have found some interesting drawings; Panther's who have antennae foots with four bolts mounted. :crazy:
But for my Panther I've used until now two sources, from Thomas L. Jentz and Hilary Louis Doyle "Panzer Tracts No. 5-3, Panzerkampfwagen Panther, Ausführung G" and from Waldemar Trojca "Im Detail, Panther Ausf. G". In both books has the antennae foot three bolts, that's why I've made it like you and have also modified my antennae foot. Finally here are still two pics; one from my Panther now and a second from a four bolts mounted antennae foot.
antennenfuss.jpg
Panther_Antennae_4Bolt_Mounted_3.jpg
Panther_Antennae_4Bolt_Mounted_3.jpg (87.66 KiB) Viewed 3261 times
Greeting Hotte

IG-Panzerjäger Berlin

HL Tiger I late (ElMod)
Torro Kingtiger (ElMod)
Tamiya Tiger I early (ElMod)
Tamiya Panther G (ElMod)

The thinking is allowed to all people, but many are spared. (Curt Goetz 1888-1960)
jeff1101
Corporal
Posts: 340
Joined: Tue Jan 03, 2012 9:08 am

Re: HL Panther G customization diary

Post by jeff1101 »

Hi hotte8487,

Glad to be of help. There is something very strange in that last picture you posted. (The line drawing). It seems to have a mixture of Panther D and G features. Aside from the number of bolts in the antenna base, it has the 4 Panther D style molded exhaust louvres and engine access hatch and yet the drawing seem to show a Panther G tank. (Blanked headlight mounted on left side fender, no letterbox opening on driver side front glacis, hatch hinge opening upwards for radioman and driver etc.) Sorry but I would not use this drawing as a reference for a late model Panther G (Manufactured Dec., 44 onwards) as it has too many incorrect details.
jeff1101
Corporal
Posts: 340
Joined: Tue Jan 03, 2012 9:08 am

Re: HL Panther G customization diary

Post by jeff1101 »

Updates 8/8/13

Took the time to primer paint the tracks, idlers and drive sprockets. I was very conscious of the spray distance to prevent the powdery texture that happened before when I primed the hull. Pretty happy the way it turned out.
Image
Image
User avatar
Wildboar44
Corporal
Posts: 392
Joined: Sun Jan 13, 2013 10:28 pm
Location: Kent England UK.

Re: HL Panther G customization diary

Post by Wildboar44 »

Great build on this one Mr Jeff , I truly admire your attention to detail .
Yesterday is our history, Tomorrow is an eternal mistery, Today is a gift, its why its called "The Present".
User avatar
PainlessWolf
Lieutenant-Colonel
Posts: 7587
Joined: Sun Feb 26, 2012 9:09 pm
Location: Southern Colorado Rocky Mountains

Re: HL Panther G customization diary

Post by PainlessWolf »

Good Afternoon,
It's almost impossible to say enough good things about this build. You've basically built an amazing new tank on the chassis of what you bought from Heng Long. I can honestly say that the ideas for the few (compared to your total workover) things I have planned for my Panther G come from the work that you have done. Your Panther is an inspiring build.
regards,
Painless Wolf
...Here for the Dawn...
jeff1101
Corporal
Posts: 340
Joined: Tue Jan 03, 2012 9:08 am

Re: HL Panther G customization diary

Post by jeff1101 »

Updates 8/10/13 - Welds, welds and more welds

Wow, thanks guys for the kind words. I started this diary totally new to 1/16 RC, scale modelling and even panther tanks in general. The wealth of information from this forum and encouragements continually motivate me to go on. I'm also glad my postings (and ramblings) are useful to some as well. :thumbup:

And with that I continue.

There is a rain guard on the rear turret hatch. This hatch is for the loader and the rain guard throws rain to the sides of the hatch so water doesn't get inside the fighting compartment.

In HL tanks, the rain guard looks too neat and clean. Since the guard is welded on, this should also have weld marks. (see picture below of the Bovington panther in http://www.net-maquettes.com)
Image

Here is mine after I added the weld marks.
Image

Notice that I already primed the turret and yet added this detail in. For me it's better to add as much stuff as I can and be absolutely satisfied (instead of regretting later) since I know I can still correct things before I start spraying the base coat of paint. As always with adding last minute details like this, it helps that you are not in a hurry to get the tank finished. :crazy:

Unfortunately I was too focused on what I was doing to take pictures of the steps, but for tiny welds such as this, I jam as much milliput ( along the side of the guard) that can stick, and then wipe like crazy using wet cotton swabs before the putty sets so that only a thin line of putty is left along the side of the guard.

I then use a fine needle to scribe the weld marks on to the putty (see my build log for something I did similar for the top turret details - Updates 03/09/13 - Completing the detailing of the turret http://www.rctankwarfare.co.uk/forums/v ... start=220)

Its a chore I definitely do not enjoy doing. It ranks second worst (in terms of frustration) to assembling PE parts. Milliput has a very small window of time (first 30 minutes) in which it is workable. After that, it would often time adhere to your fingers or applicator (such as tweezers, toothpick etc.) more readily than the spot you want it to. 8O

Using the same technique I also added weld lines to the armored exhaust.In early panthers, these were made from cast metal parts, but in later panthers (due probably to save time making them) these were made from thick metal sheets welded together. (However some late model panthers would still have the early cast armored exhausts.)

And where there are welds, there will be weld marks. Here is the picture of the welded armoured exhaust from the Bovington Panther. (again from http://www.net-maquettes.com)
Image

And here is my version.
Image

Also notice in the above I added the weld marks in the pintle mount. (The protruding tow hitch like device attached to the engine cover, below the exhaust) Adding the weld marks here were more difficult as the mount has a complicated shape and thus a lot more corners. Let's just say I was not looking forward to doing that again. :eh:
Post Reply

Return to “Panther”