Page 24 of 41
Re: HL Panther G customization diary
Posted: Sun Mar 17, 2013 2:37 pm
by jeff1101
Updates cont'd - My Airbrush and Compressor setup
To supply compressed air I decided to use my old compressor which I first bought to paint the house years ago. It can go to as high as 120 psi but I plan to use it for just 30 psi.

However, it uses a different sized hose compared to the airbrush.

I shopped around for a coupling/reducer and found some sold as fittings for water purification systems. They didn't have a coupling but they had some elbow reducer. So I bought those. I also bought hose for the fittings as well. The hose and fittings are rated 30 psi water (60 psi max) so I hope it would be suitable for the same pressure on air.


The elbow fits to the compressor hose. The metal to plastic grip is pretty strong.

I attached the screwed connector at the end of the hose. I tied some wire to it to keep it attached nice and tight.

The connector then screws to the airbrush. I have just attached everything at this point and and have not fed any air into the system yet to check for leaks. I'll do that next week.

Re: HL Panther G customization diary
Posted: Sun Mar 24, 2013 12:27 pm
by rcGrunt
Im brand new to the rc tank hobby , just driving them but watching this thread has me itching to atleast try out the modelling side of the hobby. excellent step by step mate even for a newbie such as myself you make it look achievable. looking forward to seeing the paint job
Re: HL Panther G customization diary
Posted: Sun Mar 24, 2013 12:28 pm
by rcGrunt
Im brand new to the rc tank hobby , just driving them but watching this thread has me itching to atleast try out the modelling side of the hobby. excellent step by step mate even for a newbie such as myself you make it look achievable. looking forward to seeing the paint job
Re: HL Panther G customization diary
Posted: Mon Mar 25, 2013 2:59 pm
by jeff1101
Try it. I was a newbie when I started this tank last year. I purposely made the build thread as a "how to" to encourage others to have as much fun (and frustration

) as I did.
Re: HL Panther G customization diary
Posted: Mon Mar 25, 2013 3:36 pm
by dgsselkirk
Neat work on the air brush fitting. When you go to try it out try running it at 14-15 PSI and see how you like that. Not sure if that monster can run that low! LOL!
I would find 30 too high to use.... besides, you use 30 you will run the risk of blowing some of those bity details off!

This is an awesome build Jeff, your detail work is some of the best I have seen. Can't wait to see what you do with the paint. Do you have a particular vehicle in mind?
Re: HL Panther G customization diary
Posted: Sat Mar 30, 2013 8:04 am
by jeff1101
Re: HL Panther G customization diary
Posted: Sat Mar 30, 2013 8:41 am
by jeff1101
Updates - cont'd Turret Preshading and modulation
I added the initial shading color for the turret. This will hopefully add contrast to the nooks,corners, panel gaps and weld lines. For the shading color I mixed 1:1 matt black and dark grey. I then added about half the ratio of Tamiya thinner.

I also went to the drugstore and bought some cheap droppers and specimen containers. The droppers I used to measure the different paint mixes I will use and the containers are useful for holding leftover paint or If I want to pre-mix a big batch of paint in a particular color.

And here are the results.


I decided to completely cover the barrel using the pre-shade color. I don't know why but I just liked how it looked. Of course I used only 1 coat and the grey was still showing underneath to give it that feathered appearance.

My main problem was that my compressor auto stops at more than 100 psi

. I don't know how to set it any lower so I have to turn off the compressor when it reaches 30 psi, do some painting and again turn on the compressor once the air begins to go down lower than 10 psi.
And despite that large tank, the air pressure goes down pretty quickly. I am noticing I can only do less than 3 minutes of continuous spray before the air pressure goes down too much that it badly affects spray quality at which point I turn the compressor on again. (very tedious to say the least

)
Also I don't know how accurate the compressor gauge is but I notice I am getting better spray quality if the air pressure (as seen in the gauge) is 35 to 40 psi.
I will stop with the turret at this point so that the tank hull can catch up. I still have to add some minor details before I start priming and pre-shading it. This way I can spray the entire tank with the base color in one go.
Re: HL Panther G customization diary
Posted: Sat Mar 30, 2013 10:07 am
by maxmekker
Nice update mister. Preshading looks good. I have to an old compressor , and like you I have to turn it on and off since ,while the regulator works on mine , it is not good enough for steady pressure, and I hav a smaler one than you so I get even shorter spray time. I'm looking at buying something like in the picture.
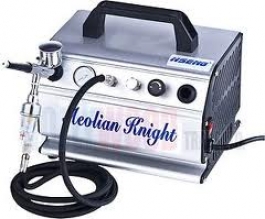
- largeimg1238AS-179%201.jpg (45.96 KiB) Viewed 3745 times
I used to thin Tamiya with the x20a, but I tried the L Thinner and the paint spray's on even better, tamiya is still my favoritt over AK and Vallejo.
Re: HL Panther G customization diary
Posted: Sat Mar 30, 2013 2:27 pm
by jeff1101
dgsselkirk wrote:Can't wait to see what you do with the paint. Do you have a particular vehicle in mind?
I was hoping on doing this, but with the standard 3 color pattern (primer or red brown, olive green and dark yellow)


Re: HL Panther G customization diary
Posted: Fri Apr 05, 2013 3:32 am
by dgsselkirk
Hi Jeff,
Just curious, are you using laquer thinner with Tamiya acrylics???? I can see your issues with pressure, you are getting a little splatter. Not a big deal at the step you are at now but you are going to hate it when you begin the colour coat. If I may suggest... if you are using the Tamiya acrylics try straight old rubbing alcohol (99%) it is way less expensive than the brand thinner and I find it sprays beauty! Make it about the consistancy of milk. It may help with the splatter as well since with laquer thinner it actually congeals acrylic paint into microscopic balls as it comes out of the air brush and basically acts like a wet snowball against your tank on a very small, small scale of course! Of course all this is mute if you are not using laquer thinner!


