Electronics
As I have already said, electronics are not my strong point. However, through trial and error – and a lot of help from others on this site – this is what I have done...
Originally this was an old smoke and sound Tiger with an RX15 board. There was no flashing hull MG – instead the coaxial MG flashed in the turret. Then I up-graded the lower hull to one with an RX18 board. Because I was going to install an Asiatam recoil unit and install a working hull MG I stripped the electronics out of the turret completely.
Moving the turret traverse motor
The HL turret traverse is designed to stop the turret from traversing totally to the rear. Obviously it can’t keep on going round and round without ultimately snagging on its internal wires, but the choice of 6 o’clock was presumably made to prevent the gun from snagging on the aerial. Since I had relocated my aerial mount to its correct position behind the right rear of the turret it made sense to have the turret traverse stopping at 4 o’clock too. Because I had already shifted the turret ring back I was going to have to relocate the motor anyway so I decided to move it to sit under the new aerial. I simply glued it into its new place and wedged it in with plasticard and square shaped brass. It worked perfectly. Of course, I hadn’t thought about the fact that it would now get in the way of the speaker. This I relocated to the opposite side of the hull and fixed in place with sticky-backed Velcro.
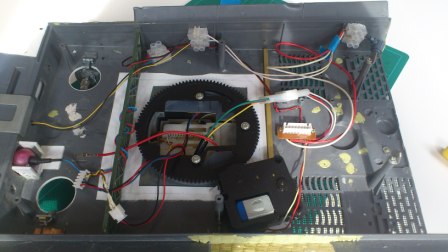
- View from beneath hull showing relocated turret traverse motor.jpg (36.47 KiB) Viewed 16375 times
Installing the Asiatam recoil unit
Although I had originally planned to keep the bb firing gun, once I saw the recoil unit in action on another tank I knew I had to install one. The unit generates a pretty strong gun flash via a bulb which sits inside the muzzle brake. At the same time the gun snaps back in a very satisfying way before sliding slowly back to its original position. The way the unit patches into the RX18 board means that all this is accompanied by the gun fire sound and ‘jerking’ tracks which you would otherwise get by pressing the bottom right hand button on the handset. Some people don’t like the track movement and there are ways of doing without it. Personally I think it’s better than nothing: after all, in any film of real Tigers firing their 88 the whole tank does shake.
Going for the recoil unit has other advantages, too. Once you have moved the turret ring back there is a potential fouling of the bulky bb mechanism on the front of the ring. I gave up before managing to resolve this problem. The recoil also requires a new metal barrel of the correct length. Although I had already extended my plastic HL barrel I was never that happy with its appearance. I was also conscious of the fact that it was a weak point, having already snapped the muzzle brake of another Tiger. The new metal barrel and muzzle certainly make the tank look more business-like.
However, once I bought the unit I started to wonder whether I had bitten off more than I could chew. The first problem was that it came without any instructions. I bought mine from Steve at Welshdragon and he was as helpful as he could be, but the instructions which he eventually emailed to me were for a Panzer III. Then I managed to find some on line for the Tiger 1. Both of these are in the form of blurry photographs with hilariously poor English captions. They are also misleading because, as I
now know, they are actually designed for an older tank with the RX15 board. They are really only of any use when it comes to physically installing the unit inside the turret - but that’s the easy part!
This is what has to be done with the rather bewildering array of wires:

- The three connections from the turret recoil unit to the hull.jpg (35.59 KiB) Viewed 16375 times
1. There are two short wires coming out of one side of the unit. Mine are blue and white. These are supposed to be attached to the turret switch under the loader’s hatch which turns the bb gun on and off. My switch was long gone and it’s hard to see why anyone would want to turn off the recoil anyway. Accordingly they simply need to be soldered together in order to complete the circuit.
2. There is a group of three thin wires coloured red, yellow and green. These are the main connectors. According to the instructions they are supposed to be soldered to the small square board under the rear of the engine deck to which the bb gun wiring was originally attached (this is itself connected to the multi-pin socket which accepts the multi-pin plug reaching up from the lower hull). The red wire goes in between the other two, opposite the red wire on the other side. Depending on how you connect the other two wires will determine whether pushing the left controller stick up triggers the recoil or the gun elevation/depression – or visa versa. At first I connected mine in line with the instructions by soldering them to the square board. However, then I realised that this would make removing the turret from the upper hull problematic. Accordingly I sourced a three-point plug and socket from a motorcycle dealer on ebay and used this to make the connection instead, dispensing with the square board all together. This allows me to easily separate the turret for maintenance.

- My original connection between the recoil unit and hull - note appalling soldering.jpg (36.61 KiB) Viewed 16375 times
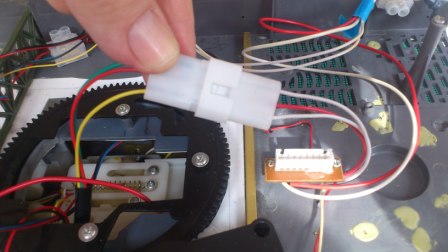
- New three pin plug replacing connection between turret and hull.jpg (35.45 KiB) Viewed 16375 times
3. Coming from the flash unit and battery unit are a series of wires which culminate in a small plug. My instructions had nothing to say about this, but the plug fits easily into the empty ‘MG fire’ socket in the RX18 unit. It can thus be easily disconnected if you want to separate the top and bottom of the hull.
4. Finally there is the most mysterious wire of all – a thick red one culminating in a bayonet connector. This is actually the earth and it needs to be patched in to one of the wires coming from the track motors to the battery. If you follow the instructions and simply solder the wire in place, however, you have suddenly lost the ability to separate the upper hull from the lower and the turret from the upper. To avoid this I simply found a wire with the female part of the bayonet connection (the same type used for the aerial) and soldered this into the motor circuit.
After all of this was done I fired up the tank and prayed. You know that you’ve done something right when you hear a faint whining sound and the barrel suddenly slides out to its full length – the unit’s initial setting has the gun in recoil and it’s the motor which then winds the barrel forward and extends the spring ready for the snap back. This all worked, as did the elevation; then the gun recoiled, flashed and ‘ka-boomed’ – but only once. I had to take the whole thing out to check the wires. Nothing seemed out of place. I even found that I could get it to work again (but only once) by giving the recoil cog a slight prod with a screwdriver. I was about to give up and send the unit back for a replacement when I read elsewhere on this site that the spring might need stretching. So I disconnected one end, flexed it a couple of times and – hey presto! It worked. It’s a salutary lesson that in electronics it’s not always the actual electronics that are the problem...