Hi This is a very good project,I like they original ideas to overcome the problems ,the sign of a good engineer.Top job look forward to seeing a video of this model running.You might have problems with paint peeling from the nylon wheels,If you do you might consider coating the wheels with superglue or epoxy glue to give the paint something to stick too.
Keep up with the posts will watch with interest.
regards pete
1/8th Merkava Dor Dalet

Re: 1/8th Merkava Dor Dalet
So I have had five weeks by myself and a fair amount of time spent working on the Merkava.
I am pretty happy with the revised drive train, the motor mounts are solid and the cross bracing has provided me with a solid esc mount that doubles as a large heat-sink.
This has also freed up some space in the front compartment for me to fit a smoker, planned to be a water based fogger, with a fill point under the drivers hatch and the exhaust on the front right hand side.
The micro servos driving the headlights has been replaced by a single standard jobbie, incorporating a micro switch to control power to the LED’s. I just need to do the final connection to the servo arm, and wire up the headlights, and make the headlights and fit the headlights and, and, and.

In the centre compartment, I’ll be fitting a control box, sound board and RX along with the two speakers that were scavenged out of a home theatre system.
I may change the speaker setup somewhere down the line, if I am not happy with the results.
The rear compartment will house the lipo batteries on either side as well as a little internal diorama, which will be viewed via the rear door. I still haven’t decided what to do and a lot will depend on info and photos I obtain via IDF forums and sources.

The door itself has changed considerably over the summer, internally I ripped out the original mechanism and have fitted two micro servos (previously driving the headlights) with a mixer/servo slow unit. Along with finishing the external detailing, I added two micro switches to the mechanism. One will turn on an internal light (red) and the other will trigger the sound card with some radio messages.

Heading back around to the front, I installed the drive sprocket covers, carved some tow hitches and detailed the top deck with hinges and latches.


The right hand side received some additional detailing to the side skirt mounts, along with completing all the rivets to the skirts themselves.
At the rear I completed the stowage bins and mud flaps on both sides as well as fitted the baskets either side of the rear door. I also added two track links to the bottom half of the fuel cells, but you’ll have to look closely to find them.


On top, I added a shovel and a few more latches and bits of detail, so all in all quite productive.

I have left myself a week to work my way down the left hand side and get that finished before the wife and boys return home and I am forced to remove the Merkava from the living room coffee table and return it to my workshop!
Jd
I am pretty happy with the revised drive train, the motor mounts are solid and the cross bracing has provided me with a solid esc mount that doubles as a large heat-sink.
This has also freed up some space in the front compartment for me to fit a smoker, planned to be a water based fogger, with a fill point under the drivers hatch and the exhaust on the front right hand side.
The micro servos driving the headlights has been replaced by a single standard jobbie, incorporating a micro switch to control power to the LED’s. I just need to do the final connection to the servo arm, and wire up the headlights, and make the headlights and fit the headlights and, and, and.
In the centre compartment, I’ll be fitting a control box, sound board and RX along with the two speakers that were scavenged out of a home theatre system.
I may change the speaker setup somewhere down the line, if I am not happy with the results.
The rear compartment will house the lipo batteries on either side as well as a little internal diorama, which will be viewed via the rear door. I still haven’t decided what to do and a lot will depend on info and photos I obtain via IDF forums and sources.
The door itself has changed considerably over the summer, internally I ripped out the original mechanism and have fitted two micro servos (previously driving the headlights) with a mixer/servo slow unit. Along with finishing the external detailing, I added two micro switches to the mechanism. One will turn on an internal light (red) and the other will trigger the sound card with some radio messages.
Heading back around to the front, I installed the drive sprocket covers, carved some tow hitches and detailed the top deck with hinges and latches.
The right hand side received some additional detailing to the side skirt mounts, along with completing all the rivets to the skirts themselves.
At the rear I completed the stowage bins and mud flaps on both sides as well as fitted the baskets either side of the rear door. I also added two track links to the bottom half of the fuel cells, but you’ll have to look closely to find them.
On top, I added a shovel and a few more latches and bits of detail, so all in all quite productive.
I have left myself a week to work my way down the left hand side and get that finished before the wife and boys return home and I am forced to remove the Merkava from the living room coffee table and return it to my workshop!
Jd
-
Andy in Cheltenham
- Corporal
- Posts: 427
- Joined: Mon Sep 21, 2009 12:54 pm
- Location: Tewkesbury
Re: 1/8th Merkava Dor Dalet
You are an artist sir. 
-
blimp
- Sergeant
- Posts: 738
- Joined: Sat Dec 11, 2010 12:29 am
- Location: Watford , NW Londonistan . U.K.
Re: 1/8th Merkava Dor Dalet
Agreed , this is something very special indeed , great work .
to the bouncy room ! Yay !
Re: 1/8th Merkava Dor Dalet
I have been spending a little cash of late and getting bits and bobs to try and get the Merkava moving again, literally speaking.

Two 24v 8Ah lipo batteries to begin with

Wiring up the control box with a watt/amp meter

The monster 805 servo modded to 360 degree and fitted to a spring tensioner

The esc hiding behind the headlight servo

And for the finale, my sound system arrived today!
Jd
Two 24v 8Ah lipo batteries to begin with
Wiring up the control box with a watt/amp meter
The monster 805 servo modded to 360 degree and fitted to a spring tensioner
The esc hiding behind the headlight servo
And for the finale, my sound system arrived today!
Jd

Re: 1/8th Merkava Dor Dalet
I have one ask. What will be turret? I search plans and drawings for Merkava Mk3. This model is hidden for me, i was find more pics Merkavas Mk 1/2/4, anything a satisfactory for Merkava 3  . My model will be based no the paper plans from polish GPM.
Piotr
Re: 1/8th Merkava Dor Dalet
I am using several different sources but the most useful would be this book from Desert Eagle publishing
http://ebookee.org/Merkava-Siman-3-Merk ... 56420.html
It might be out of print, I'm not sure, but a 3d specific book is due out soon.
http://www.deserteagle-publishing.com/
Jd
http://ebookee.org/Merkava-Siman-3-Merk ... 56420.html
It might be out of print, I'm not sure, but a 3d specific book is due out soon.
http://www.deserteagle-publishing.com/
Jd
Re: 1/8th Merkava Dor Dalet
Thanks for the positive comments guy, the work is quite rough in reality.
As for the finger, that is a whole other story, it certainly would have been a lot less painful if I had stitched it up myself!
Back to the tank.... I have spent the last couple of weeks on the internal electronics, wiring up the control box and making sure the different output voltages were correct.

The control box distributes and regulates power to the different and disparate components

The primary voltage is 24V which powers the two scooter motors (main on/off switch under the drivers hatch). The red switches control the smoke (24v), sound and fans (12v) and servos and receiver (6v). The display provides watt/amp/volt info depending on the menu I choose.
To the left of the box is a 1/4 scale servo with a wheel mounted and modified to turn 360 degrees and this is wired into a headinglock gyroscope (little blue box located in the middle of the red switches)
http://youtu.be/odMuK-eflMk
The video shows the proof of concept for the turret rotation, the speed looks about right to me for a modern tank but it is difficult to judge without a turret in place, any views?. The small movement at the end of the video is the gyro doing what it is supposed to do, I was manually moving the hull and the gyro was moving the turret ring to stay in it's original location. The idea is that wherever I point the turret it will stay in this position independent of the movement of the hull. I'll have to fine tune the gyro at some point, because it is way too sensitive at the moment.
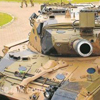
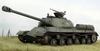
I took some fresh photos without a flash so it is easier to see some of the detail, most don't need descriptions


As I previously said, the track and drive sprocket is from a chieftain, but I have milled out the hubs and added bolts to try and come close to the real thing.


The rear door and stowage baskets are getting there and but I need to wire in the tail lights. I also haven't decided weather to continue with the baskets in thin copper sheet as seen on the left or make them in fabric.
Here is some video of the rear door working from the inside...
http://youtu.be/DvHP6rso2H4
and then an outside view
http://youtu.be/odMuK-eflMk
http://youtu.be/8z8w1ciY4TM
The internal lighting and sound are dependent on me working out how to programme the sound card
And finally some general shots


I'll spend the next couple of nights working on the sound and light system and then I'll work on the headlights.
Jd
As for the finger, that is a whole other story, it certainly would have been a lot less painful if I had stitched it up myself!
Back to the tank.... I have spent the last couple of weeks on the internal electronics, wiring up the control box and making sure the different output voltages were correct.
The control box distributes and regulates power to the different and disparate components
The primary voltage is 24V which powers the two scooter motors (main on/off switch under the drivers hatch). The red switches control the smoke (24v), sound and fans (12v) and servos and receiver (6v). The display provides watt/amp/volt info depending on the menu I choose.
To the left of the box is a 1/4 scale servo with a wheel mounted and modified to turn 360 degrees and this is wired into a headinglock gyroscope (little blue box located in the middle of the red switches)
http://youtu.be/odMuK-eflMk
The video shows the proof of concept for the turret rotation, the speed looks about right to me for a modern tank but it is difficult to judge without a turret in place, any views?. The small movement at the end of the video is the gyro doing what it is supposed to do, I was manually moving the hull and the gyro was moving the turret ring to stay in it's original location. The idea is that wherever I point the turret it will stay in this position independent of the movement of the hull. I'll have to fine tune the gyro at some point, because it is way too sensitive at the moment.
I took some fresh photos without a flash so it is easier to see some of the detail, most don't need descriptions
As I previously said, the track and drive sprocket is from a chieftain, but I have milled out the hubs and added bolts to try and come close to the real thing.
The rear door and stowage baskets are getting there and but I need to wire in the tail lights. I also haven't decided weather to continue with the baskets in thin copper sheet as seen on the left or make them in fabric.
Here is some video of the rear door working from the inside...
http://youtu.be/DvHP6rso2H4
and then an outside view
http://youtu.be/odMuK-eflMk
http://youtu.be/8z8w1ciY4TM
The internal lighting and sound are dependent on me working out how to programme the sound card
And finally some general shots
I'll spend the next couple of nights working on the sound and light system and then I'll work on the headlights.
Jd
Re: 1/8th Merkava Dor Dalet
I started work last night on the headlights


Can anyone guess what I started with?
Jd
Can anyone guess what I started with?
Jd
