Wings' T90 Build log

User avatar
HERMAN BIX
Major-General
Posts: 11256
Joined: Sun Jan 12, 2014 12:15 am
Location: Gold Coast,Australia

Re: Wings' T90 Build log

Post by HERMAN BIX »

I have spare links, somewhere. Just looked in where they should be but aren’t :problem:
Now will look thru the spare parts stash.
I don’t remember putting them in with all the other stuff but I have a lot of stuff !!
HL JAGDPANTHER,HL TIGER 1,HL PzIII MUNITIONSCHLEPPER, HL KT OCTOPUS,HL PANTHER ZU-FUSS,HL STuG III,HL T34/85 BEDSPRING,
HL PZIV MALTA,MATORRO JAGDTIGER,HL F05 TIGER,TAMIYA KT,HL PANTHERDOZER,HL EARLY PANTHER G,TAIGEN/RAMINATOR T34/76,
HL AN-BRI-RAM SU-85
User avatar
Wings0fPlague
Recruit
Posts: 17
Joined: Wed May 07, 2025 10:19 am
Location: Perth, Western Australia

Re: Wings' T90 Build log

Post by Wings0fPlague »

Thanks Herman, but no need to worry now :)
I've already shot a message to Toucan, and they said they will ship me 5 track pieces at no cost to me, pretty stellar support!
User avatar
Wings0fPlague
Recruit
Posts: 17
Joined: Wed May 07, 2025 10:19 am
Location: Perth, Western Australia

Re: Wings' T90 Build log

Post by Wings0fPlague »

So, since deciding that the green it came with is a solid base coat that I'm happy to use and incorporate with the final paint job (which will essentially just be a weathered version of how it is + ukranian markings)
I have started putting all the detail on, although the mg is not fixed at this stage, so that I can remove it for painting access.
With the scale of the tank, the airbrush can easily get in the cracks and crevices - and I'm (luckily) not going into the painting process alone - when that time comes.
I have enlisted the help of my good friend suggy, who is the best scale modeller I know. He will be helping me with the painting and is answering all my questions regarded to that.

At the moment, I have only done the turret, and have started on various parts of the hull while the turret dries. I will leave the barrels off the rear for now, so that I can comfortably lay the hull bottom upside-down when making the skirts.
20250520_195542.jpg
20250520_195542.jpg (2.12 MiB) Viewed 334 times

However, I did notice that inside the hopper-hatch, there is a Hole, the perfect size for a BB round, in the floor of the chamber.
20250520_195552.jpg
20250520_195552.jpg (1.9 MiB) Viewed 334 times
I'm not sure what this is for, and - as the turret is removed from the hull - I can see that it goes just into the hull.
Unless you guys know of a use for it, I will be covering the hole (and IR sensor plug) with some aviation-grade aluminium tape... just because I have a spare roll :D
Pavel
Corporal
Posts: 471
Joined: Sun Jun 12, 2022 6:41 pm
Location: Москва Россия

Re: Wings' T90 Build log

Post by Pavel »

You have a version with IR combat, I have BB, there the balls are loaded into the Commander's hatch.
In your version there is a hole for the IR combat mushroom, next to it is a connector for its connection...
Attachments
IMG_20250520_162449.jpg
IMG_20250520_162449.jpg (696.84 KiB) Viewed 318 times
User avatar
Wings0fPlague
Recruit
Posts: 17
Joined: Wed May 07, 2025 10:19 am
Location: Perth, Western Australia

Re: Wings' T90 Build log

Post by Wings0fPlague »

Ahhh, I see. Thank you Pavel!
As far as I understand, mine can do both - it has the BB cannon installed, and the hopper has a channel leading towards the loading chamber, as seen here;
20250520_214429.jpg
20250520_214429.jpg (1.63 MiB) Viewed 316 times
I'll go ahead and cover the hole + IR plug then, will just make sure the plug's pins are insulated from the aluminium tape :)
User avatar
Wings0fPlague
Recruit
Posts: 17
Joined: Wed May 07, 2025 10:19 am
Location: Perth, Western Australia

Re: Wings' T90 Build log

Post by Wings0fPlague »

Didn't get much time during the week to work on the T90, but now that my exam is done and passed (yay!) I have spent a bit of time last night and today working on the rubber skirts.

first thing first, now that I had my material I was using (some 0.2mm scrap tin sheeting) I could make the proper dimensions for what I needed to cut out, and prepare that in a drawing for me to follow;
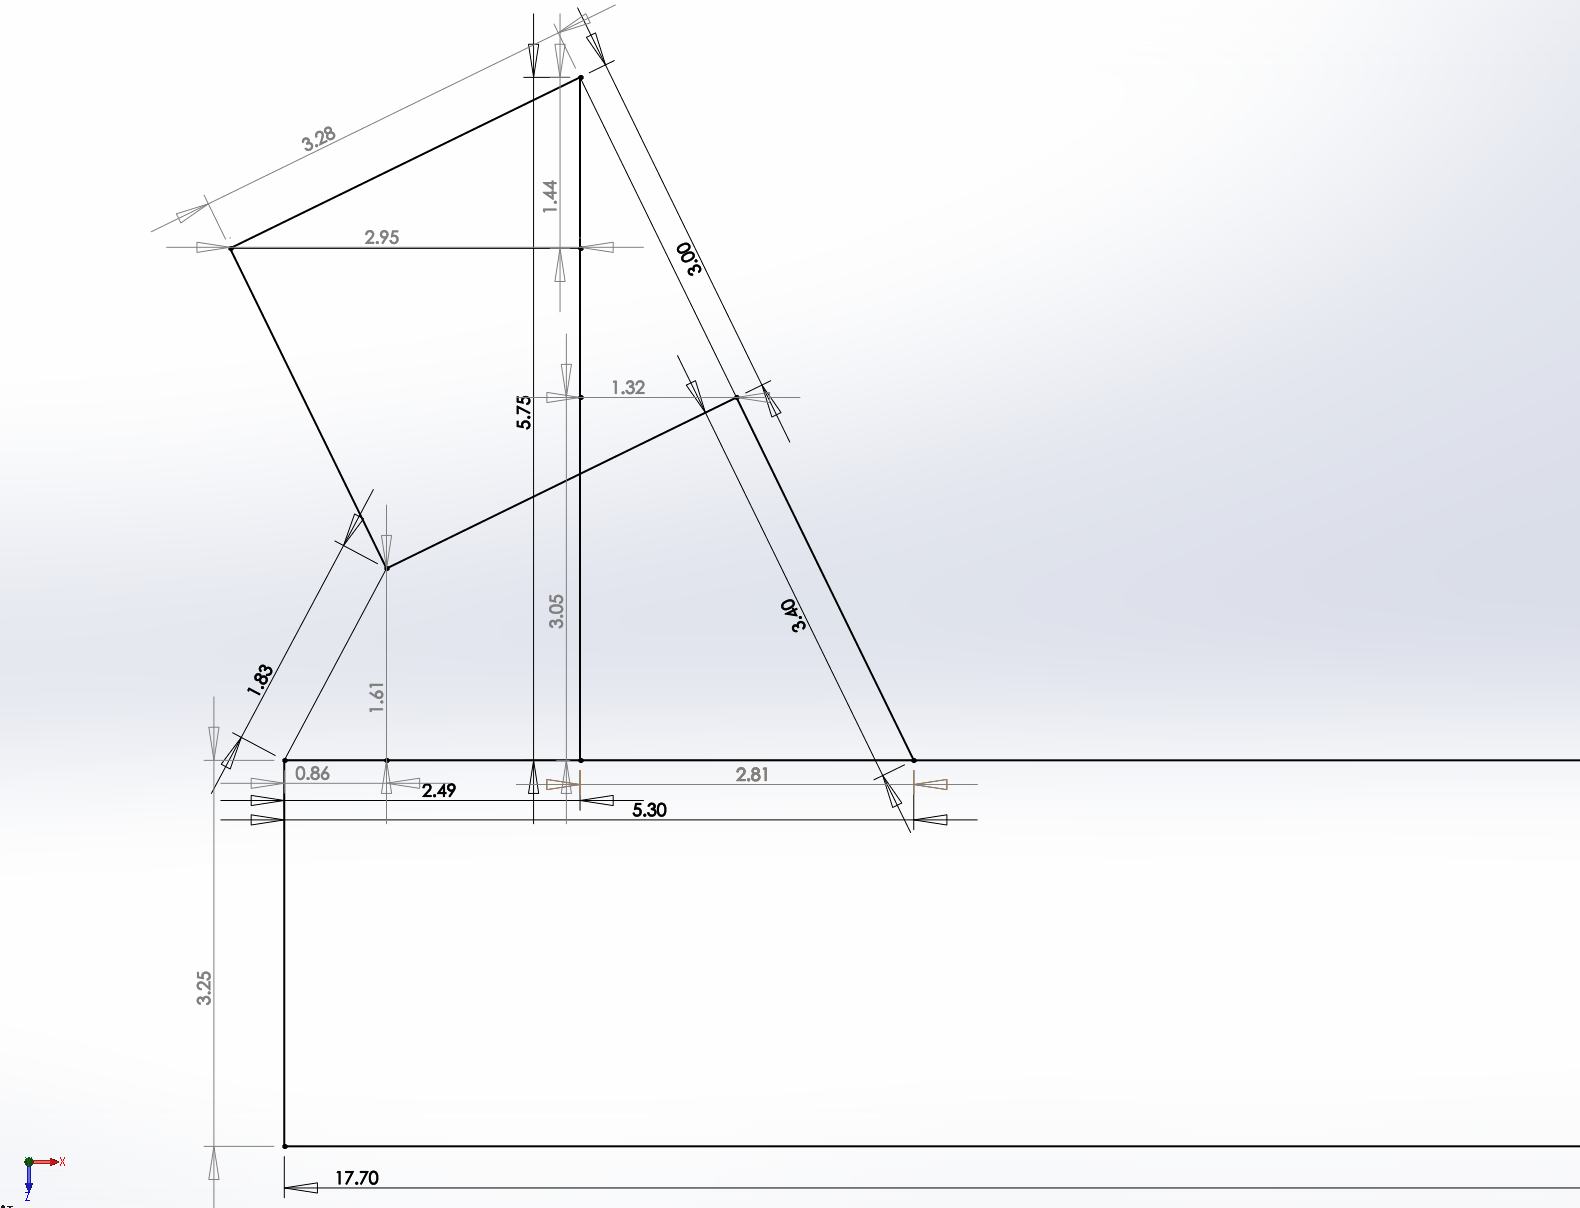
actualdims.PNG
actualdims.PNG (168.71 KiB) Viewed 232 times
And with that drawing, I cut out and bent my little brackets to shape.
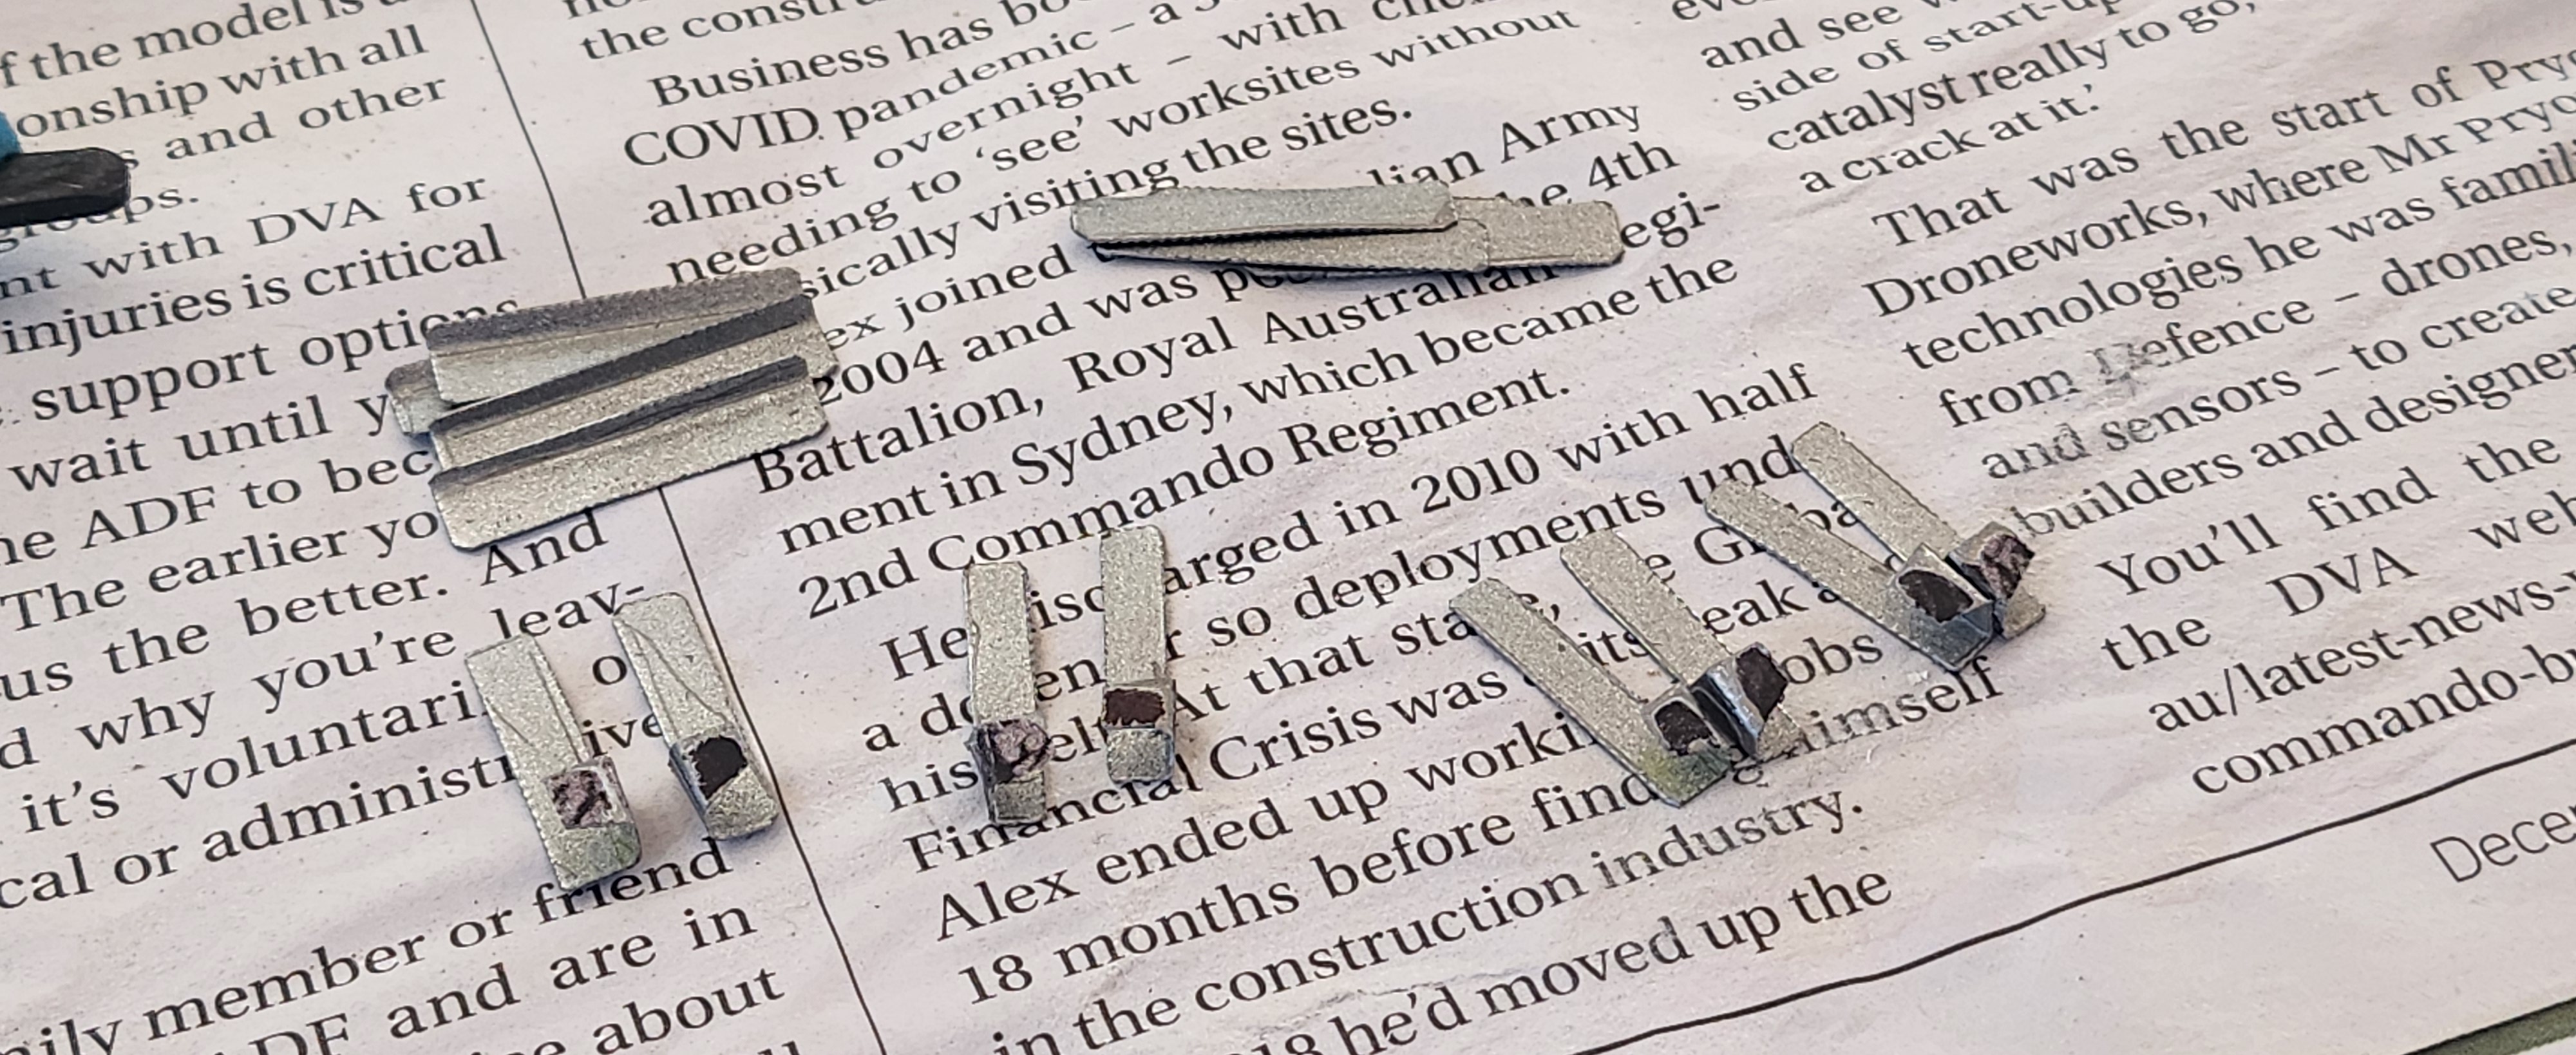
20250524_110331.jpg
20250524_110331.jpg (1.22 MiB) Viewed 232 times
With that, I first cut off the bold heads of the bottom of the tank, and sanded them back;
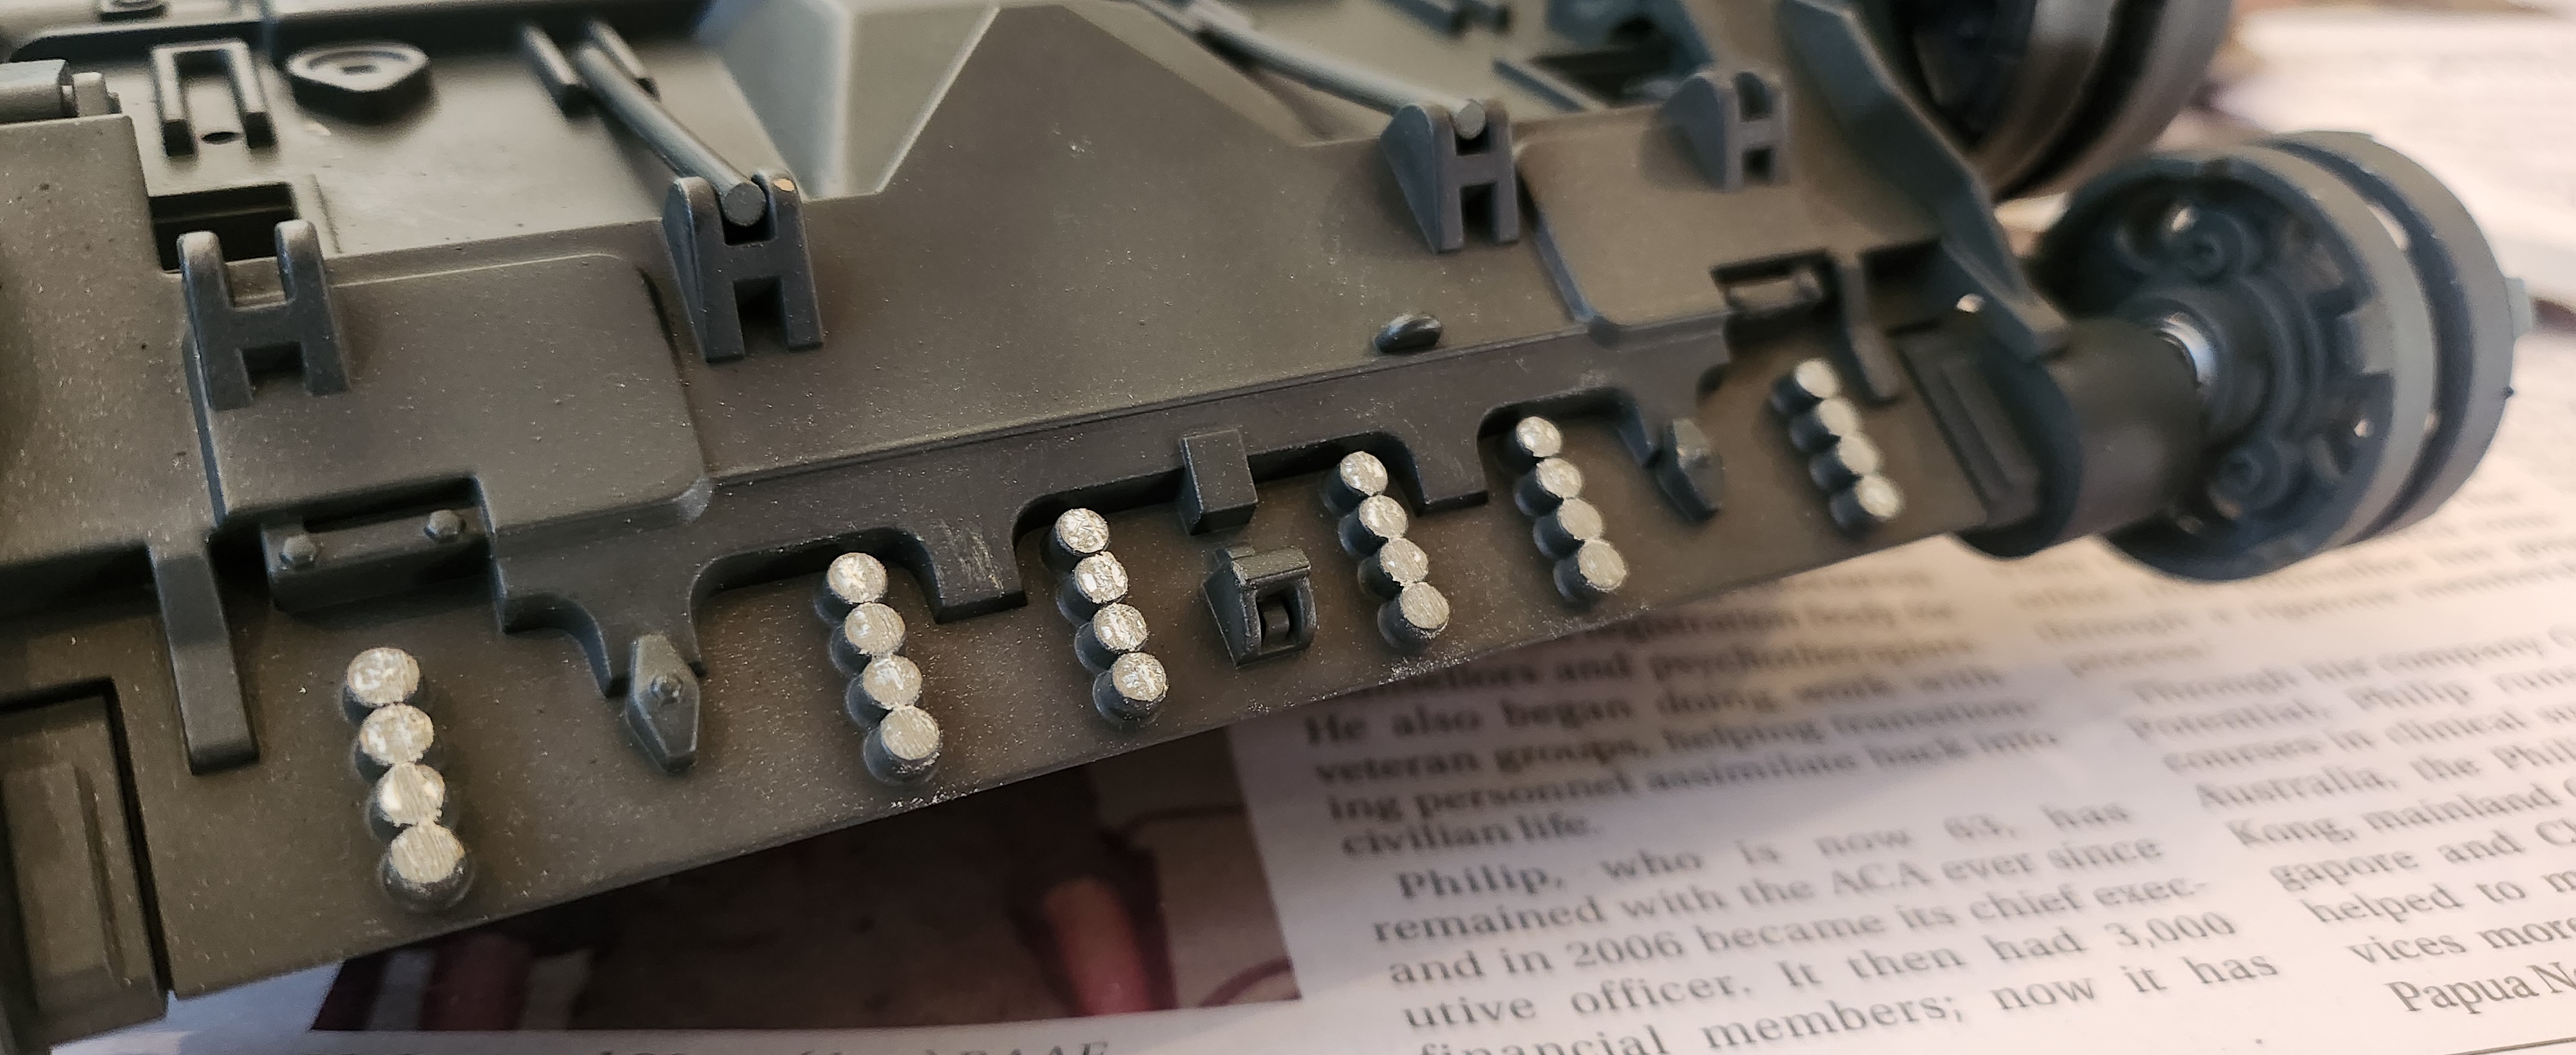
20250524_103722.jpg
20250524_103722.jpg (1.91 MiB) Viewed 232 times
and assembled these on the underside of the tank like so;
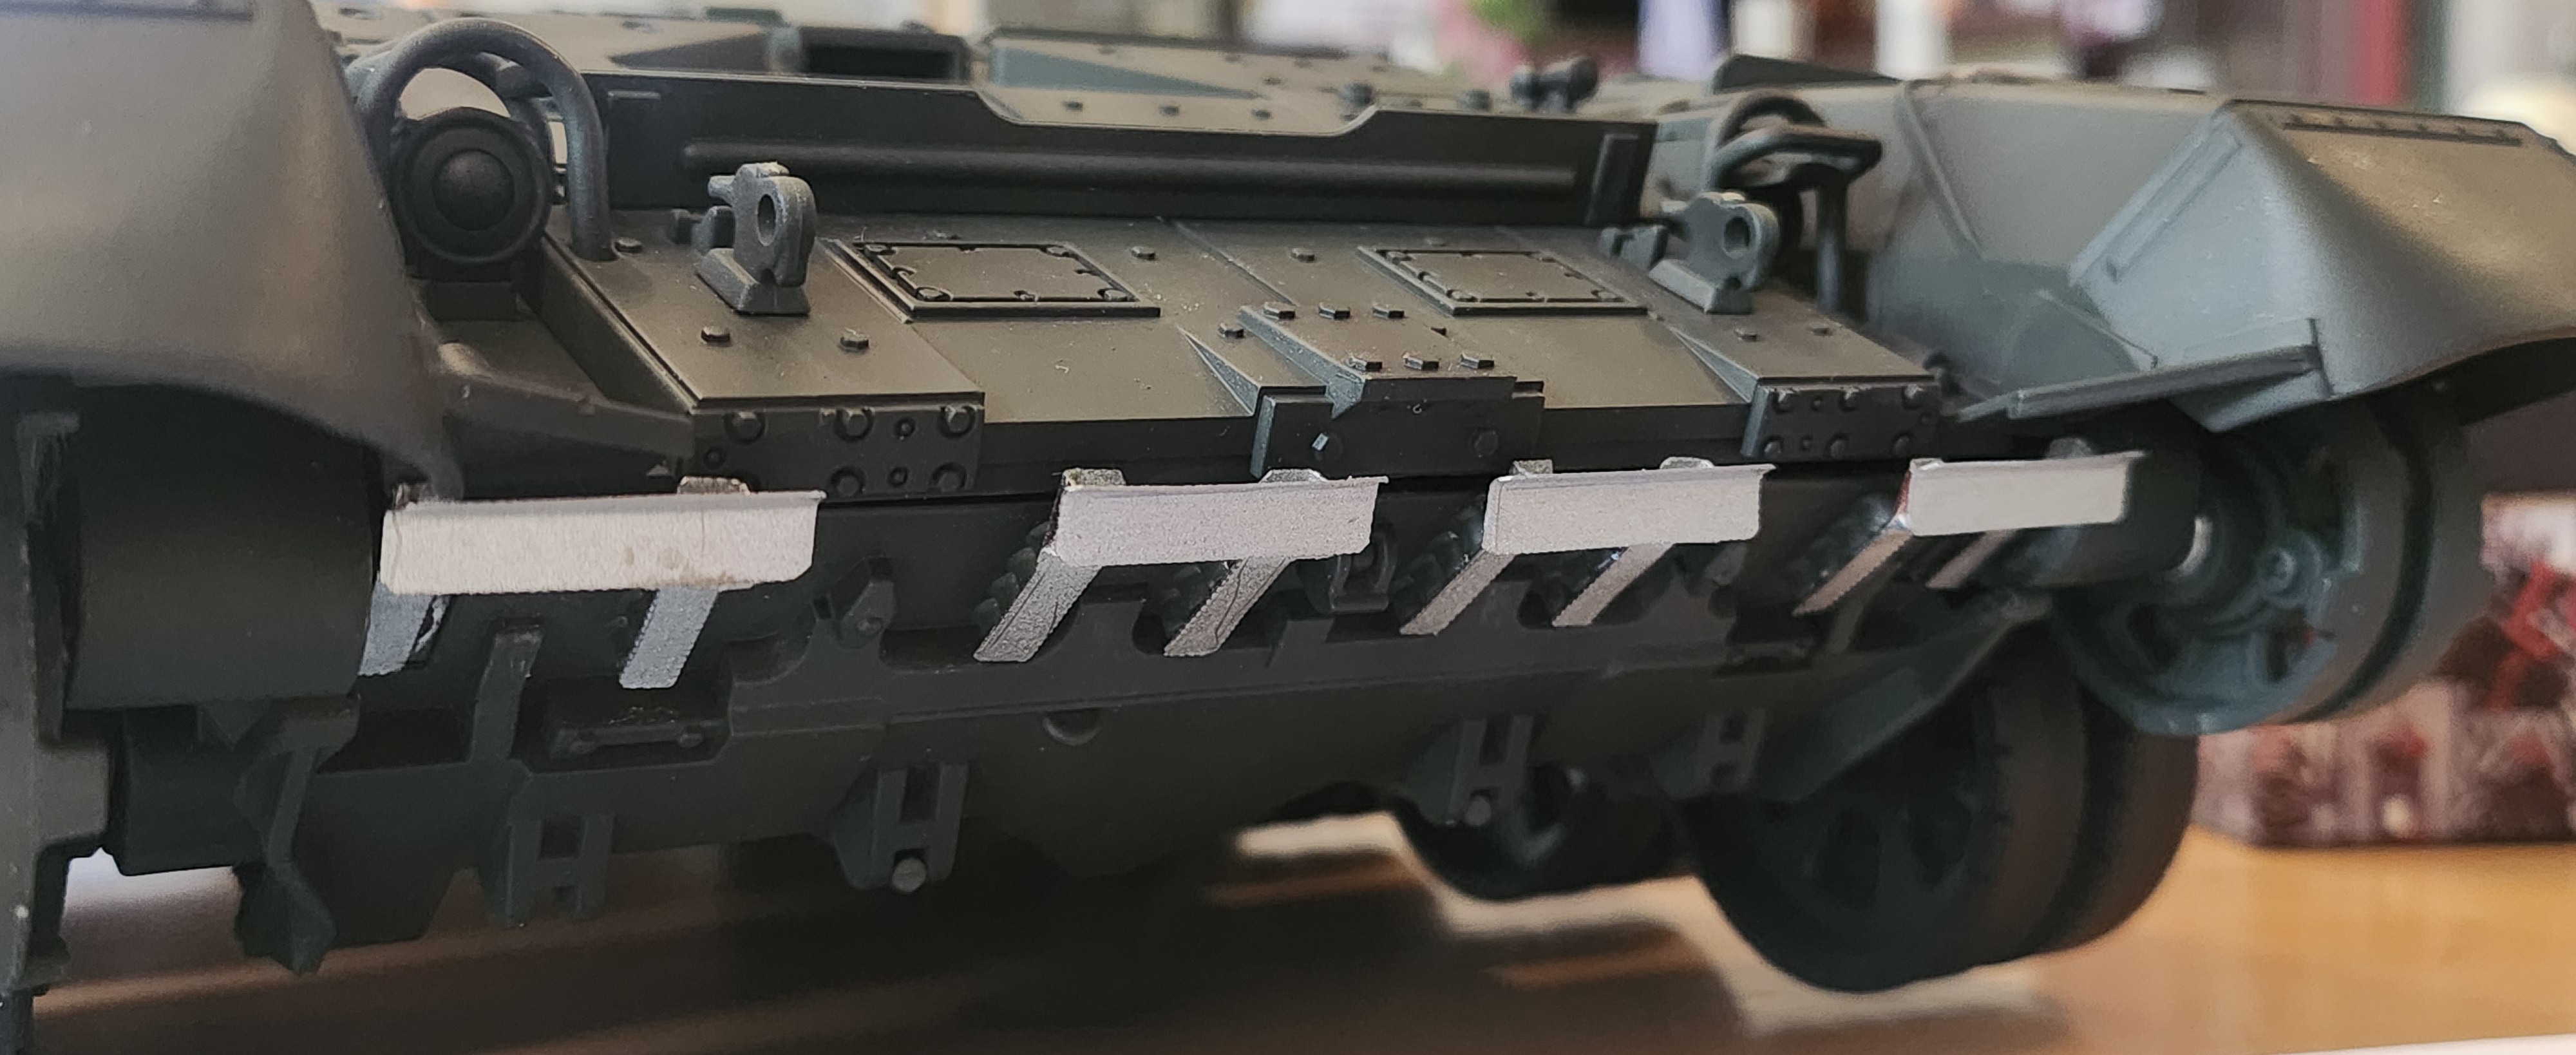
20250524_122050.jpg
20250524_122050.jpg (1.25 MiB) Viewed 232 times
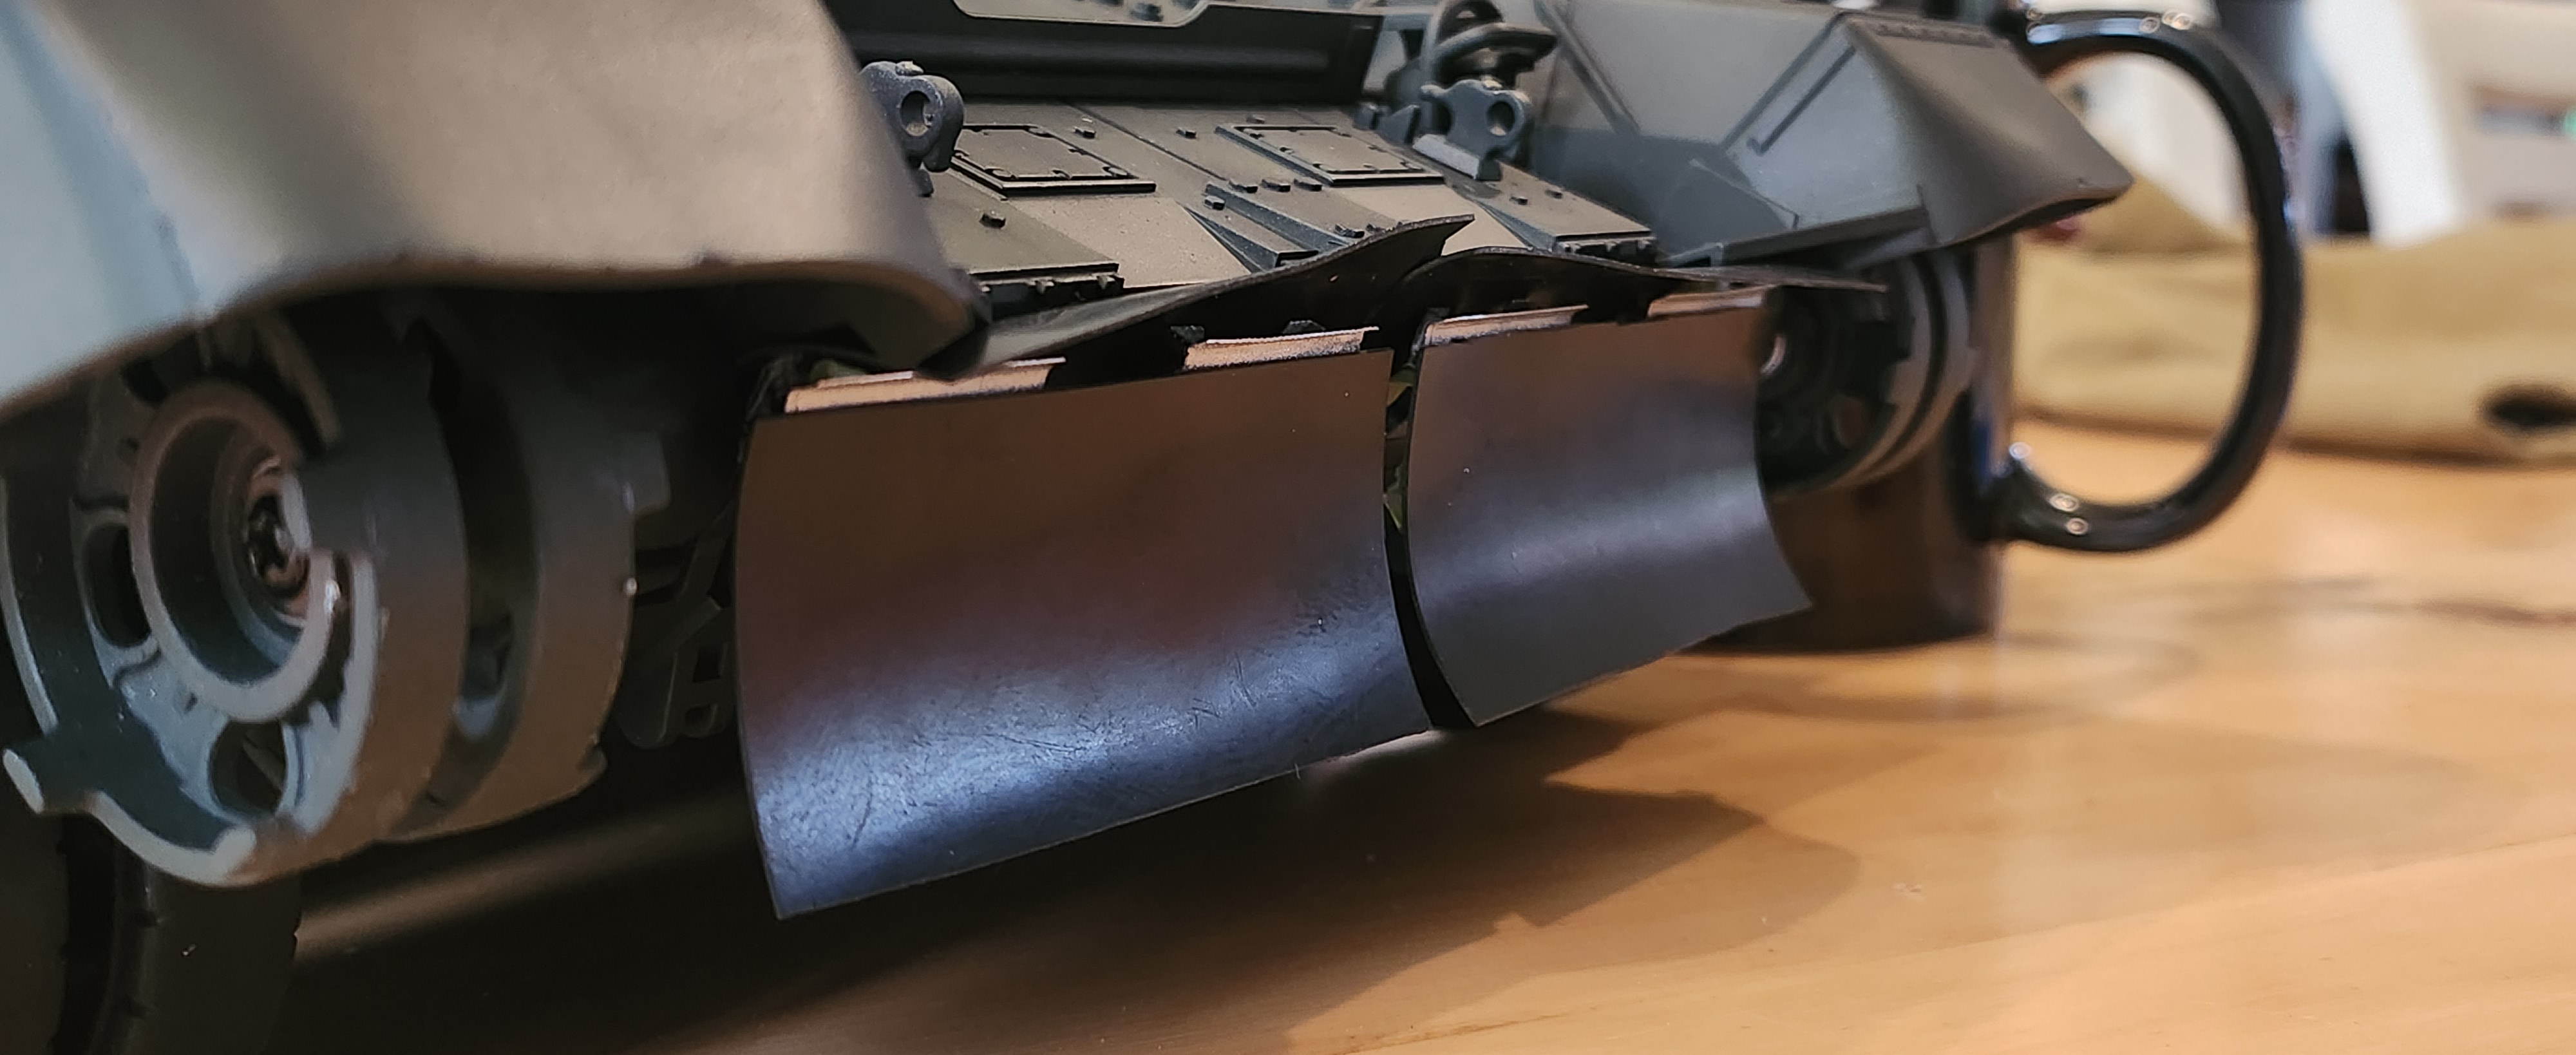
I will do some cleaning up sanding, and paint these before I permanently mount the rubber, but I wanted to test fit and cut the rubber to size so that it is ready to go asap.

I had measured based off the real tank's dimensions for the rubber, and the bottom parts looked fantastic. However, on the top, the measurements I had were too wide, so i needed to trim them.

I mounted the track temporarily to check the gap between it and the skirt, there is a pretty scale accurate clearance between the skirt and the track, but I am concerned that on the model when running off-road, this might get caught with the assistance of some FOD.
20250524_122719.jpg
20250524_122719.jpg (1.12 MiB) Viewed 232 times

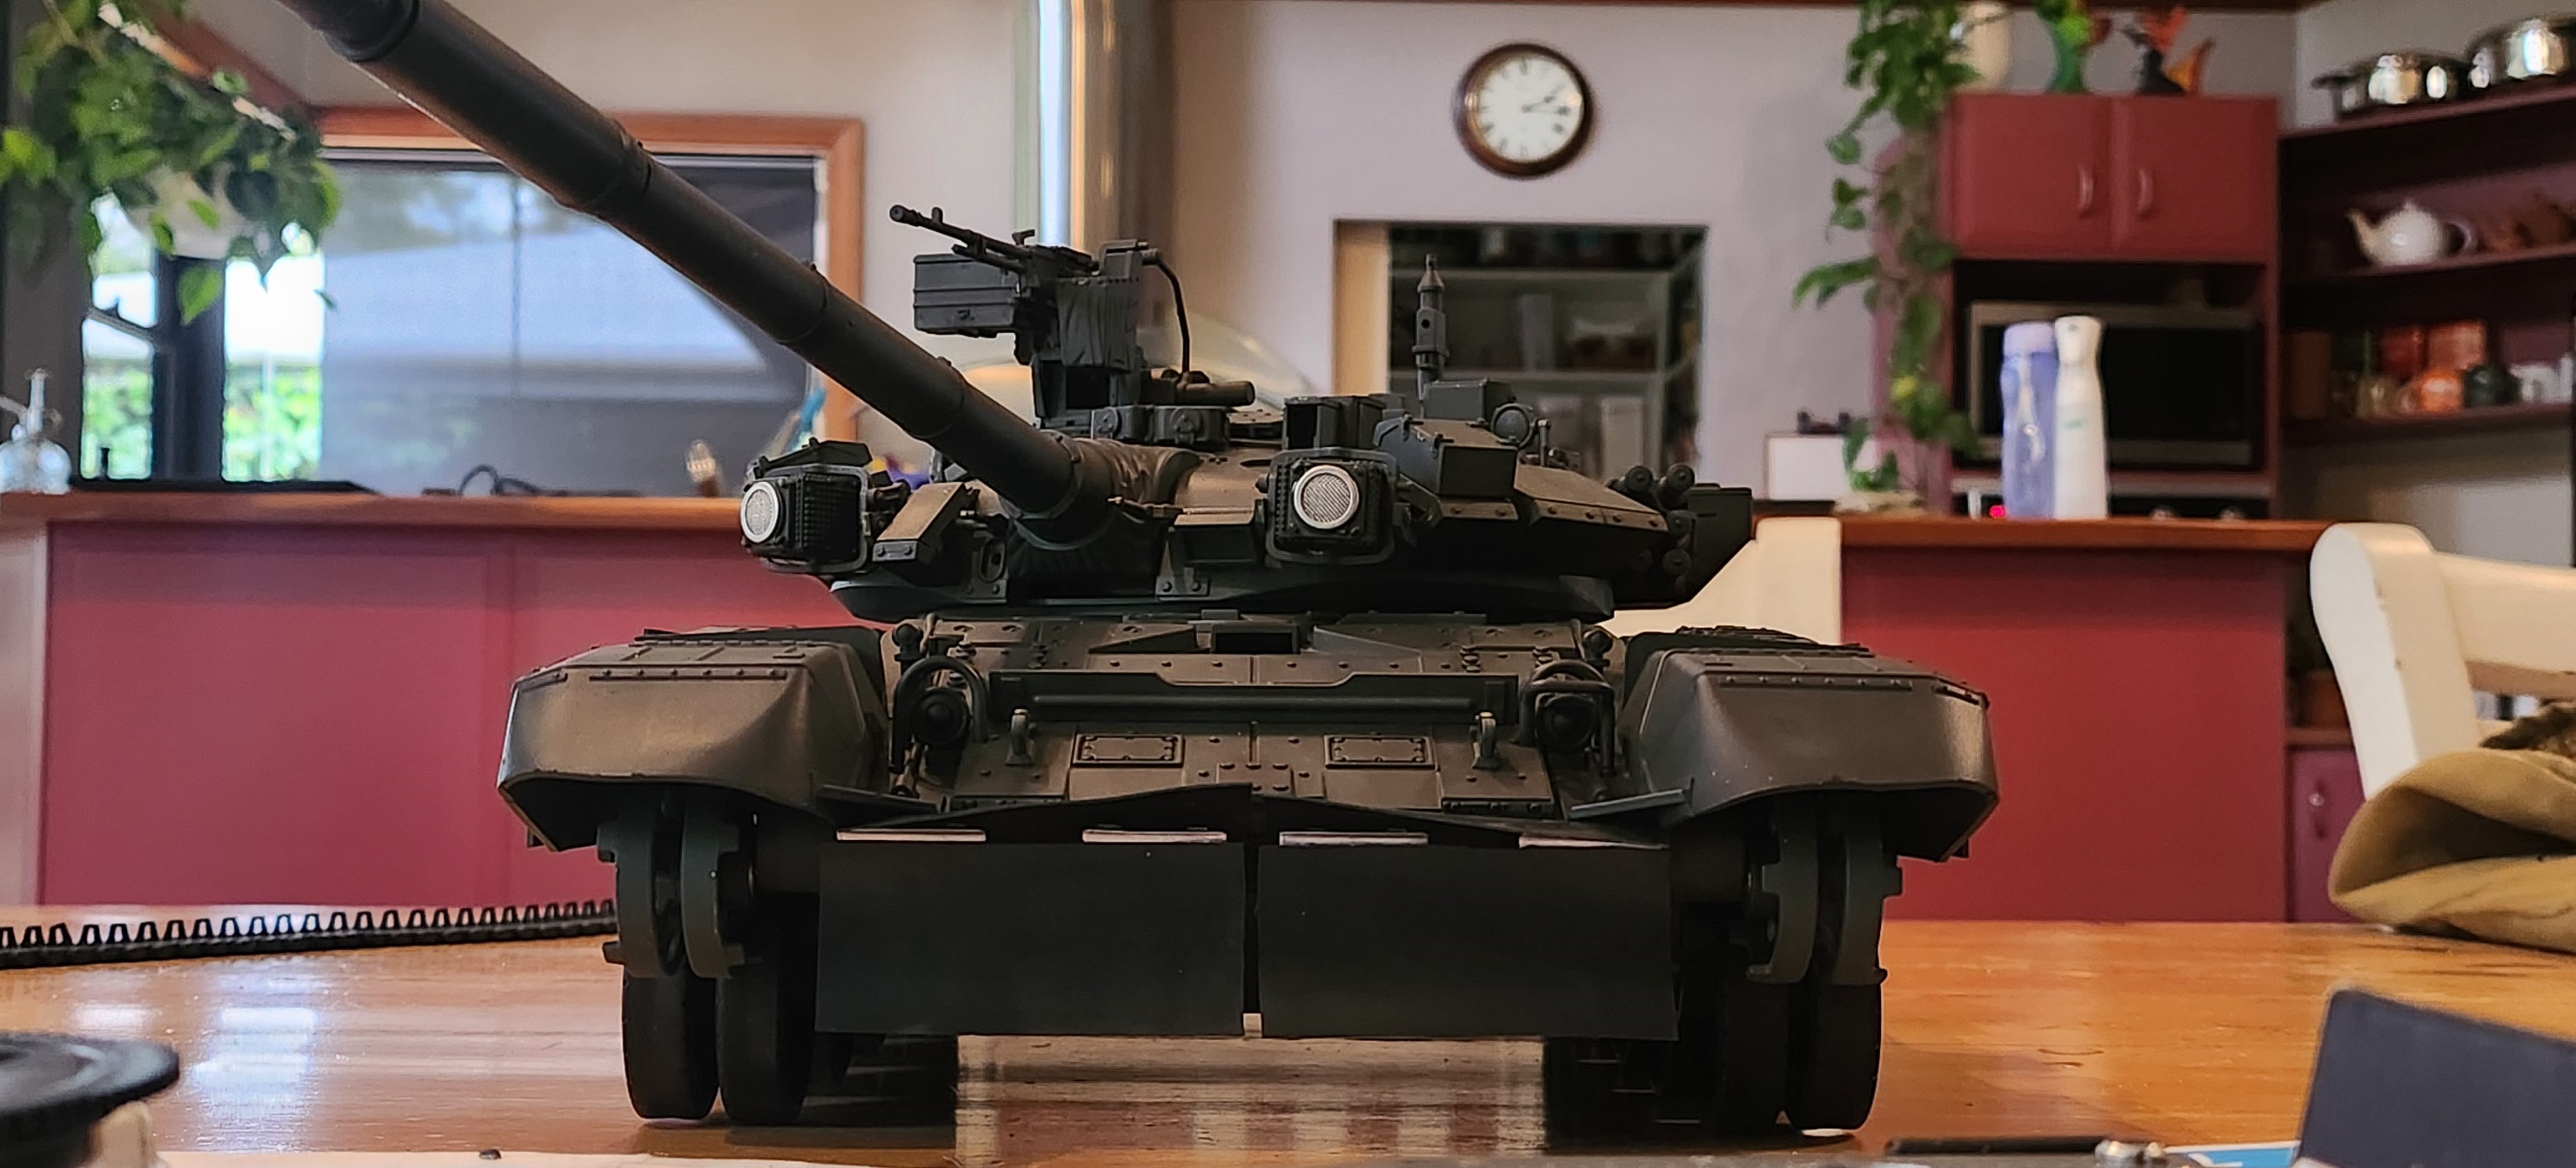
After cutting them all to scale, I thought a dry fit was in order, I used some masking tape to hold them on temporarily, and wow; I'm very happy with how it looks so far!
20250524_135420.jpg
20250524_135420.jpg (1.1 MiB) Viewed 232 times
20250524_141534.jpg
20250524_141534.jpg (818.05 KiB) Viewed 232 times
There are the face brackets that the rubber is held between also, and they will be mounted after the painting is done.
I am hoping to stick all of this in with dressmaker pins for that extra 'bolt' appearance, I just need to find somewhere that sells 0.7/0.8mm drill-bits, (alas, my local bunnings does not)

Cheers,

Wings
User avatar
HERMAN BIX
Major-General
Posts: 11256
Joined: Sun Jan 12, 2014 12:15 am
Location: Gold Coast,Australia

Re: Wings' T90 Build log

Post by HERMAN BIX »

I love anything different on a model.
Rubber skirts & add on armour seem to be a thing with me!
Great job on the mounts :thumbup:
Mr Meter Rat modified his T72 to enable the entrenching blade to work and thats a cool innovation too.

Great ideas & certainly well thought out & organised
HL JAGDPANTHER,HL TIGER 1,HL PzIII MUNITIONSCHLEPPER, HL KT OCTOPUS,HL PANTHER ZU-FUSS,HL STuG III,HL T34/85 BEDSPRING,
HL PZIV MALTA,MATORRO JAGDTIGER,HL F05 TIGER,TAMIYA KT,HL PANTHERDOZER,HL EARLY PANTHER G,TAIGEN/RAMINATOR T34/76,
HL AN-BRI-RAM SU-85
User avatar
Wings0fPlague
Recruit
Posts: 17
Joined: Wed May 07, 2025 10:19 am
Location: Perth, Western Australia

Re: Wings' T90 Build log

Post by Wings0fPlague »

wow! a working entrenching blade is seriously impressive, especially if it can handle the loads of actually digging in!
Thanks! I'm still waiting on some scale parts to arrive, but now the next problems to solve are the best way to mount the camo nets to the barrel, and what I'm going to do about an antenna that can handle a flag flying off it, but not feel too stiff.
User avatar
Wings0fPlague
Recruit
Posts: 17
Joined: Wed May 07, 2025 10:19 am
Location: Perth, Western Australia

Re: Wings' T90 Build log

Post by Wings0fPlague »

The Torro photoetch and tow cables have arrived and I had an interesting time putting them all on.

The main big grilles fitted perfectly no problems and look great! however, the tank chassis itself did not lend itself so easily to the smaller grilles on the rear.
As you can see here; the little bolt heads and structure under it were in the way and prevented the grille pieces from fitting.
20250528_203823.jpg
20250528_203823.jpg (2.04 MiB) Viewed 36 times
Unfortunately, I don't have the tools (or confidence) to completely remove the structure under the bolts, but I was satisfied enough with the fit after just cutting off and sanding down the bolt heads, the offset and angle is far less egregious than before;
20250528_212530.jpg
20250528_212530.jpg (2.34 MiB) Viewed 36 times
Shown in the photo also, the photoetch plate included these fantastic brackets for the fuel lines on the external tanks, and they look fantastic.
The detail on these little grille pieces is fantastic, far above what I expected.
20250528_214411.jpg
20250528_214411.jpg (1005.12 KiB) Viewed 36 times
I have also added the metal tow ropes, they are a little on the long side, but with the log attached they look great with a little bit of slack.
20250601_160048.jpg
20250601_160048.jpg (1.19 MiB) Viewed 36 times
Speaking of the log, The same photoetch kit came with some fantastic mounts for them. Unfortunately, I wasn't able to get 12mm dowel at my local bunnings, and had to resort to the closest, 12.7mm.
This meant I had to make straps from scratch out of the photoetch sprue, but, all things considered, it looks fantastic.
20250601_153206.jpg
20250601_153206.jpg (1.53 MiB) Viewed 36 times
20250601_153140.jpg
20250601_153140.jpg (1.55 MiB) Viewed 36 times
Painting starts tomorrow, my friend who will be helping me has the week off work, which works out perfectly.
While he has the tank, I will work on the flag and the antennae for it.

Cheers,

Wings
Pavel
Corporal
Posts: 471
Joined: Sun Jun 12, 2022 6:41 pm
Location: Москва Россия

Re: Wings' T90 Build log

Post by Pavel »

And don't forget that the ENTIRE tank is painted, only the machine gun is removed, and the triplexes are closed.
I am explaining that the log is also painted.
Cylindrical logs come to the factory where tanks are made, they are smooth and even, the ends are evenly sanded, and only in combat units after use are the logs replaced with what is cut in the forest and, after cleaning it, painted.
Often lazy soldiers steal a log from another tank to make their job easier.
In a tank regiment of my friend, they began to put the tank number on the ends, but the crooks erased it and painted their own...
Attachments
brevno-samovytaskivaniya-na-tanke-t-90a-0007540917-preview.jpg
brevno-samovytaskivaniya-na-tanke-t-90a-0007540917-preview.jpg (95.84 KiB) Viewed 29 times
brevno3sm.jpg
brevno3sm.jpg (59.64 KiB) Viewed 29 times
20098709_7c5d047cef049f557ac22bde4b65bb01_800.jpg
20098709_7c5d047cef049f557ac22bde4b65bb01_800.jpg (59.78 KiB) Viewed 29 times
13.jpg
13.jpg (626.02 KiB) Viewed 29 times
Post Reply

Return to “T-90”