Page 3 of 11
Re: VK 16.02 Leopard
Posted: Wed Nov 03, 2021 12:00 am
by HERMAN BIX
What a neat little tank!
A bit better armed than the Luchs and better armour than the Puma if not as nimble.
Cool build & something different for sure.
Re: VK 16.02 Leopard
Posted: Wed Nov 03, 2021 9:21 am
by LK88
I thought a lot about building this super compact tank, and I would go 100% the same way, use it as the base of the panther and its wheels and chains, and I would use the cap from Puma ... I keep my fingers crossed and I'll watch
Re: VK 16.02 Leopard
Posted: Sat Nov 06, 2021 10:56 pm
by Edumardo
Hi all,
With the theory and measurements of the previous steps, I am locating on the side of the chassis the holes to screw the arms that support the wheels and the "channel" that allows their movement. All measurements used are taken from the plastic chassis of the Heng Long Panther:
- 2021-014.jpg (25.56 KiB) Viewed 3291 times
And this would be the movement of the arm:
As for the part where to screw the arm and that holds the spring that acts as a suspension, I want to design something totally inspired by the ludwigs-hobby-seite kits:
Re: VK 16.02 Leopard
Posted: Mon Nov 08, 2021 7:25 am
by LK88
you continue nicely and thoughtfully, I will be happy to watch it
Re: VK 16.02 Leopard
Posted: Thu Nov 11, 2021 7:06 am
by Edumardo
Hi all,
I did a first design of the swing arm support:
- swim_a10.jpg (38.79 KiB) Viewed 3229 times
To check the viability of the measurements and movements I have chosen to make a somewhat crude assembly to check that everything works as it should. First, in the absence of a 3d printer, I have built the supports with several layers of 3mm styrene and a wooden rod of the appropriate size (6mm):

- swim_a11.jpg (38.17 KiB) Viewed 3229 times
And then a side plate and base assembly with the same material intended for the construction, 3 mm styrene, and joined as designed. With the blueprint of the part sticked to the side, I have emptied the material from the holes and screwed everything in place:

- img_2017.jpg (58.23 KiB) Viewed 3229 times
And this is how it works:
After several tests, I have reached the following conclusions:
- It is a valid design, and the movement of the arm is just as good (or as bad) as they do on the Hen Long chassis.
- 0.5 mm in CAD seems a lot, but when machining parts by hand it is very difficult to adjust to those measurements.
- I have widened the channel where the arm goes up and down to avoid friction.
- I have redesigned the support, shortening the rod and giving the area where the spring is housed a bit more depth. It would be like this:

- 2021-016.jpg (45.52 KiB) Viewed 3229 times
Re: VK 16.02 Leopard
Posted: Fri Nov 12, 2021 3:11 pm
by LK88
super work ...! you could do it twice twice, once for me

)
Re: VK 16.02 Leopard
Posted: Mon Nov 15, 2021 7:09 am
by Edumardo
LK88 wrote:super work ...! you could do it twice twice, once for me
)

My goal is to share the entire CAD project with the community so you can 3dprint it yourself, but there is a long way to do that. I dont own a 3d printer (a buddy does the job) and there are a lot a untested parts or I'm still working on them.
Re: VK 16.02 Leopard
Posted: Mon Nov 15, 2021 7:24 am
by Edumardo
For most of the armor plates I will use 3mm thick styrene. It matches quite well with the theoretical armor thickness of the design and I think structurally it will hold up well.
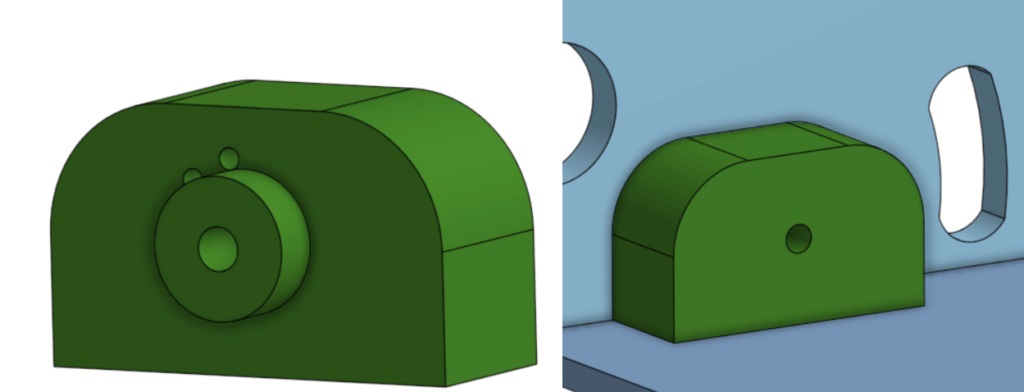
I do not rule out, once the motors and wheel supports have been positioned, reinforce them from side to side to give it greater consistency and serve as a support for the electronics. For certain parts with a high level of detail I will print them in 3d, either in fdm or resin.
For example, the air intakes are already printed in fdm:
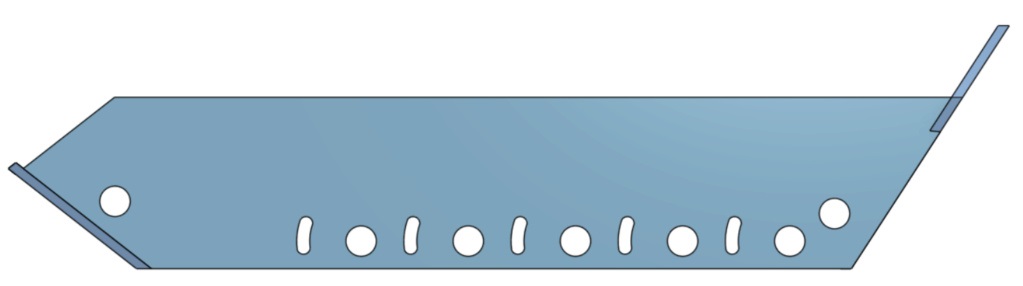
For the hull I already cut the belly, hull sides and lower front. This is how it looks (unglued):
Bevel detail of the belly and the lower front:
Re: VK 16.02 Leopard
Posted: Mon Nov 15, 2021 7:56 am
by HERMAN BIX
Jeez its coming together so well.
Im looking forward to the turret

Re: VK 16.02 Leopard
Posted: Tue Nov 16, 2021 7:13 pm
by Edumardo
To make the bevel of the previous post I have followed the following technique: mark the position of the bevel and hold the part against a straight edge. Next, and with a sandpaper block, the plate is worn down until the desired angle is reached. Here is the lower front halfway through the process:
How do we calculate the distance to grind? It is a simple trigonometric operation, or even easier by seeing the model in onshape: