Page 3 of 9
Re: My Panther G Build
Posted: Thu Mar 24, 2016 7:39 pm
by Ad Lav
Nicely done! They do some lovely things for tanks but look bloody fiddly!
Re: My Panther G Build
Posted: Fri Mar 25, 2016 8:56 am
by HERMAN BIX
Worse when it gets your finger onto your cheek - trust me !

Re: My Panther G Build
Posted: Fri Mar 25, 2016 11:07 am
by silversurfer1947
magman wrote:Good work Richard,

I will look for the amo bag for your mg next week, and send you one.
That's very kind of you. I do think all the little extra touches add so much to the finished article. It makes it a unique example and very much your own.
Re: My Panther G Build
Posted: Sat Mar 26, 2016 1:27 pm
by silversurfer1947
I am beginning to think someone at Aber has a warped and slightly sadistic sense of humour. I am currently engaged in assembling their cleaning rod case. The end caps are retained by two small lengths of chain. Rather than supply the chain, which would have been easy, there are individual photo-etched links, each measuring some 1mm by 0.5mm. I am supposed to cut these, link them together then solder all the cuts. Bearing in mind that I can only really see the links by using a large magnifying glass, the chance of me achieving this are much the same as a snowball's chance in hell. Now I need a source of suitable very fine link chain that won't cost an arm and a leg.
Re: My Panther G Build
Posted: Sat Mar 26, 2016 3:32 pm
by billpe
It's much easier to just buy the chain. Historex do a good selection.
Re: My Panther G Build
Posted: Sun Apr 03, 2016 1:37 pm
by silversurfer1947
Slowly making progress. Assembling all the Aber fitting takes me a long time, and I always get the feeling I don't have much to show for the hours of work. I do hope it is all worthwhile. I am not intending to stop though.
Question time again, I'm afraid. The side armour skirts are obviously painted to match in with the camouflage on the tank hull, but what about the inside? Is it left plain steel, red primer or yellow base coat?
Re: My Panther G Build
Posted: Sun Apr 03, 2016 4:28 pm
by silversurfer1947
Thanks very much for all the information, particularly about the side armour. Never heard of tennax so I shall have to do some searching. Already had trouble with super glued bits falling off.
Re: My Panther G Build
Posted: Fri Apr 15, 2016 3:05 pm
by silversurfer1947
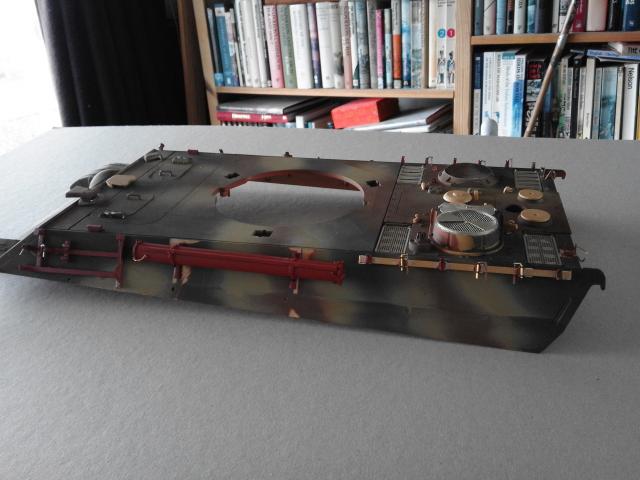
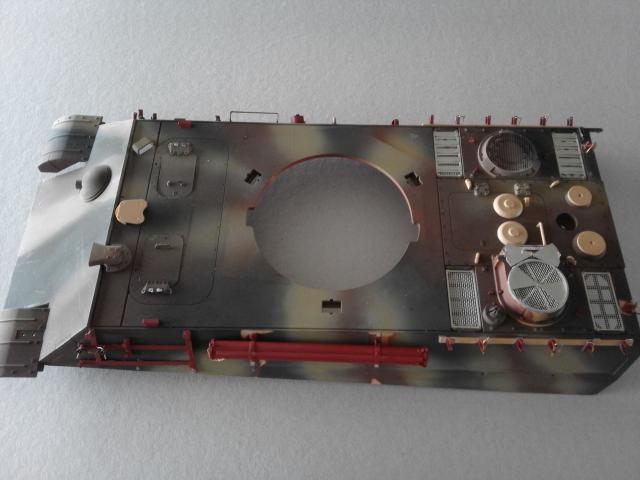
A little more progress. Does not look like much, but all these Aber fittings seem to take a lot longer than their size would warrant. Several times, I had to walk away before I started throwing my toys out of the pram. I think this is the majority of them done now.
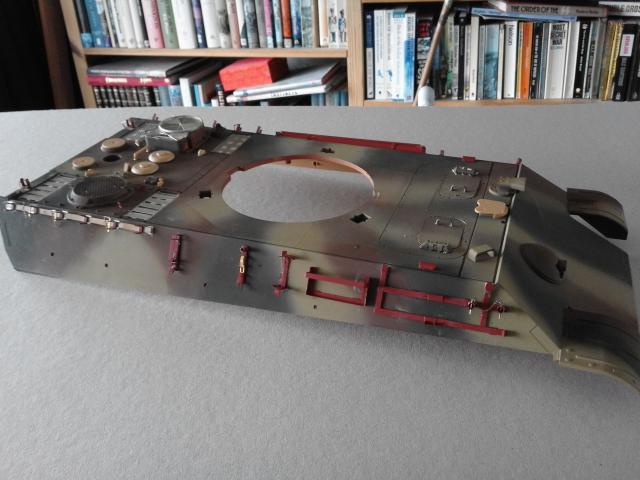
- 20160415_142231.jpg (43.12 KiB) Viewed 5643 times
- 20160415_142243.jpg (39.85 KiB) Viewed 5643 times
- 20160415_142252.jpg (32.77 KiB) Viewed 5643 times
I did not plan things very well, having failed to realise I needed to remove a number of the mouldings from the hill. Hence the bare patches. Hopefully, with a few coats of paint, it will look considerably better.
Re: My Panther G Build
Posted: Mon Aug 15, 2016 4:09 pm
by silversurfer1947
I had not realised it was so long since my last post. A lot of my time has been taken up with scenery for BAD and waiting for a replacement gun mantlet, which did not materialize. Eventually I opted for a metal one from Mitosal. Painted the gun barrel, then discovered that 2 coats of paint stopped it moving in the mantlet. It's fine now I've cleaned off the breech end. I will try to get a few photos of the tank in its current state.
Re: My Panther G Build
Posted: Mon Nov 07, 2016 2:00 pm
by silversurfer1947
Despite the absence of posts, I have been making very slow progress, in between scenery and figure production. I had, I thought, been quite clever in fitting a hidden IR system using the Vampire from rctank electronics (purchased before I read wibblywobbly's masterclass). Though the tank is not finished, I thought it would be useful to check it all out at the next BAD meeting, so I have fitted the turret to the hull and started to connect up all the various sets of wires. All was going well until I tried to connect the Vampire unit and IR emitter to the Tamiya MF01. That was when I discovered that they are fitted with Clark board type connectors, which are not compatible with the Tamiya sockets. It would seem that I have two basic option. Firstly, obtain some Tamiya plugs and wiring , chop off the existing plugs and connect them up, or, secondly, bodge the existing plug to fit the Tamiya sockets.
So, does anyone know where, if at all, one can get pre-wired Tamiya plugs (1 5-pin and 1 2-pin)? Alternatively, how do you alter Clark plugs to fit Tamiya sockets, and which wires are which, i.e. which way round do they go?