My Tiger Tank 1 (Early model, full option) Build.

User avatar
Ad Lav
Captain
Posts: 4247
Joined: Tue Sep 01, 2009 4:44 pm
Location: Kent

Re: My Tiger Tank 1 (Early model, full option) Build.

Post by Ad Lav »

That looks great!

Nicely done!

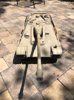
The tracks alone weigh 1.5kg lol :D
User avatar
Markocaster
Staff Sergeant
Posts: 997
Joined: Mon Mar 31, 2014 11:16 pm
Location: Bay Area , California

Re: My Tiger Tank 1 (Early model, full option) Build.

Post by Markocaster »

Looking good :thumbup:
HL /Mato tiger 1 early, Tamiya Tiger 1 early, Taigen tiger 1 mid
Taigen T34/85, HL SU-100
Jagdpanzer Lang
Taiga Jagdpanther
Heng Long Sherman DGS Firefly kit
Tamiya King Tiger (unbuilt)
Mato all metal Panzer III
1/10 Jagdpanther
User avatar
silversurfer1947
Lieutenant
Posts: 3337
Joined: Tue Oct 27, 2015 9:54 pm
Location: Bristol, UK

Re: My Tiger Tank 1 (Early model, full option) Build.

Post by silversurfer1947 »

I have made some progress, though not as much as it might seem from the photo. I have merely put the lower hull, top and turret together to give myself an overall impression of how things will look. One thing I have noticed is that all the weight is at the front of the turret, causing it to lean forward. I have not yet fitted the turret rotation and supports to the hull top. Will this correct the lean, or should I be fitting some weight to counterbalance the turret?
20151204_134548.jpg
I have made a couple of small changes so far by fitting Schumo headlights and towing shackles. I purchased some Aber PE brass sets. When I find a magnifying glass, I will set about the very small fittings and catches etc. Some of them are made for 1/16 scale fingers I think. Unfortunately, my fingers are 12" to the foot scale. Apart from those, I have replacement rear fenders and the engine cover grills. If I can manage the rear fenders, I will proably have a go at side fenders as well.

I have 2 observations. First, from my limited research, the kit supplied tank numbers would seem to be the wrong colour. A quick look on google failed to reveal an alternative source for 332 in the correct colours. Second - the paint used is Tamiya spray TS-4. The instructions gave XF-63 as the ordinary acrylic equivalent, so I bought a pot for painting small details. When I tried it, it came out several shades darker, despite a good shaking of the pot. Is more agitation required or are they indeed different colour?
Last edited by silversurfer1947 on Wed Dec 09, 2015 9:50 am, edited 1 time in total.
Richard
Tamiya Tiger 1, Taigen FlakPanzer IV,Torro M16 half-track, Tamiya Panther,WSN/Torro T34,Taigen M41 Bulldog,H/l/Taigen Sherman M4A3,H/L T90, Haya M3 Grant, Metal Origins 234/2 Puma, Nashorn by Alwyn. I was only going to have one tank - honest! :D
User avatar
DavidByrden
Corporal
Posts: 300
Joined: Wed Sep 08, 2010 6:13 pm
Contact:

Re: My Tiger Tank 1 (Early model, full option) Build.

Post by DavidByrden »

silversurfer1947 wrote:an alternative source for 332 in the correct colours.
If you're interested in the colours or features of a specific Tiger, I might have some information for you. But I'd need to know more. "332" isn't enough to start with.

David
User avatar
jarndice
Colonel
Posts: 8372
Joined: Mon Sep 03, 2012 11:27 am
Location: the mountains of hertfordshire

Re: My Tiger Tank 1 (Early model, full option) Build.

Post by jarndice »

Hi Richard,There are a few tricks that make PE easier,Instead of a Soldering Iron I use a "NIMROD Butane Torch" which comes with a variety of different tips, with that I use Fryolux Paint" which is a VERY TOXIC liquid solder, So instead of soldering all you do is paint the point that needs soldering and apply the butane burner, The word easy was made for this work. :thumbup:
The large sections of the fenders both front and rear are very flimsy, so I cut one mm plasticard to size and superglue it to the back of the metal sheet, including the smaller hinged side sections.
If you don't have a "Pin Vise" now is the time to get one, Try E-BAY, Working with PE is the reason Pin Vise's were invented, easy to use and gives you complete control when drilling holes. There are a lot of holes in the fenders that will need drilling,
ABER as part of the kit provide the hinges for the side sections, Forget them unless you have the skill of Michaelangelo and the patience of a saint, go online and find a DOLLS HOUSE Accessories site and look for the hinges, There is a wide range available, you will know what is right when you see it.
If you are after authentic rivets for the endless holes you have now drilled in the fenders "Small Dressmakers Pins" are the answer, Push them through the hole in the brass and plasticard laminate, Superglue, then snip off the protruding tail.
PE is fun or frustrating it depends on your pace, DO NOT RUSH and finally when you come to paint it you should first paint all the metal with a metal primer then cover with a regular primer.
Good luck Shaun.
I think I am about to upset someone :haha:
User avatar
silversurfer1947
Lieutenant
Posts: 3337
Joined: Tue Oct 27, 2015 9:54 pm
Location: Bristol, UK

Re: My Tiger Tank 1 (Early model, full option) Build.

Post by silversurfer1947 »

DavidByrden wrote: If you're interested in the colours or features of a specific Tiger, I might have some information for you. But I'd need to know more. "332" isn't enough to start with.

David
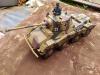
It's 332 from 503rd Heavy Panzer Battalion, Russian front 1943. There are a couple of black and white photos to be found. There seems to e a debate as to whether the main coour was grey or yellow. As you can see I have opted for grey. Any further info would be appreciated. Thanks.
Richard
Tamiya Tiger 1, Taigen FlakPanzer IV,Torro M16 half-track, Tamiya Panther,WSN/Torro T34,Taigen M41 Bulldog,H/l/Taigen Sherman M4A3,H/L T90, Haya M3 Grant, Metal Origins 234/2 Puma, Nashorn by Alwyn. I was only going to have one tank - honest! :D
User avatar
silversurfer1947
Lieutenant
Posts: 3337
Joined: Tue Oct 27, 2015 9:54 pm
Location: Bristol, UK

Re: My Tiger Tank 1 (Early model, full option) Build.

Post by silversurfer1947 »

jarndice wrote:Hi Richard,There are a few tricks that make PE easier,Instead of a Soldering Iron I use a "NIMROD Butane Torch" which comes with a variety of different tips, with that I use Fryolux Paint" which is a VERY TOXIC liquid solder, So instead of soldering all you do is paint the point that needs soldering and apply the butane burner, The word easy was made for this work.
Good luck Shaun.
Thanks for the advice. Pin vice on order. I was wondering what my chances were of succesully drilling very small holes with my Dremel. I reckoned somewhere between nil and not very good!

Regarding the butane torch, there seems to be quite a range of Nimrod torches. Advice as to what power would be appreciated. Would the Pro 50 be powerful enough? The Frylolux paint, at first sight, seems exceedingly expensive. if it does the job, that's not a problem, but if you could recommend a source at a good price, that would be very useful.

Thanks again. People here are very helpful, particularly for novices like me.

Richard
Richard
Tamiya Tiger 1, Taigen FlakPanzer IV,Torro M16 half-track, Tamiya Panther,WSN/Torro T34,Taigen M41 Bulldog,H/l/Taigen Sherman M4A3,H/L T90, Haya M3 Grant, Metal Origins 234/2 Puma, Nashorn by Alwyn. I was only going to have one tank - honest! :D
User avatar
jarndice
Colonel
Posts: 8372
Joined: Mon Sep 03, 2012 11:27 am
Location: the mountains of hertfordshire

Re: My Tiger Tank 1 (Early model, full option) Build.

Post by jarndice »

Richard, I use a "Nimrod Pro 50", very nice tool. Don't forget the Butane gas lighter refill,
"Maplin's is a reliable source for "Fryolux", if you are getting it from your local Maplin's store best to check it is in stock, if not they have an excellent on line site.I agree approximately £34 is expensive, if it is any consolation it is a bit like marmite the pot seems to last forever, You apply it with a paint brush and literally paint it on unlike solder which is very wasteful.
I cannot say this often enough, THIS STUFF IS TOXIC!!!
shaun
I think I am about to upset someone :haha:
User avatar
Ad Lav
Captain
Posts: 4247
Joined: Tue Sep 01, 2009 4:44 pm
Location: Kent

Re: My Tiger Tank 1 (Early model, full option) Build.

Post by Ad Lav »

Good progress Richard, starting to look more like a Tiger!

Not that hot with etch sets - I tend to buy select bits but the Aber stuff is top notch.

Some very knowledgable guys on here, you're in good hands.
User avatar
jarndice
Colonel
Posts: 8372
Joined: Mon Sep 03, 2012 11:27 am
Location: the mountains of hertfordshire

Re: My Tiger Tank 1 (Early model, full option) Build.

Post by jarndice »

Richard if your engine grills are from "ABER" do make sure you look at them closely before fitting them,
One side has crease lines that are there to allow you to bend the edge to follow the shape of the engine cover.
Place the "ABER" grill over the engine cover CREASE LINE UPWARDS" then super glue in place finally tapping along the crease lines to follow the shape of the engine cover,
A tip- Dry run fitting the grill, and you can press along the crease lines with your thumbs to get the rough shape you need before glueing in place.
Then finesse the bend in the grill.
shaun
I think I am about to upset someone :haha:
Post Reply

Return to “Tiger I”