Ah, i see.
Well, considering it's nearing midnight and tomorrow morning will be early, i'll be leaving for a while.
But again, thanks a ton for the help so far!
Disassembling HL King Tiger
Forum rules
If your question is electronics related please post it in one of the relevant boards here: viewforum.php?f=31
If your question is electronics related please post it in one of the relevant boards here: viewforum.php?f=31
-
forgebear
- Warrant Officer 1st Class
- Posts: 1848
- Joined: Fri Nov 21, 2008 11:15 pm
- Location: bedford
- Contact:
Re: Disassembling HL King Tiger
no problem glad to help out thanks dave 
Re: Disassembling HL King Tiger
Back, after a short time of being busy.
I returned with a set of proper tracks for the tank, though after installing it, it does not run very smoothly.
The idler wheels appear to run into the inner track guides on one side, and on the other the drive sprocket doesn't always catch into the track holes.
Is this a common issue that's solvable or did i just mess something up?
*edit*
Found something, the drive sprocket might not be properly aligned / off center, i'm checking that now, but that doesn't explain the idler wheel running into the guides.
Last edited by Fooks on Sat Mar 29, 2014 6:30 pm, edited 1 time in total.
Re: Disassembling HL King Tiger
Just as a trouble shoot... switch the tracks back to the ones that came with the tank and see what happens...if it runs smooth... check and perhaps lube the tracks...the links could be binding.... charge up your battery... take your take to an area where you can open it up to full speed ... run it forwards and backwards several times... some spins won't hurt ... do it till the battery is weak...charge it again.. repeat the process... if you do this for about an hour or more...it should break in your drive trainFooks wrote:Back, after a short time of being busy.
I returned with a set of proper tracks for the tank, though after installing it, it does not run very smoothly.
The idler wheels appear to run into the inner track guides on one side, and on the other the drive sprocket doesn't always catch into the track holes.
Is this a common issue that's solvable or did i just mess something up?
A lot of modellers make the mistake of test running new drive trains in the comfort of the home... I have found slow indoor maneuvers hinder the proper workings ...and could actually damage your gears idlers and sprockets.... just take it outside and let her rip...make sure you gears are lubed ...go easy though you don't want grease all over the inside of your tank...I usually use a dental probe and some thick viscous silicon lube and touch some to the bearing surface motor pinions and gear surfaces...one dab on those .. the lube will spread by itself
Good Luck
ALPHA
Re: Disassembling HL King Tiger
By the way... Did you get metal sprockets and idlers with your tracks?...if you did ... check the alignment of the teeth.. some have been noted to be off... if yours is...return them for a replacement set
ALPHA
ALPHA
Re: Disassembling HL King Tiger
I thank you for the information.
I've replaced the track on the side where the drive sprocket did not catch into the holes.
With the original, plastic track it works like a charm, it appear to be lined up properly.
I will be switching the other side now, results of the idler wheel will arrive in a moment.
And yes, I installed the metal drive sprocket and idlers, and did not really pay attention to their alignment, will do that while the second track is off.
*edit*
Part of the problem has been found, it appears that there is a small miscast inside one of the idler wheels. A piece of metal protrudes on the inside, probably nudging the guides out of the wheel.

*another edit*
Success.
Watching the pattern in which the idler missed the guide, I've decided to add a few extra washers. After adding two, the problem has been almost minimized and only misses it barely, in which case it only adds a slight bump to the track. Next up is finding a proper lubricant to smooth the tracks up a bit.
I've replaced the track on the side where the drive sprocket did not catch into the holes.
With the original, plastic track it works like a charm, it appear to be lined up properly.
I will be switching the other side now, results of the idler wheel will arrive in a moment.
And yes, I installed the metal drive sprocket and idlers, and did not really pay attention to their alignment, will do that while the second track is off.
*edit*
Part of the problem has been found, it appears that there is a small miscast inside one of the idler wheels. A piece of metal protrudes on the inside, probably nudging the guides out of the wheel.
*another edit*
Success.
Watching the pattern in which the idler missed the guide, I've decided to add a few extra washers. After adding two, the problem has been almost minimized and only misses it barely, in which case it only adds a slight bump to the track. Next up is finding a proper lubricant to smooth the tracks up a bit.
Re: Disassembling HL King Tiger
Great news.... way to go about investigating the problem ... you will find no matter the brand they all have some kind of idiosyncratic problem....that tiny overcast is easy... just file or cut it off with a flat xenon cutter... another inexpensive tip to stabilize your gearbox connection to your sprockets .. is add a couple of these nylon bushings to each side

it was a tip given to me by another more experienced tanker... who went through all the other more expensive mods ...just a couple of these are comparable and only cost about 50 cents for two of them... can be found at your local hardware store
I installed them with a little skepticism ...but found they improve the turning response as well as your forward and reverse...takes a little time to get the correct fit... mostly lengthwise ... but well worth it
Happy Tanking
ALPHA
Re: Disassembling HL King Tiger
It appears the problem is still present, though less then before. The idea of adding the washers is a good one indeed, though i cannot get my hands on them currently, I shall keep it in mind.
The other problem with the drive sprocket missing the holes is still weird though. I've added some lubricant to the links, and yes i had to do that by hand on all pieces because I only had very thin lubricant around. But the problem still remains. I've gotten the tip for a way to loosen it up quite a bit. The plan itself is quite....extreme, but i have no doubts in the fact that it will, at least, smoothen the tracks up.
The tip was as such:
Get a steel pot, fill it with quite some engine oil, heat it up a bit (a bit, not too much) and dunk the tracks in for a few minutes. After that, you take the tracks out and, with a piece of cloth, you take away all the excess oil from the tracks. The should result in oil being every tiny notch that is not in plain sight (mostly the link pins)
I have no experience with tricks like this, but i am worried that even though it'll be lubricated rather well, the oil will attract dust and dirt, reversing the process rather quickly. So if someone could enlighten me about this, i'd be thankful.
Sadly, as i don't have my hands on any of the materials to try these things, i'll just have to start on the transplantation of "some" internals.
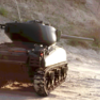
I've stripped it down to it's bare bones (which wasn't very hard, one piece of hardware, woohoo) and i'll be preparing it for its new internals. I've gotten my hands on another circuit board from a Mato Sherman, which works surprisingly well and allow for some simple modifications here and there. I'll just have to attach some proper wiring to all of the engines and fit them with some clips.
*edit*
Oh, and yes, the miscast was easily dealt with. Straight surface, large miscast, it only took two swipes from a small iron saw to take it off. Gone over it with some rough sanding paper to get rid of the remains and it's looking better then ever.
The other problem with the drive sprocket missing the holes is still weird though. I've added some lubricant to the links, and yes i had to do that by hand on all pieces because I only had very thin lubricant around. But the problem still remains. I've gotten the tip for a way to loosen it up quite a bit. The plan itself is quite....extreme, but i have no doubts in the fact that it will, at least, smoothen the tracks up.
The tip was as such:
Get a steel pot, fill it with quite some engine oil, heat it up a bit (a bit, not too much) and dunk the tracks in for a few minutes. After that, you take the tracks out and, with a piece of cloth, you take away all the excess oil from the tracks. The should result in oil being every tiny notch that is not in plain sight (mostly the link pins)
I have no experience with tricks like this, but i am worried that even though it'll be lubricated rather well, the oil will attract dust and dirt, reversing the process rather quickly. So if someone could enlighten me about this, i'd be thankful.
Sadly, as i don't have my hands on any of the materials to try these things, i'll just have to start on the transplantation of "some" internals.
I've stripped it down to it's bare bones (which wasn't very hard, one piece of hardware, woohoo) and i'll be preparing it for its new internals. I've gotten my hands on another circuit board from a Mato Sherman, which works surprisingly well and allow for some simple modifications here and there. I'll just have to attach some proper wiring to all of the engines and fit them with some clips.
*edit*
Oh, and yes, the miscast was easily dealt with. Straight surface, large miscast, it only took two swipes from a small iron saw to take it off. Gone over it with some rough sanding paper to get rid of the remains and it's looking better then ever.
Re: Disassembling HL King Tiger
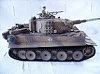
That's what mine looks like...I just got the gearbox with the black gears that was mentioned, coincidentally arrived today they cost me $50 from Hobby raw.
For parts you might want to know the KT is Heng long model 3888.
For parts you might want to know the KT is Heng long model 3888.
Re: Disassembling HL King Tiger
Don't use automotive lubricants for these tanks... they have petroleum products in it that can harm the plastic as well as the paint ...if you are going to attempt this "hot dunk"... use vegetable oil...the type you use for cooking ... canola is good ...break it first... (heat till smoke then cool)...then WARM again ...take off the heat..and soak the tracks DO NOT KEEP IT ON HEAT..if you do you will get too much penetration into the metal...a really bad thingFooks wrote:It appears the problem is still present, though less then before. The idea of adding the washers is a good one indeed, though i cannot get my hands on them currently, I shall keep it in mind.
The other problem with the drive sprocket missing the holes is still weird though. I've added some lubricant to the links, and yes i had to do that by hand on all pieces because I only had very thin lubricant around. But the problem still remains. I've gotten the tip for a way to loosen it up quite a bit. The plan itself is quite....extreme, but i have no doubts in the fact that it will, at least, smoothen the tracks up.
The tip was as such:
Get a steel pot, fill it with quite some engine oil, heat it up a bit (a bit, not too much) and dunk the tracks in for a few minutes. After that, you take the tracks out and, with a piece of cloth, you take away all the excess oil from the tracks. The should result in oil being every tiny notch that is not in plain sight (mostly the link pins)
I have no experience with tricks like this, but i am worried that even though it'll be lubricated rather well, the oil will attract dust and dirt, reversing the process rather quickly. So if someone could enlighten me about this, i'd be thankful.
just let the warm oil cool with the tracks in it... the theory behind it is like making rock candy ... the oil will bond with the metal... take out immediately when cool...dry the tracks off
you're using a Mato board with a Heng Long controller? didn't think that was possible...the control is totally different
Sadly, as i don't have my hands on any of the materials to try these things, i'll just have to start on the transplantation of "some" internals.
I've stripped it down to it's bare bones (which wasn't very hard, one piece of hardware, woohoo) and i'll be preparing it for its new internals. I've gotten my hands on another circuit board from a Mato Sherman, which works surprisingly well and allow for some simple modifications here and there. I'll just have to attach some proper wiring to all of the engines and fit them with some clips.
Good for you... by the way where are you located ?
*edit*
Oh, and yes, the miscast was easily dealt with. Straight surface, large miscast, it only took two swipes from a small iron saw to take it off. Gone over it with some rough sanding paper to get rid of the remains and it's looking better then ever.
ALPHA
