Page 20 of 41
Re: HL Panther G customization diary
Posted: Mon Jan 21, 2013 12:00 pm
by majordisastor
Really, Really enjoying this build thread, so many practical ideas backed up with a great photographic step by step account of what you are up to.....just fantastic and one of the best build threads I have seen!!
As for filing down those tracks...well I take my hat off to you !!
Andy
Re: HL Panther G customization diary
Posted: Sun Jan 27, 2013 12:25 pm
by jeff1101
Updates 1/27
The psycho in me won over.

I removed several of the hooks and relocated them to the correct position. I knew It would be a lot more difficult (later on) if I ever changed my mind when I begin painting. This way I am now satisfied with the way it looks.

I also sanded the excess solder on the center washer on the radiator fan tower to flatten it then added the nut detail using a cut cylindrical spare sprue.

Not much work was done today as I had some errands to do, but I did manage to add some detail to the turret. Since Heng Long chose a very late model panther (indicated by the radiator tower, chin mantlet and flame dampener exhaust) I thought I add the brackets for the poison gas detectors attached to the turret. (This was issued by the Waffenamt for all panthers made starting Oct 1944) I used the photos of the Aberdeen panther as reference. (from
http://one6armor.stinch.com/pantherg/ab ... therg.html)
I cut the brackets from brass sheet. Then added the bolt detail by CA gluing .030 styrene rods cut to right size.

To seal it in place I painted some plastic glue over the brackets. (Same effect as varnish)

And here are the poison gas brackets attached to the turret and one right beside the Nahverteidigungswaffe. (see arrows)

Re: HL Panther G customization diary
Posted: Sat Feb 02, 2013 11:54 am
by jeff1101
Updates Feb 02/13
I was intrigued with how good cutting with a thread is so I decided to try the technique in removing the rear column light.
When I attached column light holder, I forgot to shave off the molded on column light. Now the holder is on top of the column light making removal of this part difficult.

Here is how I removed it. I turned the tank on its side and tied a heavy weight ( in this case my tape measure) on the string and hung the string over the molded column light. The other end of the string I held.

Here is a closer shot of the process. I have already cut almost midway into the column light with the thread. I have also taped the surrounding areas to avoid scuffing or damaging it with the thread.

And here is the rear of the tank after the column light was shaved away and puttied smooth.

Re: HL Panther G customization diary
Posted: Sat Feb 02, 2013 12:31 pm
by jeff1101
Updates cont'd - Making the gun travel lock functional
I can't take credit for this mod as I have seen this done in the forums before. However I posted pics below of how I did mine as this mod can save you a couple of quid from buying the full articulating metal ones from third party suppliers. (Although the metal travel locks even have fully functional locking chains they can be expensive)
First detach the gun travel lock. I haven't glued mine to the tank at this point.

I got some leftover .08 brass rod from the Aber rear deck PE set.

Next drill both ends of the travel lock bracket about halfway through.

Dry fit the travel lock to the tank (so it doesn't move) and then use the thread again to cut the tube hinge free. (Here I swung the turret around so that the gun barrel doesnt interfere with what I was doing)

Here is a pic of the travel lock after it is freed from its bracket.

Next continue drilling the travel lock hinge all the way through. Be careful in drilling and make sure it is straight as you are liable to either break the lock or have the drill emerge on a wrong side. It is a good idea to take your time in drilling and double check at intervals that you are still drilling straight.
When you have drilled all the way through you can now insert the brass rod to see if it fits.

Next pass the rod both through the lock hinge and bracket.

Cut the excess rod at both ends. The rod is held by pressure alone (Its quite a tight fit) so I didn't even have to put glue to the rod to hold it in place.

Glue the travel lock back into the tank. Here is the travel lock in the upright position.

And here is the pic of the gun barrel held securely in its cradle.

Re: HL Panther G customization diary
Posted: Sat Feb 02, 2013 4:52 pm
by maxmekker
I take my hat of for you. Damn fine work, and a great build blog. one step closer to primer time

Re: HL Panther G customization diary
Posted: Sat Feb 02, 2013 6:05 pm
by doc larsson
boy attention to detail ?
Re: HL Panther G customization diary
Posted: Mon Feb 04, 2013 2:32 pm
by jeff1101
Updates - Feb 4, 2013 - Relocating the antenna
HL had placed the stock antenna in the wrong location and a lot of other builders have relocated theirs. To be honest, I was a bit ambivalent with this mod at first as I was willing to sacrifice some accuracy for the sake of function but in the end I was glad I did it anyway as it was fairly easy to do and the rear deck looked better after the mod.
First I marked with pencil where I will cut out the antenna base.

Then I drilled holes in all four corners.

I inserted the thread in the hole and started cutting.

And here is the hole after the antenna base was removed. It's not the straightest cut I have made since I was having difficulty controlling the thread from this position.

And here is the antenna base. I think it was put in place when the plastic was injected into the mold and it will not come out easily.

I used my drill as a clamp and used the thread method again to cut the antenna free.

Next I cut a hole on the new location. I had to shave off the molded cone guard of the mount so that I can fit the brass antenna base.

And here is the antenna base glued in its new location.

For added strength I added putty on the underside.

I then turned my attention to the hole I just created in the old location. I glued plastic card on the bottom and added putty.

At top side, the hole was still pretty deep so I stacked 2 plastic cards to fill it.


And here it is puttied and sanded smooth.

And with that mod done, the rear deck is now complete.
Re: HL Panther G customization diary
Posted: Sat Feb 16, 2013 2:35 pm
by jeff1101
Re: HL Panther G customization diary
Posted: Sat Feb 16, 2013 3:08 pm
by jeff1101
Updates cont'd. - Detailing the rear reflector
The molded on rear reflector looked too fake. It needs to be more 3-dimensional, it needs to have a bracket, it needs to go.


I used the thread technique to cut it off.

Once the reflector frame is freed, it no longer has a back. I sourced some thin plastic for the back.

I applied glue to the frame and glued it to the plastic sheet.


I then cut the plastic around the reflector frame.

Next I cut brass strip to the right size.

Drilled a hole in the brass and bent it like so.

I then soldered a brass wire to the hole.

Cut the excess wire.

Completed reflector bracket.

Drill a hole where the reflector used to be.

CA glue the reflector frame to the bracket.

Completed reflector.

Thread the bracket wire to the hole that was just created. CA glue the wire to the hull and also add CA glue on the oppsoite side for strength.

Completed reflector attached.

Re: HL Panther G customization diary
Posted: Sat Feb 16, 2013 4:03 pm
by jeff1101
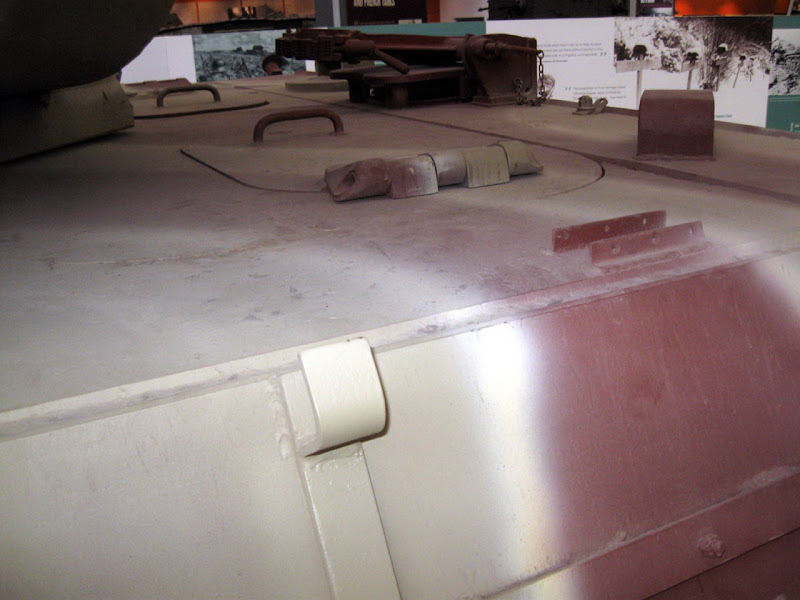
Updates cont'd. - Adding the driver/radio operator hatch lid stand-offs
For panther Gs, when the driver/radio operator hatch was fully opened, the hatch lid would often fall on the upper deck. To prevent damage to the hatch lid, a metal bracket was added. A block of wood was attached to these brackets (via bolts) to cushion the hatch lid and also to act as stand-offs.
I decided to add this detail to my panther as well. First I measured and marked the upper hull sections where the brackets will be located. Since I would be drilling the upper deck to attach the brackets I also taped some strip plastic to ensure the brackets would not move during drilling.

Next I bent some brass strips for the bracket. I drilled 2 holes in the bracket.

Using the bracket as template, I drilled additional holes to the upper deck on both side.


I then threaded a piece of brass wire and then soldered the wire to the bracket.

I then CA glued the bracket to the upper deck using the wire for added strength.

Here are the completed brackets.


For comparison here are the stand off brackets on the Bovington panther. (from
http://blog.net-maquettes.com)