Page 20 of 23
Re: DAK Pz IV Ausf G Build
Posted: Sat Nov 26, 2016 10:21 am
by Raminator
I've found that using pigments to simulate the soot on the muzzle and exhaust works better than painting. You can build up gradual thin layers and apply them in the same direction and manner as the real fumes, might be worth looking into if you're set on redoing them.
I noticed the SMD LEDs in the headlights too, nice work squeezing them in. Everything's looking great and coming together very nicely, good call on the colours.
Re: DAK Pz IV Ausf G Build
Posted: Sat Nov 26, 2016 12:33 pm
by philipat
Thanks...the headlight covers are painted. I just need to glue them on.
I'll have to look into the pigments. I've never used those before. Any recommendations for brand or source?
Re: DAK Pz IV Ausf G Build
Posted: Mon Dec 05, 2016 6:31 am
by Raminator
Tamiya's weathering masters are a nice way to introduce yourself to pigments, since they come with applicators and binders. Set B has rust and soot.
Might not be the best photo, but
this is how they came out for my T-34's exhaust and muzzle.
Re: DAK Pz IV Ausf G Build
Posted: Sun Jan 08, 2017 2:21 pm
by philipat
Good work on the T-34. Because I'm pushing to finish and don't have the pigments, I'm going to skip this this time. But, I'll get some and try them on my next build. Thanks for the tip.
Re: DAK Pz IV Ausf G Build
Posted: Sun Jan 08, 2017 2:22 pm
by philipat
I redid the muzzle brake and exhaust. They look much better now. I found that the round ends of the exhaust can be done well using a Q-tip dipped in paint and pressed into the exhaust opening. This creates a smaller ring around the top and outside edge similar to what you would find on a tailpipe. The Q-tip also helps to blend in touch ups because you can roll it, leaving a texture similar to the airbrush.
I’ve also added the tools. Everything on a horizontal surface was glued with CA glue. The things on the vertical surfaces were glued using 5-min epoxy. Hopefully, the CA will hold when driving across the lawn. I left the metal tools unpainted where it would be a metallic surface. They’ll darken a little with the washes, but it seemed better than trying to paint them a metallic color.
The machine guns were painted using Tamiya Gun Metal (X-10). I used a Q-tip to just blacken the rims of their muzzles. It’s one of those effects that you see, but don’t notice. Pretty cool.
The antenna was installed. It’s a 12.5-cm section of the HL wire antenna. That should be the scale size for the 2-m antenna. To thicken and stiffen it a little, I put heat shrink on the wire. I like the HL antenna wire because it’s stiff enough that it won’t bend the first time the turret pushes the gun tube against it. I had already drilled out the tip of the antenna base. So, I epoxied the wire in place with JB Weld and then installed the heat shrink.
Note to anyone trying the heat shrink...it shrinks longitudinally as well as laterally. I lost about .5-cm when I had to cut off wire because the heat shrink got smaller than the wire.
Re: DAK Pz IV Ausf G Build
Posted: Wed Jan 11, 2017 2:39 am
by philipat
I did a little more work on the tank this weekend. I did a dark brown wash, but I’m not convinced that made much difference. I also did a dry brushing technique. Well, really, it was probably a dry rub (without the meat, coals, or smoke

). I read somewhere about people using graphite from pencil sharpeners to hit the high points on tanks to give it a worn look. And, I have some graphite lube leftover from the Pinewood Derby days. So, I applied that with my finger and hit the edges, bolts, rivets, handles, etc. Overall, it dirtied it some and gave some worn appearance. It’s still subtle enough not to appear to be a battlefield derelict.
I also fixed the jack block in place. The leather strap is cut cloth that was painted and glued in place. The buckle is a bent staple.
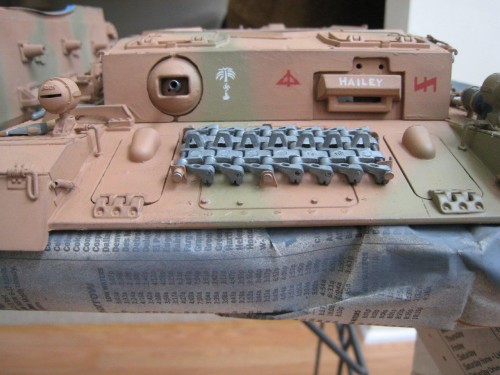
I fixed the spare tracks in place. Before I did that, I wanted to seal in the paint job. So, I applied a coat of Testors Dull Cote. I was concerned about the rubbing of the tracks rubbing off the paint. A word of warning (and reminder to myself) to anyone planning to use Dull Cote over an acrylic paint job. Apply the Dull Cote in several light coats rather than one medium coat. The lacquer Dull Cote attacks the acrylic paint. I’m sure I read that somewhere, but completely forgot. Oh well, lesson learned.
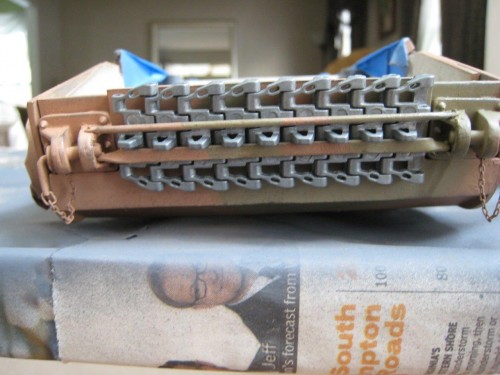
The spare tracks on the upper hull are held in place with nails. I don’t know the gauge; they were in a box of various nail sizes that I have. But, the shaft diameter is about 1.3-mm. I needed a nail head on each end to simulate the track pin’s heads. So, they’re cut so that the ends meet inside of a track link. They’re epoxied using JB Weld. The spare tracks on the front glacis are secured with the retaining bar. This was secured with 5-min epoxy.


Last thing I did was to darken the tracks. Frankly, this was an accident. I had some gun blue and I thought I’d take a little of the edge off and darken them slightly. Well, they ended up black, which wasn’t what I wanted. Since they blacken as a result of a chemical reaction with the metal, I figured I could recover it by scraping off the outer surface similar to removing rust. So, I wire-brushed the tracks. Now, they’re more of a blackened silver. I like it a lot better. Once I get them on the tank I’ll decide if it’s a technique I want to use again.
Re: DAK Pz IV Ausf G Build
Posted: Thu Jan 12, 2017 8:23 am
by Raminator
The tracks came out well, it looks like a nice raw cast steel colour. Should be a good base to weather from. What's next on the to-do list as you wrap this up?
Re: DAK Pz IV Ausf G Build
Posted: Thu Jan 12, 2017 11:05 am
by philipat
Thanks. Next plans are to hit everything with a couple of light coats of Dull Cote; lube all axles, bushings, and gears; reassemble it; and then dust it with with some Tamiya Desert Sand and Buff. That should finish the tank. I'm also going to replace the machine gun switch on the Taigen controller with a push-button. Just need some weather warm enough to do this stuff outside. Spray painting (rattle can or airbrush) indoors is a no-go.
Re: DAK Pz IV Ausf G Build
Posted: Thu Jan 12, 2017 12:02 pm
by HERMAN BIX
Yeah, she's coming along wonderfully

Re: DAK Pz IV Ausf G Build
Posted: Fri Jan 13, 2017 9:02 pm
by philipat
Thanks!