HL Panther G customization diary

jeff1101
Corporal
Posts: 340
Joined: Tue Jan 03, 2012 9:08 am

Re: HL Panther G customization diary

Post by jeff1101 »

Updates 12/20 - Correcting Mato Metal tracks

Thanks Eastern, littletankman

Lots done lately as I was able to get some time off from work, one of which is correcting the shape of the mato metal tracks. In my earlier review of the metal track, I mentioned that the track itself looked a bit thick. See pic below:

Image

Turns out the individual track links were molded incorrectly. They should have a bevel at both ends of the track links. see pic below of real panther tracks (pics are Littlefield panther from svsm.org.Pics taken by Vladimir Yakubov)

Image

It's even more evident in this shot in oblique view.

Image

So out came the drill again, this time armed with a sanding stone bit. I then sanded a bevel edge on the track links.

Image

You can see the result in the pic below. The left side tracks have been sanded on the edges and the right ones are the tracks as they are before.

Image

The only problem here is the amount of work involved to do this. I had to disassemble and sand 84 pieces of track links for just one side of the tracks. Took me 2 days to finish one side. :crazy:

Image

But the result I think in my opinion is worth it.

Image
Image
Image
Last edited by jeff1101 on Wed Aug 28, 2013 9:24 am, edited 1 time in total.
jeff1101
Corporal
Posts: 340
Joined: Tue Jan 03, 2012 9:08 am

Re: HL Panther G customization diary

Post by jeff1101 »

Thanks. Took me a long time to find a solution for the outer road wheels but now that its fixed I get to enjoy it once again on the tank.

And the track link? I thought every hard core RC tanker have one of his favorite tank. ;D

I have also done some progress on the PE work and hopefully would be the subject of my next post. I am finally seeing some light at this long tunnel. Just a few more bits and I think I will be complete. Then its painting time.

A Merry Christmas to you too.
User avatar
maxmekker
Warrant Officer 1st Class
Posts: 1719
Joined: Tue Apr 27, 2010 8:47 am
Location: Norway

Re: HL Panther G customization diary

Post by maxmekker »

this is such a great build man, again thanks for sharing, love to se it run one day .
Drammen Rock City
jeff1101
Corporal
Posts: 340
Joined: Tue Jan 03, 2012 9:08 am

Re: HL Panther G customization diary

Post by jeff1101 »

this is such a great build man, again thanks for sharing, love to se it run one day .
Thanks maxmekker. You have been giving nice comments since I began this thread and not only that have been giving very good advice as well. Your encouragements are a great motivation for me to continue. ;D
jeff1101
Corporal
Posts: 340
Joined: Tue Jan 03, 2012 9:08 am

Re: HL Panther G customization diary

Post by jeff1101 »

Updates 12/22 - Installed PE latches on stowage boxes/gun cleaner container

I have finally finished installing the small latches in the stowage box and gun cleaner tube container. My main problem in making the latches was that I cannot really see what I was doing. :crazy:

So I bought a loupe at a discount store.
Image

The nice thing about it is that it has its own stand so that you can have both hands free (you don't have to use one hand to hold the loupe) to work on whatever it is you need to work on. :thumbup:

Here is how I set it up. I used a CD sticker as a mat and then placed a double sided sticky tape as a platform to work on. The small PE parts sticks to the tape and allow me to work on them without fear the PE parts flying off.
Image
Image

This little setup helped me finished 7 latches in just 2 days! It was especially helpful when it came to threading the small wire to the hinge holes for the latches as you really need to see what you are doing at this stage.

However you still need a certain dexterity to handle the small PE parts. Completing some latches were more troublesome than others so it still needs a lot of hard work.

The results, however are more than worth it.

First the stowage boxes. I had to raise the rear of the tank on a book so I can work on attaching the latches to the stowage box. (Since the stowage box are fastened at an angle, the lids aren't horizontal)
Image

right stowage box
Image

catches attached first on the left stowage box
Image

then the latches
Image

pic of both stowage boxes
Image

Gun cleaner tube.
Image
Image
Image

With that done I can finally glue the tube to the tank hull.
Image

The tube can be opened at both ends so I had to attached latches to the other end as well. (For a total of 4 latches)
Image
doc larsson
Staff Sergeant
Posts: 829
Joined: Sat Sep 29, 2012 5:05 pm

Re: HL Panther G customization diary

Post by doc larsson »

i cant wait to see this finished..if it ever is. Nice stuff !
User avatar
maxmekker
Warrant Officer 1st Class
Posts: 1719
Joined: Tue Apr 27, 2010 8:47 am
Location: Norway

Re: HL Panther G customization diary

Post by maxmekker »

jeff1101 wrote:
this is such a great build man, again thanks for sharing, love to se it run one day .
Thanks maxmekker. You have been giving nice comments since I began this thread and not only that have been giving very good advice as well. Your encouragements are a great motivation for me to continue. ;D

wow man, that's , that's a nice thing to say. :-) Thanks.. You got some pritty good skils in those fingertips my man. I gave up with my barrel cleaning holder for my JP. I just folded them as good as I could, and soldered them solid , hehe. Keep on the good work.
Drammen Rock City
User avatar
greengiant
Warrant Officer 2nd Class
Posts: 1138
Joined: Tue Jun 26, 2012 12:15 am

Re: HL Panther G customization diary

Post by greengiant »

My tiger 1 has metal everything and the stock springs and the suspension moves smoothly over uneven terrain. I'd be afraid that stiffer springs would keep this from happening. It appears your solution by installing only a few might be a good idea if I ever need to do it.
your build is so detailed Its a work of model art. But move the antenna to a more correct location just in front of the left side forward fan grill where the there is an antenna base molding on the upper hull.
jeff1101
Corporal
Posts: 340
Joined: Tue Jan 03, 2012 9:08 am

Re: HL Panther G customization diary

Post by jeff1101 »

Thanks greengiant. I'm still thinking about moving the antenna to its correct position. My philosophy in this build is to get as much detail in, but if putting the extra detail affects the tank's functionality (or is too much trouble to build) then I would skip it.

Updates 12/27 - Correcting HL sprocket height and lower hull details

As many of you may know, the HL panther lower plate angle is incorrect. (The Tamiya one got it right though). Some brave RC modellers have even attempted to fix this. (see sturmgeschutz fix for this in the below link)

http://www.rctankregiment.com/rctankfor ... 8713c2819a

Now fixing this would entail either too much work for me or is beyond my skill, although one thing I liked about sturmgeschutz's fix is how the sprocket height was improved and how the track slop and stance look even better after his fix.

I was attracted to the panther (and german tanks in particular like the tiger 2) because of how the tracks looked. The gradual rise of the track and how it slacks just before it reaches the drive sprocket. This (as well as the interleaved road wheels) give it that very distinctive 'panzer' look.

Unfortunately because the HL sprocket is set too low (I guess they had too make compromises to house the gearbox) this look on the RC tank is greatly diminished. Surprisingly even the Tamiya panther with its correct lower plate angle also has the sprocket set low. I have seen pictures of panther A and D's with the angle of the track (in relation to the ground) between the first road wheel and the sprocket at a steep angle. (about 25 degrees). I don't see this angle at all in the Tamiya and HL versions of the panther.

One way to have this 'look' would be to clock the road wheel swing arms lower so that the sprocket height would increase in relation to the road wheels. This may be accurate for panther A and D's (see the littlefield panther swing arms in the below video)

http://www.youtube.com/watch?v=CaLTkGjlgxM

but I think the panther G have the swing arms closer to the hull. (Giving it that close to the ground look see pic below (from http://www.jedsite.info)). So for this fix I decided to leave the swing arms unchanged.
Image

I tried to replicate in sturmgeschutz's fix in adjusting the sprocket height. The mato gearbox already has a metal plate that increases the height of the drive shaft by a few millimeters. I decided to add a further few millimeters to this.

First I replicated the metal plate and holes using plasticard. I was careful not to stack the gearbox too high as I was going for a subtle look and there's a practical limit as to how high the drive shaft and sprocket is and still clear items on the outside hull. (As you'll see later).
Image

I then stacked the plastcard and metal plate like so.
Image
Image

I removed the final drive housing (its screwed to the lower hull by philips screw) and removed the gearbox driveshaft so I can check the new clearance. As you can see below the driveshaft hole no longer clears the lower hull hole.
Image

I drilled a series of small holes so I can enlarge the hull hole.
Image

Now the drive shaft clears it with plenty to spare.
Image

Next I need to enlarge the hole in the final drive housing so that the sprocket and driveshaft clears it. For this I use my drill and sanded a larger hole for it.
Image

And here compared to an unaltered final drive housing.
Image

See how the drive shaft clears the housing as well.
Image

This is the picture of the sprocket with its height adjusted. Notice how it now nicely fills the tank's wing where before there was a large gap.
Image

Correcting the lower hull detail
Also this molded part represents a bump stop for the first road wheel but is set too high. (see pic below). In HL panther this is used to prop up the track height just before it reaches the sprocket.
Image

In real panthers the bump stop is set low.
Image

I removed it for now since it was preventing the track from 'slacking' properly. I will re-attach it in the future once I decide at what height to place it.
Image

I then reattached the tracks. One nice thing when I corrected the track was that by beveling the edges of the track it clears the tow shackle holes even with the increased height of the sprocket. I think this was the original reason why the panther tracks have this bevel on the track edges.
Image

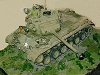
And here is the tank profile compared to the bovington tank (from rikdom's flckr page).
Image
Image
jeff1101
Corporal
Posts: 340
Joined: Tue Jan 03, 2012 9:08 am

Re: HL Panther G customization diary

Post by jeff1101 »

Updates 1/05/2013
Happy New Year!!!

New Year new updates. I have done a lot of work during the holidays. First off I added the bolt detail on the crew heater tower were it attaches to the ducting.

(Pic of real tank courtesy of Don Allen http://militarymodels.co.nz/2012/03/12/ ... er-ausf-g/)
Image

And here is the bolt detail on the tank
Image

Next I roughed up both fan housings to simulate cast texture using mr. surfacer.
Image

Image

To add visual interest, I cut a section off the right wing
Image

The MG34 mount resembles a molded on part and looked fake so off it goes.
Image

Anyway, the Germans were less strict than the Americans in putting a MG on the commander's cupola. I have seen many panther pics with no MG mounted on the MG ring so this is what it will be on this tank.

Here is the machine gun ring sanded smooth.
Image

I also finished up the rear, by adding weld lines using milliput on the rear plate.
Image

I set up assembling the tool clamps from the Aber PE set. Compared to the latches the clamps are bigger so they are easier to work with but have more parts to assemble and also unlike the latches some soldering is involved so they were still a PITA to make.
Image

Here is a pic of the test fitting of the clamps for the bolt cutter
Image

I also made a guide for the shovel handle on left side front tool rack. I had no use for the fan heater tower covers on the original PE set so used those.
Image

bend and cut to shape.
Image

drilled tiny holes.
Image

threaded brass wire and solder.
Image

drilled holes on the tank hull on the tool bracket.
Image

ran the brass wire through the holes.
Image

then CA glue it on the opposite side.
Image

With the clamps now made I was able to finally finish the front tool racks. All the tools can be fully removed for separate painting later.

Front left tool rack.
Image
Image

Front Right tool rack
Image
Image

Finally I added the handle for the jack bloc. I used the the spare tool clamp locking handle.
Image

Bent it then soldered 2 wire on the edge holes.
Image

Drilled corresponding holes in the jack block, ran the wires through them and CA glues them underneath.
Image
Image

Finished jack block.
Image
Post Reply

Return to “Panther”