Page 17 of 37
Re: Building a Mid-Production Normandy Tiger 1
Posted: Tue Sep 09, 2014 1:37 am
by SovereignZuul
I'm about to do my machine gun as well. I've got all the exact same parts for mine as you Tanks.
I noticed however, the gurtsack doesn't fit the schumo mount well. The sack is too small or the mount too big... A small modification is needed unless there's something about the sack I don't know! Hope you've got some of those nice ammo belts too!
Lookin' good as always!
Re: Building a Mid-Production Normandy Tiger 1
Posted: Tue Sep 09, 2014 8:05 am
by scalawag
Hi Tanks and all watching,
I have been watching and learning about the armoured barrels on the Mg34s. I too have been working on this with very similar parts, only difference being I have used the Jagdpanzer MG34, which is cast in white metal and similarly detailed and has the option of having an open receiver as well.
Here are some pics


I too found that the Gurtsacks were a little small for the retaining bracket on the schumo mount. I dealt with this by cutting the side of the retaining bracket on the cupola side at the moulded mount with the bolts on ( the moulded part that represents the fixing of the retaining bracket to the AA mount). I then glued the retaining bracket arm back on the underside of the moulded fixing bracket. Hope that made some sense. Here is a pic of what I have tried to describe, not easy to take a picture of it though. The modified arm is on the left of the picture.

Also I found a number of pictures showing MG34s of this type mounted to AA rings. Almost all had the front sight post fitted which is not included in the Aber barrel kit. I couldn't find any with the AA sight fitted. The brackets for both would have to be bolted to the barrel when the MG was removed from the interior mount as I don't think the barrel would fit its aperture with the sights on. this would mean that they would have to be removed to replace the gun in the interior gun positions too.
Here are a couple of the clearer pics I found


I cut the front site post from the white metal barrel and used that.
I have the perfect hobby hollow barrels on order too, to work on the hull mounted MG34s.
Re: Building a Mid-Production Normandy Tiger 1
Posted: Tue Sep 09, 2014 9:10 am
by jarndice
Paul you have achieved what I am striving toward with the mg 34 cupola mount, a couple of questions if I may? How did you aquire the AMMO BELT and do you have any more information on the picture of the mg mounted on the cupola of the PANZER 4, type of PZ4, the date of the photo,etc thanks my good friend, always a delight to see your work.

shaun
Re: Building a Mid-Production Normandy Tiger 1
Posted: Tue Sep 09, 2014 9:28 am
by scalawag
Hi Shaun,
Thanks for the compliments on the MG34s.
The ammo belts are from here
http://shop.afvmodeller.com/customer/pr ... 387&page=1
Great item, flexible resin, takes paint really well and hangs very accurately I think.
I think the top picture is actually a Pzr III judging by the back of the mantlet. I could not tell you which model I am afraid. The lower picture also appears to be a Pzr III or IV looking at the cupola. Impossible for me to tell from that picture which or what model it might be. The mount seems to be the same AA mount which is available from Schumo, and is clamped to the upper rim of the cupola. The schumo part will need a little packing to make it fit but it can be done, and according to these pics is accurate for this cupola.
Here is my Pzr III

Re: Building a Mid-Production Normandy Tiger 1
Posted: Tue Sep 09, 2014 10:57 am
by jarndice
Paul, You are of course right, I saw the back of the Mantlet and for some reason It went straight over my head, As we speak my order for AMMO BELTS from AFV is being processed, my deep thanks, this is the kind of detail that lifts the build, I smiled when viewing TFTMs SCHUMO AA MOUNT, a pin vise offers the chance of much greater detail, as to fitting on my PZ 4 cupola it went on with hardly any extra work, the Postman just delivered an ABER mg34 armoured gun barrel this morning one more to come (HISTOREX are out of stock) and some NEODYMIUM MAGNETS, these will be used to secure the hub caps on the sprockets of my Tiger 1s, yet again thanks for your help, take care, shaun
Re: Building a Mid-Production Normandy Tiger 1
Posted: Tue Sep 09, 2014 12:38 pm
by HERMAN BIX
Bang on with that '34 & mount Mr Scalawag.
Im sure Mr Tanks will make equally good use of his one................
Re: Building a Mid-Production Normandy Tiger 1
Posted: Wed Sep 10, 2014 11:12 pm
by johnbudda
still learning how to us this site found this follow up very impressed with your upgrade on the tiger and the info that went with it I am the same as yourself spent many a happy hour on avf 1/35 scale models over many years now in the last two years having done the tank fest and the dd landings my interest are rekindled and I up graded to 1/16 scale and bigger now busy on a couple of projects that hopefully I will post in the near future
Re: Building a Mid-Production Normandy Tiger 1
Posted: Sat Sep 13, 2014 12:37 am
by tanks_for_the_memory
Thanks for the contributions to the cupola MG mount guys. Scalawag you have certainly nailed it.
Yes, I also noticed that the AFV Modeller gurtsacks are a little too small for the Schumo mount. Your solution works beautifully.
And thanks also for the kind words Buddha - welcome to the bigger scale. Bigger tanks, bigger detail and (sometimes) bigger headaches!
Now, after the distractions of the turret MG (which I will get back to shortly) I decided it was time to have some more fun with some of my 'silly putty'.
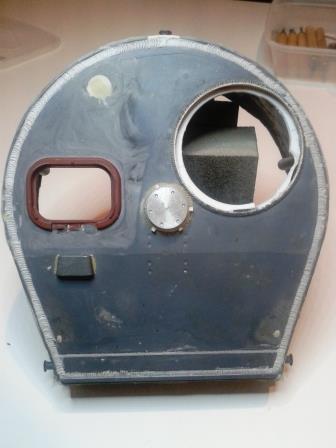
More turret zimmerit and roof weld beads
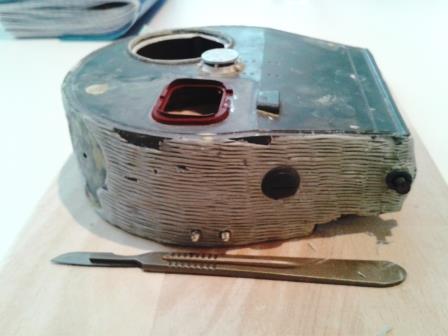
- Zimmerit on the right side of the turet after a little battle damage has been added.jpg (25.87 KiB) Viewed 5336 times
Well this was pretty much the same as the other side of the turret, although the escape hatch makes things a little more interesting (and I'll come back to the hatch itself next time).
Note that the left side of the turret usually had only two track hangers. Obviously the escape hatch takes up some of the room but there were originally three - until they found that the rear-most one got in the way of the engine hatch (this could only be opened by traversing the turret to three o'clock). You do see some pictures of Tigers with three however, and my set came with eight in all (five for the left side, three for the right).
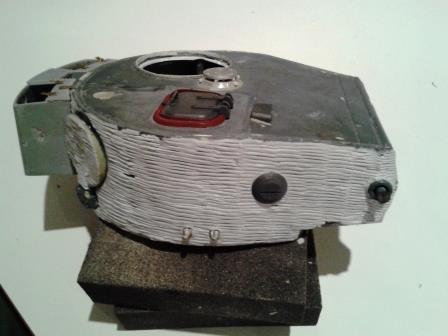
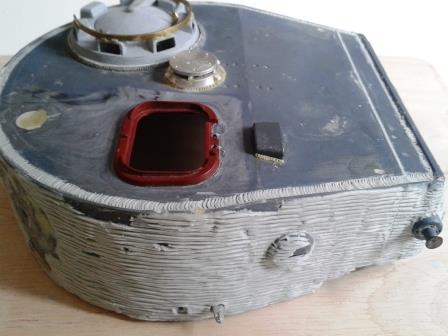
- Well that's the other side almost finished.jpg (25.58 KiB) Viewed 5336 times
The Hachette stowage bin is only temporarily pressed into place in these pictures to ensure that it sat flush against the zimmerit. Remember that the bin was attached
after the zimmerit had been applied to the tank.
Next I got stuck into the weld beads around the turret roof. I had already ground down the original beads to leave a shallow groove around the gap between the turret sides and roof in he same way I did with the hull - although the horse-shoe shape around the back of the turret was a bit more of a challenge. Then I laid in thin sausages of Magic Sculp, pressed and smoothed them into place with my fingers and shaved off the excess with a sharp, flat-edged tool. For the thinner weld lines behind the mantlet and the other, parallel one behind it I simply pressed the putty into the gaps which were already there.
Then I went to work with my V-shaped tool, pressing it into the putty at a shallow angle at regular intervals to make the distinctive 'ripple' of the weld beads. It's a little rough right now, but some gentle sanding tomorrow should tidy everything up. Then I'm hoping the paint job (when I finally get around to it!) will bring everything together...
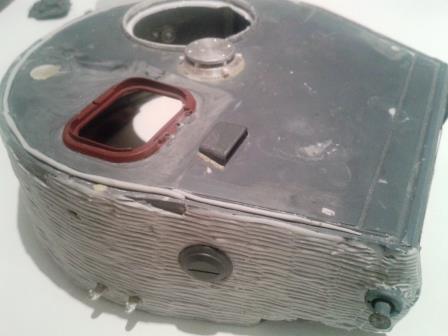
- As with the hull roof thin sausages of putty were rolled out and laid into the groove.jpg (26.46 KiB) Viewed 5336 times
- Weld beading was added using a V-shaped tool.jpg (26.5 KiB) Viewed 5336 times

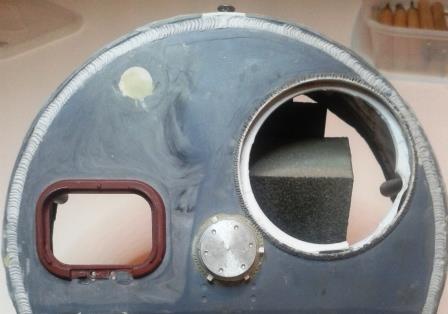
- Close-up of the weld beads around the rear of the turret roof.jpg (20.44 KiB) Viewed 5336 times
- The completed turret roof weld beads.jpg (25.05 KiB) Viewed 5336 times
- Zimmerit, weld beads and the cupola in place.jpg (29.96 KiB) Viewed 5315 times
Re: Building a Mid-Production Normandy Tiger 1
Posted: Sat Sep 13, 2014 12:46 am
by HERMAN BIX
The Zim-whisperer !!
Re: Building a Mid-Production Normandy Tiger 1
Posted: Sat Sep 13, 2014 1:17 am
by tanks_for_the_memory
Herman -if you were there when I did it you would know that there's not much whispering involved at all. Mumbling, perhaps. Swearing, certainly.


