Page 16 of 127
Re: HL M1A1 HA, Some Good Progress! Update 4/03
Posted: Tue Apr 05, 2016 12:16 am
by BarryC
atcttge wrote:Great progress.
Any plans to make a mounting plate for the gearbox? Just so make things at that area even more durable? It'll also add weight if you're making it out of aluminium or steel. I'd like to put a mounting plate for the gearbox, but couldn't find one.
Excellent suggestion Atcttge!
I had considered doing just that for several reasons:
1. Plastic mounting post not desirable for long term maintainability. I am concerned about thread wear and being easily stripped out during normal removal and installation of mounting screws.
2. Mounting post easily damaged especially with the use of the “Axle Supports”. I have found that to remove or install a gearbox both must be unmounted so that they can be moved all the way outboard and tipped up and aft to accommodate getting the opposite GB in or out. I worry about snapping the threaded end off of the aft most mounting post. However even with the mounting plate both GBs will have to be unmounted to allow removal and installation of one or both for the same reason.
I would use a piece of aluminum with a minimum thickness of .125”though I think .187” would be better giving a solid thickness for tapping and yield a good number of threads.
How to mount the plate is another matter. I am ruling out the existing mounting post as they align with the mount holes in the GB. I suppose a mounting “block” could be attached central to the GBs and anchored up through the hull. The plate would attach to the block then the existing mount holes in the GBs would be used to attach to the plate. The block would have to be relatively thick to allow tapping into both the upper and lower faces and to set the plated at the proper height. Shims made of peel-able shim stock could be used to properly align the drive shafts to the axle supports for “fine” tuning. This could be a great improvement; being able to actually control the alignment of the drive shift.
I like the idea and it bears do more scrutiny!
Cheers,
Barry
Re: HL M1A1 HA, Some Good Progress! Update 4/03
Posted: Tue Apr 05, 2016 12:18 am
by BarryC
Uncarina wrote:Barry,
Very precise work! This is outstanding.
Cheers, Tom
Thanks Tom, I just hope my detail work turns out 1/2 as nice as yours!
Barry
Re: HL M1A1 HA, Some Good Progress! Update 4/03
Posted: Tue Apr 05, 2016 12:31 am
by BarryC
Short update tonight.
Cut and temp fitted the center beam. I still need to file them to fit squarely then glue them in place.

TAFN,
Barry
Re: HL M1A1 HA, Short Update 4/04
Posted: Thu Apr 07, 2016 1:35 am
by BarryC
Quick update,
I am calling the primary structure for the Belly Armor complete.
I need to secure the blind nuts with some epoxy just to be sure. Once the decking is in place there will be no access to fix one if it comes loose.


TAFN, Thanks for looking in!
Barry
Re: HL M1A1 HA, Quick Update 4/06
Posted: Fri Apr 08, 2016 2:57 am
by Uncarina
Barry,
Excellent work!
Cheers, Tom
Re: HL M1A1 HA, Quick Update 4/06
Posted: Fri Apr 08, 2016 12:27 pm
by BarryC
Thanks Tom!
Working on the front and read pieces which be solid to absorb impacts without transmitting to much of the force into the remaining structure. These two pieces will be bolted through the hull separately from the main structure. I had considered shaping aluminum bar stock but lack the tooling needed to avoid having to shape entirely with hacksaw and hand file. I could do it but the time needed would be substantial.
Cheers,
Barry
Re: HL M1A1 HA, Quick Update 4/06
Posted: Fri Apr 08, 2016 11:54 pm
by BarryC
Well sometimes you receive unexpected help.
Rye Field Model has released a M1A2 SEP Abrams TUSK I / TUSK II / M1A1 TUSK (3 in 1) kit. So I ordered it because it includes one of the two specific tanks I am working to model.

]
However much to my surprise the Belly Armor is VERY different than the Legend conversion kit I have been using for reference.


Decision TIME!

l]

I believe I am going to use the Rye Field Model kit as my reference going forward including reshaping my Belly Armor to match. Reworking the Belly Armor structure will present a few challenges but I believe in the end it will be worth the effort to get it right.
Back to
"Old Drawing Board"!
Barry
Re: HL M1A1 HA, New info MAJOR change to Belly Armor 4/08
Posted: Sat Apr 09, 2016 3:19 am
by BarryC
I figured I might as well get started with the "engineering" changes. I still hope to get the decking down over the weekend to stay on track.

TAFN,
Barry
Re: HL M1A1 HA, New info MAJOR change to Belly Armor 4/08
Posted: Sat Apr 09, 2016 1:30 pm
by CODY614
Well...I've been following your build, and was curious about your "Belly Armour" layout. I have the Tamiya 1/35th scale SEP Abrams Tusk II. And I have been trying to find a good reference to this. I mean come on how hard is for some one to take a 62.1 ton tank and get some good underside photo's?
So I'm with you on the right layout, "Confused". Tamiya is almost 99.9% accurate, so that's the way I was going to go...
Front...
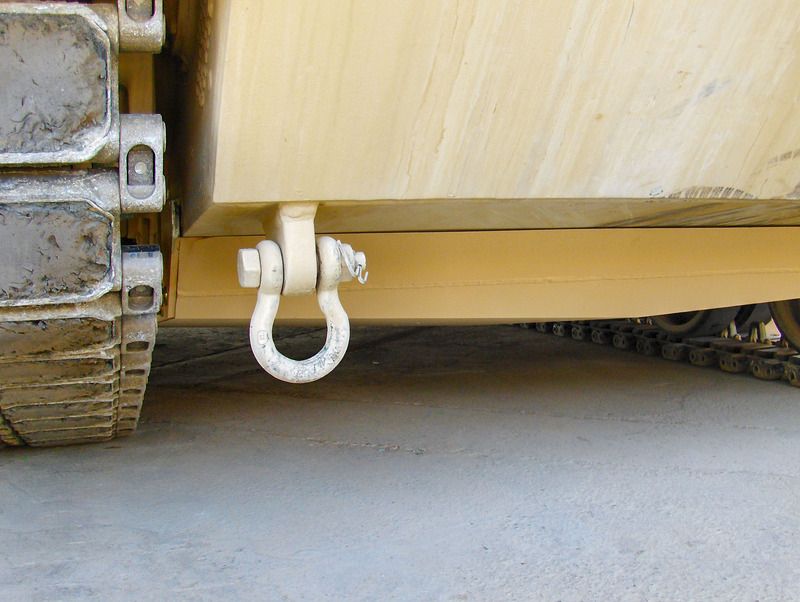 Looking forward...
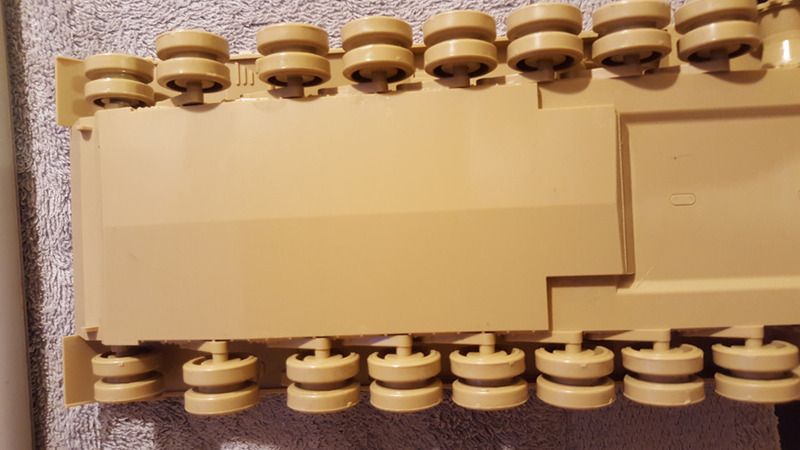
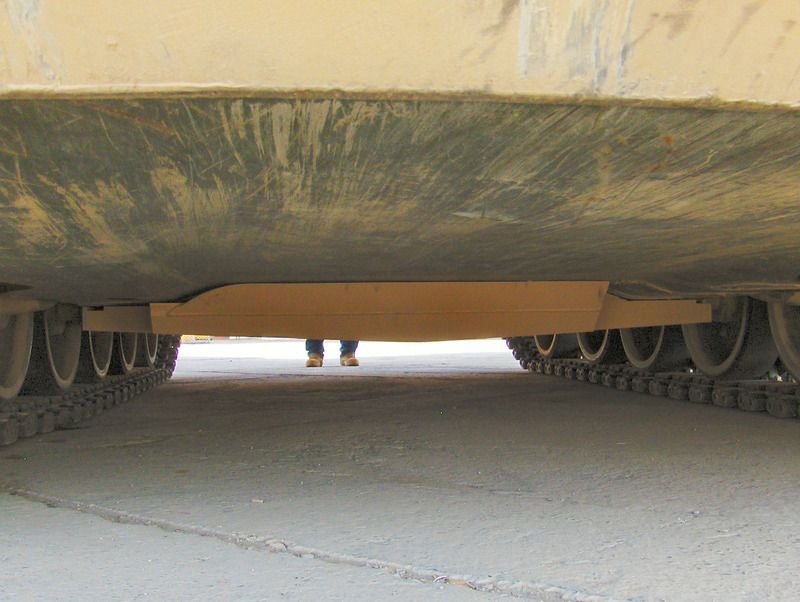 Tamiya lower hull...
Re: HL M1A1 HA, New info MAJOR change to Belly Armor 4/08
Posted: Sat Apr 09, 2016 3:27 pm
by BarryC
Cody,
You photos have relieved my anxiety over having committed to the change without any evidence.

I read some where that the Belly Armor added about 1000 kilos so It makes sense to protect the crew area and not sustain the additional weight of protecting the power plant.
Here's the new look, hopefully I can get some of the decking down now and then tackle the forward sloped section.


Thanks Cody,
Barry


