Page 15 of 29
Re: Cromwell Mk 4 1:16 scratch build Ludwig kit
Posted: Sun May 21, 2017 1:44 am
by c.rainford73
Mr 43rd such a wonderful job on these parts ( and the rest of the build of course) brilliant design and impressive display of your craftsmanship

Following along

Re: Cromwell Mk 4 1:16 scratch build Ludwig kit
Posted: Sun May 21, 2017 3:37 am
by PainlessWolf
Good evening, 43rdR&R,
That's a very, very exacting display of scratching a part out of styrene. Not only the fact that you could do it but that you _wanted_ to do it speaks volumes. ;o)
Following along.
regards,
Painless
Re: Cromwell Mk 4 1:16 scratch build Ludwig kit
Posted: Sun May 21, 2017 11:32 am
by 43rdRecceReg
Thanks a bunch, Carl and Painless.

Lao Tzu is famous for saying: " A journey of a thousand miles begins with a single step..". What he failed to mention, were the trips and stumbles at the start, and along the way!!

Building from scratch is full of trial and error: things that ought to work in theory, or on scraps of paper, that don't when tested. That solid ground you stepped on wasn't so solid after all


.
With RTR tanks, or assemble-it-yourself arrangements, from manufactured kits (Tamiya, Torro etc..) not much thought is involved. Flatpack tanks are in another universe entirely. The wiring for the main MG in the Cromwell, for instance, is in the upper hull section, while the wiring for the Headlamps is in the lower hull. But since they're normally linked in HL/Taigen circuitry; in fact, they're generally soldered to the upper hull 8- pin connector ..that's a problem. I need them to be easily separable, for maintenance purposes. Just as a standard 8-pin cable connector from the MFU in the lower hull, to the 8-pin connector in the upper hull, makes access to a Taigen/HL innards and testing components awkward (solution: buy a special 12 in. long cable), having a union between
fixed components in the upper and lower hulls could be an even bigger pain. So, I plan to connect the lamps to the soldered back of an eight pin upper hull connector from a Pz IV, and run run a JST connector from the front to the input of the new (9-pin) HL t90 block connector. Even the turret motor will terminate in JSTs, so that it can be quickly disconnected if needed.
I don't have any little intermediate daughter boards around the house, so that'swhy the PzIV 8-pin connector will have to do. I don't think that having circuits made and separated by JST connectors should introduce much unwanted resistance; but I'll find that out by trial and (hopefully)..no error

Now for that first step...
Re: Cromwell Mk 4 1:16 scratch build Ludwig kit
Posted: Sun May 21, 2017 11:35 am
by HERMAN BIX
A tow hitch...............simple to ask for, tough to deliver Sir.
What a fine example of complex detail made to look simple, and done very well.
Your workings on this 'Ikea Tank' are astounding.
Re: Cromwell Mk 4 1:16 scratch build Ludwig kit
Posted: Sun May 21, 2017 3:04 pm
by 43rdRecceReg
HERMAN BIX wrote:A tow hitch...............simple to ask for, tough to deliver Sir.
What a fine example of complex detail made to look simple, and done very well.
Your workings on this 'Ikea Tank' are astounding.
Tough to deliver indeed, HB! This almost needs a cranial caesarian section!

Coming from one of the Tank Illuminati, your generous praise is very encouraging.
Whilst trying to find detailed pics online, or in the few books available, of the parts I needed to make- I came across this unusual Cromwell. It appears to be covered in a sort of herringbone pattern Zimmerit coating.
Further research suggested that the material in question was rubber

How clever of the Brits to ensure that 88mm AP shells, travelling at over 2,500 Ft per sec, would simply go: "Boi.. oi..oing ..!!" and bounce off the side of the Cromwell.
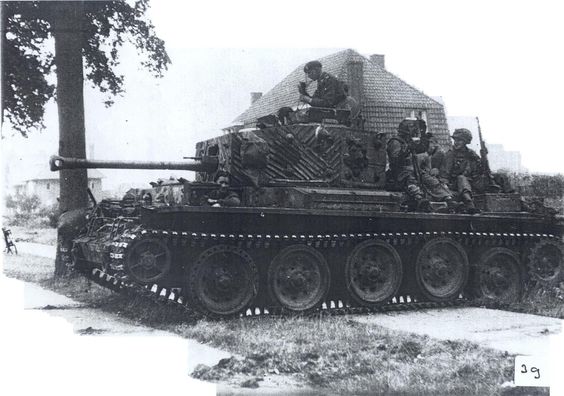
- British Zimmerit- rubber Chobham
- Cromwell with Zimmerit.jpg (45.22 KiB) Viewed 3980 times
Here's mention of the work of the latex lads (or rubber boffins) on Brit armour..
http://www.tanks-encyclopedia.com/ww2/b ... -zimmerit/
Re: Cromwell Mk 4 1:16 scratch build Ludwig kit
Posted: Sun May 21, 2017 9:22 pm
by doc larsson
look like us paras on board too interesting pic
Re: Cromwell Mk 4 1:16 scratch build Ludwig kit
Posted: Sun May 21, 2017 9:30 pm
by Soeren
That hook Looks fantastic. What do you use for such precise cutting of your styrene?
Re: Cromwell Mk 4 1:16 scratch build Ludwig kit
Posted: Mon May 22, 2017 12:31 am
by 43rdRecceReg
Soeren wrote:That hook Looks fantastic. What do you use for such precise cutting of your styrene?
I Used wood and model sculpting chisels like these:
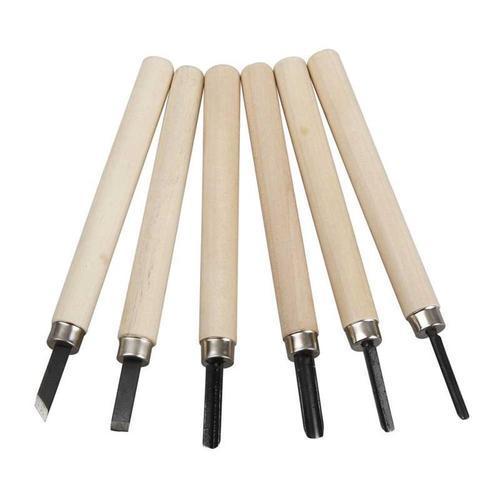
- Sculpting set
- Wood carving and model chisels.jpg (18.25 KiB) Viewed 3955 times
They cost less than £5 on Ebay...and represent a bargain at that price. One is for corners (right angle profile), and a couple are fluted for curves. I also used various grades of emery paper, combined with sets of flexible fine grit manicure emery boards. Then there's my indispensable Trumpeter razor saw. It came in handy for cutting out profiles (works like a coping saw, or band saw...but with a tiny detailed blade).
Re: Cromwell Mk 4 1:16 scratch build Ludwig kit
Posted: Mon May 22, 2017 12:34 am
by 43rdRecceReg
doc larsson wrote:look like us paras on board too interesting pic
Yes, I noticed the yankee passengers too. Looks like the tank commander's ordering up a takeaway for them...
Re: Cromwell Mk 4 1:16 scratch build Ludwig kit
Posted: Mon May 22, 2017 6:22 am
by Soeren
Ah there it is again, the razor saw, I am just adding stuff to my online shopping basket for modelling and completely forgot about that. Thanks, I'm glad I asked.