Page 14 of 25
Re: Amateur Build. HAYA Centurion KIT
Posted: Thu Nov 07, 2024 3:14 pm
by Herr Dr. Professor
"[W]hen I have completed my first Clark board installation...I won't need to do this." That's a good idea all the time! I am watching because I am thinking about a Clark board for a KV-2 after the money tree shakes next year. So I'm watching carefully.
Re: Amateur Build. HAYA Centurion KIT
Posted: Fri Nov 08, 2024 7:35 am
by Meter rat
Did the kit come with all the plugs required, and any instructions/information on how to set it all up?
Re: Amateur Build. HAYA Centurion KIT
Posted: Fri Nov 08, 2024 10:54 am
by zooma
Meter rat wrote: ↑Fri Nov 08, 2024 7:35 am
Did the kit come with all the plugs required, and any instructions/information on how to set it all up?
The wires were in the kit along with the cupola rotation motor and gearbox, turret turning motor, standard steel drive gearboxes with motors, lights, on/off switch etc . Quite a well equipped KIT - but NO INSTRUCTIONS or building/set-up information, but I have gleaned most of what I needed to know just by fitting the parts together and taking an occasional peek at the online videos.
I didn't find the videos as helpful (or comprehensive) as they could have been - but they did make a useful reference for some specific information when I wanted to check something, but they are NOT a step by step building reference.
The Clark board was bought recently and that did not come with any form of documentation either - but again, there are online videos available to help provide a reference and the RTR Centurion handbook that also comes with the kit does include a diagram of the Clark board that shows where to plug-in the various connections.
Andrew at HAYA is always available and willing to help answer any questions - and this is a valuable resource if needed.
HAYA Centurion KIT. First Power-up.
Posted: Fri Nov 08, 2024 11:24 am
by zooma
Last night I loosely positioned everything close enough to plug everything in and switched ON.
I do not have any motor wires (with plugs) yet, so I plugged-in a pair of standard motors and let them dangle over the side of the hull so I could see if/when the pinions turned.
The red LED for the machine gun flash was not in the kit (one is on its way) so I kept the ends of the connecting wires apart.
The cupola motor turned nicely and the turret turned OK as well. The gun elevation unit could be seen to move as it should and I was able to establish the "resting position" for the gun elevation servo and fit the output arm and check that it functioned (it did!).
I put a small blob of thread lock on the small metal fixing spacer that screws into the end of the barrel to connect the operating wire to the recoil servo (this will be buried inside the turret so I don't want to coming loose!) - and tested it again.
There was a slight "buzz" from this servo when at rest, so tried to re-bend the piano operating shaft slightly to ensure that the servo was not under any load. This had mixed results - sometimes it buzzed and sometimes it didn't! Maybe when I get used to the radio I can see if it has any "user adjustable" servo travel adjustment settings . If it does this will be very easy to "dial-out".
The sound worked OK. I did not adjust the volume control - but this was included in the kit and it has been fitted.
The main gun sound was good and the recoil action worked well....and the optional main gun flash LED worked too!
The headlights worked at first - but after lots of switching (to find motor drive etc) they did not - so I probably switched them off. I will learn all of the radio switching sequences when the tank is running, but at this stage everything has worked that I can see.
No machine gun flash could be tested, but once the red LED bulb arrives I will fit it. The two different (?) machine gun sounds work well (something else for me to work-out in time).
When I found out how to engage "drive"(rather than just revving the motor sounds) I could see the pinion gears spinning on the two loose motors that I had hanging over the edge of the chassis, so everything that I could see was working OK.
Next I can start to install everything into the tank - but first I need to fit some motor wires (with plugs to fit the Clark board) to the Blue motors and this will probably require removal of the tracks and gearboxes so I can get to the motor terminals safely with my soldering iron.
Re: Amateur Build. Clark Board.
Posted: Fri Nov 08, 2024 12:17 pm
by zooma
Herr Dr. Professor wrote: ↑Thu Nov 07, 2024 3:14 pm
"[W]hen I have completed my first Clark board installation...I won't need to do this." That's a good idea
all the time! I am watching because I am thinking about a Clark board for a KV-2 after the money tree shakes next year. So I'm watching carefully.
If you buy your Clark board from Andrew at HAYA he can supply it pre-loaded with the correct engine sound.
What I did not realise is that you need to specify all of the electrical functions that you have on your tank so that the board is correctly programmed for your tank!
I bought a gun flash LED with my Clark board and so the board had to be programmed to work it. If/when I add a smoke function to the gun barrel, the board will need to be re-programmed to work the gun smoke unit etc........
Those that know more than myself about these "boards" (probably almost everyone) can change the programming themselves using a TV type controller.
........more about this later...........I have removed the BB function from my tank so I can thread the gun flash LED "up the tube"... and later I will add a gun smoke tube - so I will need to re-programme the Clark board to operate it!
Amateur Build. Mantlet Disaster Strikes !
Posted: Fri Nov 08, 2024 12:45 pm
by zooma
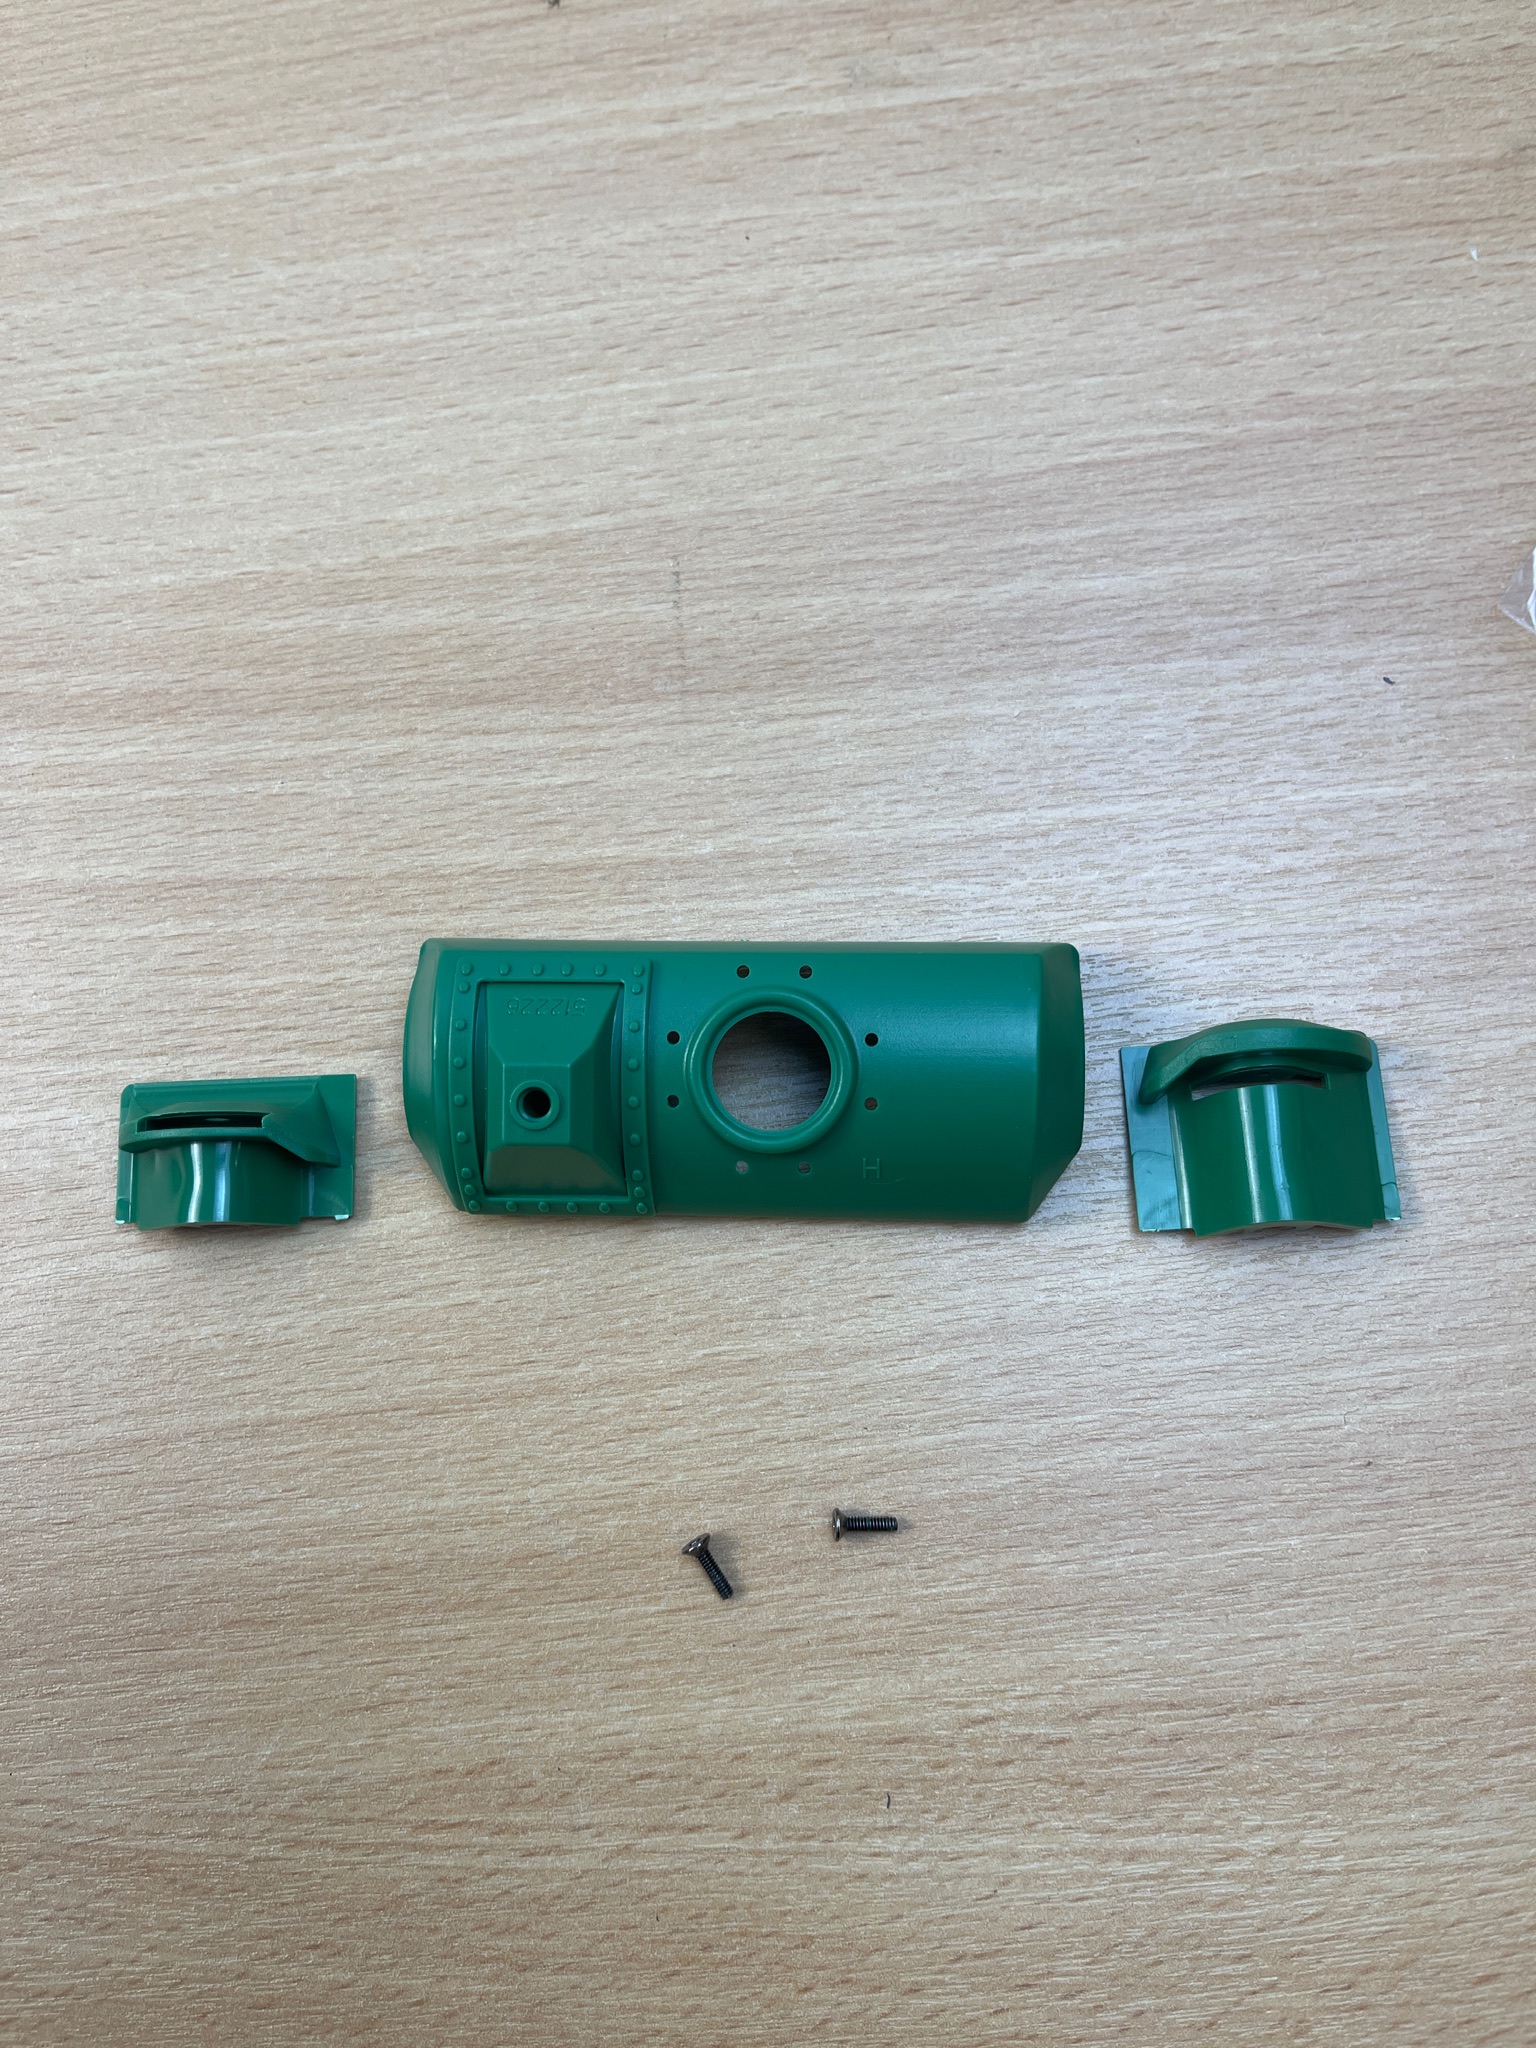
- New parts on the way - but at a cost !
- 18BF927E-E42A-4EAA-B19F-677AA56146D9.jpeg (1.03 MiB) Viewed 455 times
I fitted the gun mantlet to my Centurion KIT when I painted the turret. Those who have been following this build will recall that the two counter-sunk machine screws that act as a pivot and hold this mantlet in place (one of each side) were missing from the KIT.
As a previous model engineer (when I was younger!) checked my stocks of miniature machine screws and found a pair of the correct size countersunk M2.5 machine screws in stainless steel with TORX heads.
To fit the tested radio system into the tank I needed to remove the mantlet to fit the gun assembly into the turret - a simple job that only needed these two screws to be removed.
To my horror I remembered that these particular TORX screws had what was termed "security heads" on them. Basically they could be tightened-up OK (turn clockwise as normal when tightening a screw), but when an attempt to remove them was made, the anti-clockwise rotation caused the indentations in the head to shear off - so they could not be removed!
Although annoyed, I was not too bothered as I thought I could just carefully bore through the centre of the screw head and remove the screw shaft.
I had a good stock of new High Speed Steel drills (HSS) so I started with a 1.5mm size and blunted it almost straight away. A second and third (new) HSS drill also failed, so I increased the size to 2mm and then 2.5mm. This time honoured sequence should have worked easily (it always had previously!) but this time the "stainless steel" screws just heated -up and melted the surrounding plastic!
Even after being melted into the plastic (and wondering about in the molten plastic at various new angles) these steel screws resisted all attempts to have any metal removed from them.
The end result was two melted trunnion supports (one each side) and gun mantlet moulded hinges that these (hot) screws pivot in were melted too.
End result - three new plastic parts needed and two of the correct size screws - cost £24.99.
If the right size screws were in the kit this would never have happened ! Even if I found a way to damage the screw heads (unlikely) being typical 'soft" kit metal they would have been really easy to drill out.
Gutted !
I should have been more patient, and reported the missing screws and waited for them to be delivered.... I would be £25 better off too!

Re: Amateur Build. HAYA Centurion KIT
Posted: Fri Nov 08, 2024 2:53 pm
by Herr Dr. Professor
Thank you, zooma: "If you buy your Clark board from Andrew at HAYA he can supply it pre-loaded with the correct engine sound." I need to remember this: I have always had good experience with Andrew Haya (and my bloated tank collection of waiting tanks proves it

). I am also considering a Beier board. But at this point the whole question is moot, as I need to sweep up a small pile of money
after tax time and the coming new year.
Re: Amateur Build. HAYA Centurion KIT
Posted: Fri Nov 08, 2024 6:12 pm
by Ludwig von wigbearer
Herr Dr. Professor wrote: ↑Fri Nov 08, 2024 2:53 pm
Thank you, zooma: "If you buy your Clark board from Andrew at HAYA he can supply it pre-loaded with the correct engine sound." I need to remember this: I have always had good experience with Andrew Haya (and my bloated tank collection of waiting tanks proves it
). I am also considering a Beier board. But at this point the whole question is moot, as I need to sweep up a small pile of money
after tax time and the coming new year.
Bloated tank collection of waiting tanks,

that gave me a good laugh, it sums my collection
up exactly.
Regards John

Re: Amateur Build. HAYA Centurion KIT
Posted: Fri Nov 08, 2024 7:16 pm
by zooma
[/quote]
Bloated tank collection of waiting tanks,
that gave me a good laugh, it sums my collection
up exactly.
Regards John
[/quote]
I think it's an addiction!
Amateur Build. HAYA Centurion KIT. Reverse Polarity Plugs!
Posted: Fri Nov 08, 2024 7:32 pm
by zooma
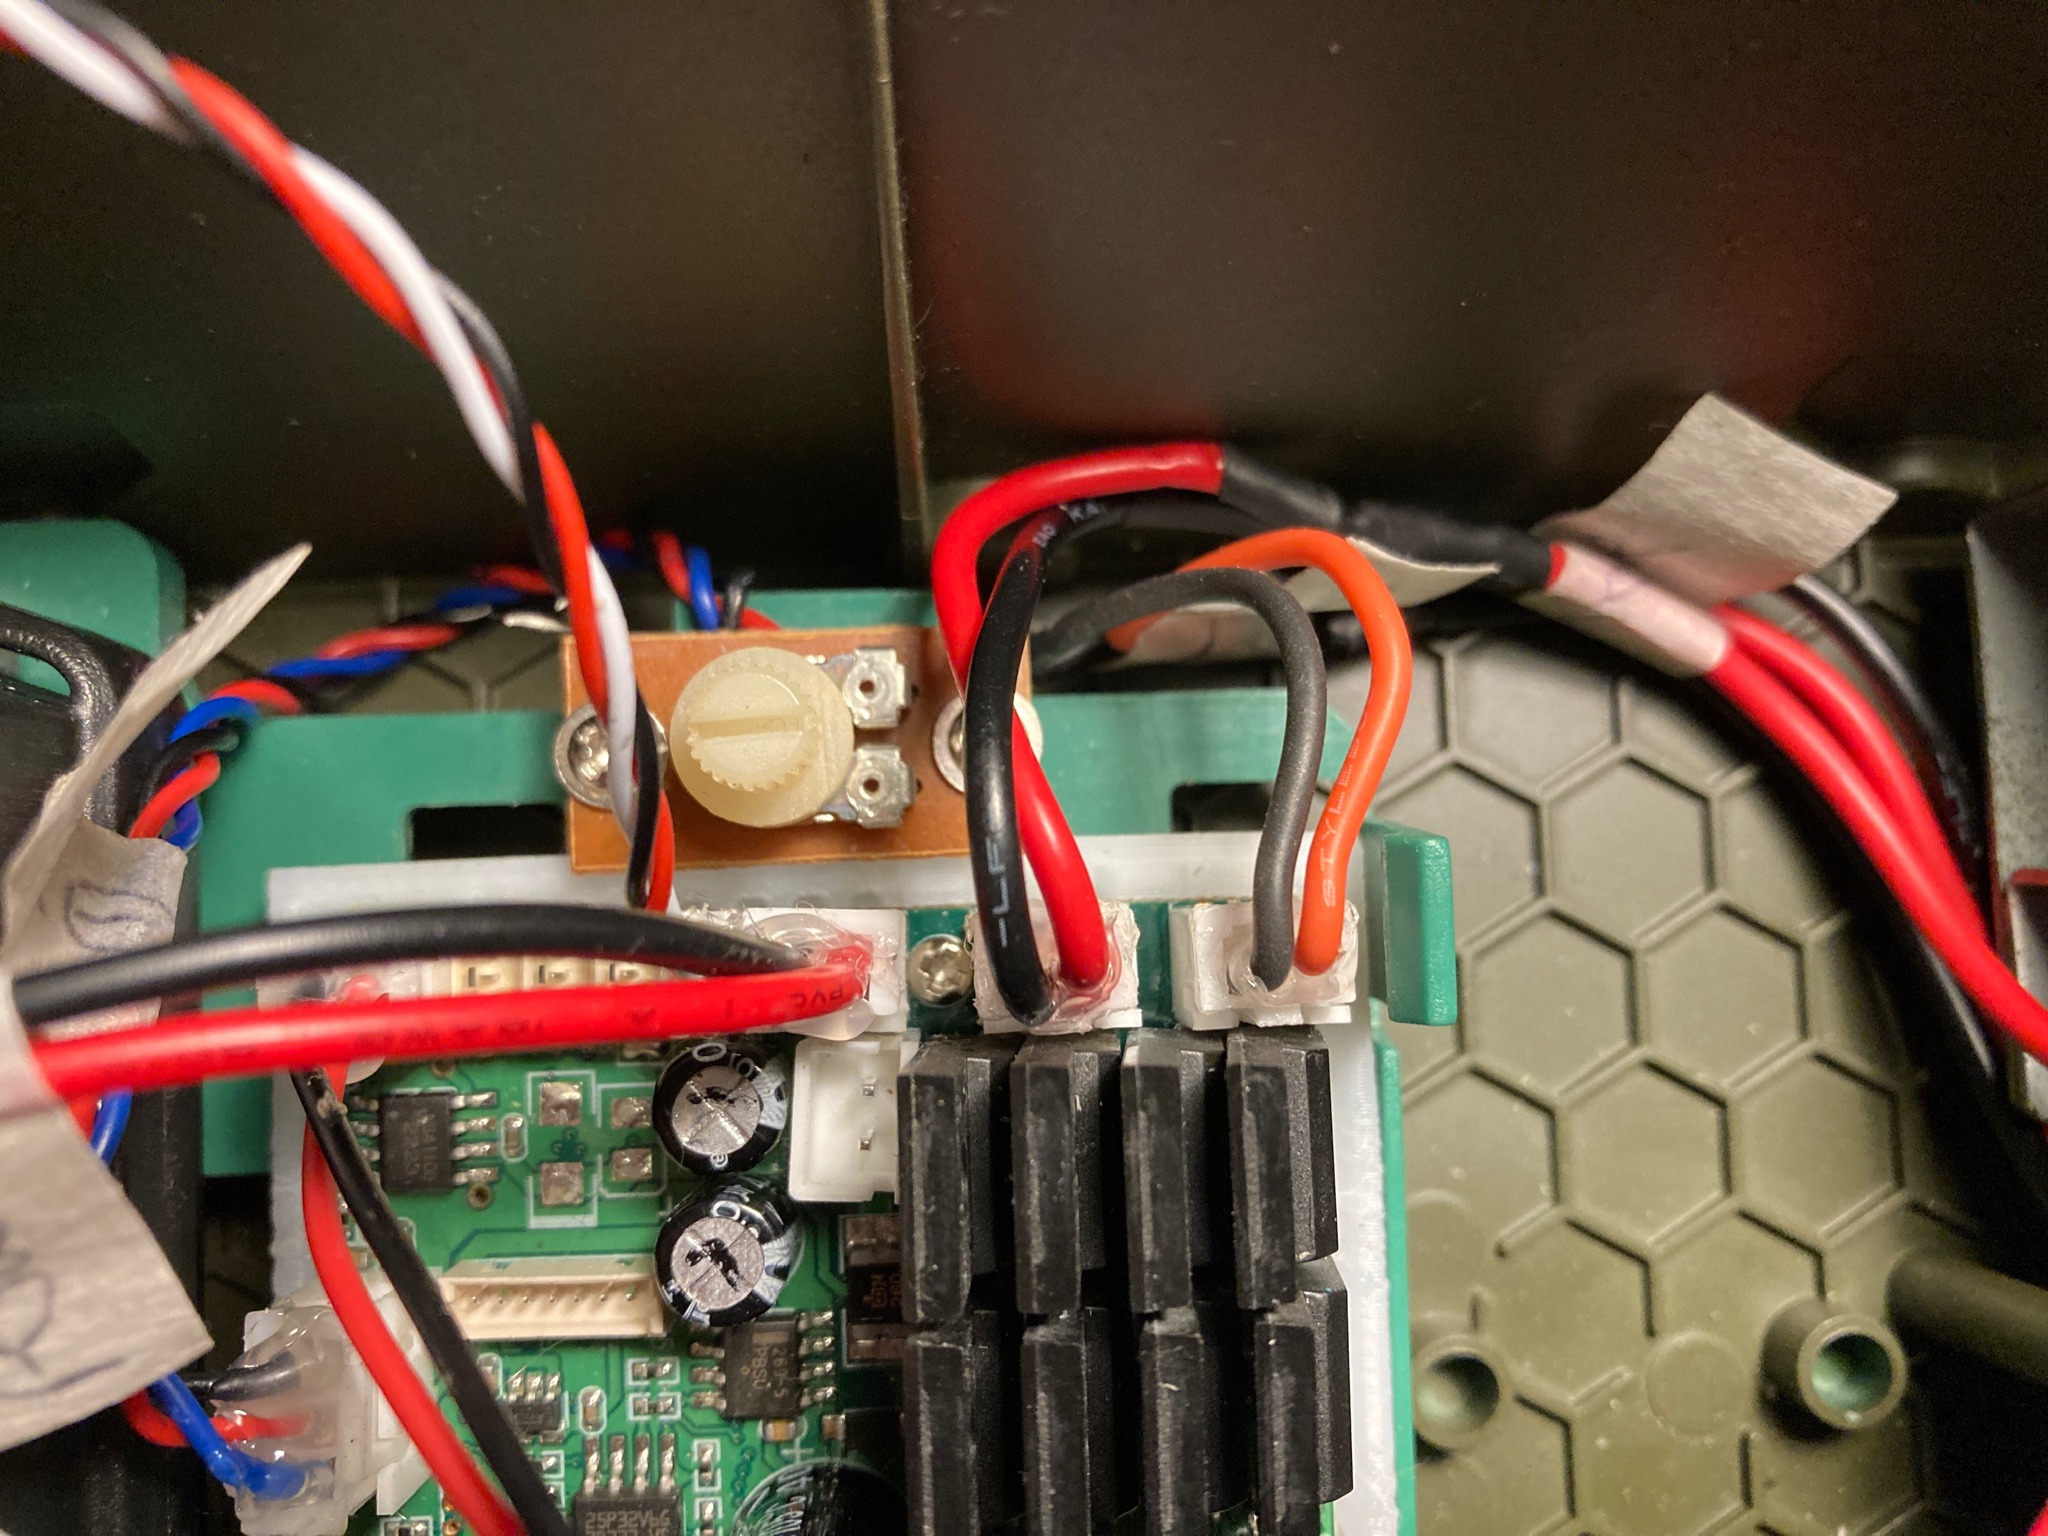
- Lucky I spotted these reverse polarity plugs before switching the power on !
- 3089AA4F-C6C2-401F-9461-958CD271135F.jpeg (740.38 KiB) Viewed 408 times
The motors and gearboxes were stripped out of my HATA Centurion KIT today to give me some access to solder on the new motor leads that I had just received in the post this morning.
I put everything back together and had also taken the time to put some hot-melt glue on the end of all the leads that would plug into the Clark board to strengthen them .
Unfortunately (when admiring my new neat and tidy installation), I noticed that the wires in the white plugs that fit into the Clark board were fitted the wrong way around!
The positive and negative wires had been inserted into the white connecting plugs the wrong way around !
Although I was gutted (second time in two days!) I was pleased that I noticed it as the reverse polarity could have caused me a much bigger problem if I had not spotted it before powering the system up again!
This has not been a good week for my HAYA Centurion KIT build - I was confident that I would have the tank running by this weekend and that I would be spending the next few days finishing it off and enjoying it!
As it is, I need to wait for the new mantlet parts to arrive and sort out another pair of motor leads.....and then strip the gearbox out of the hull again so I can solder and replace the motor leads (again!).
Can anyone let me know how to identify (by name or type) the white plugs that are used on the ends of the motor leads? If I can buy some of these plugs on their own I can make up my own leads when needed?