Page 14 of 14
Re: Panzer IV Ausf F1 to H Build
Posted: Sat Nov 21, 2015 9:22 pm
by philipat
So, how many pots did you need to cover the entire hull? Thinking about trying an airbrush approach.
Re: Panzer IV Ausf F1 to H Build
Posted: Sat Nov 21, 2015 11:54 pm
by KTRob
Hi Philipat, I used 3 cans of TS3 on the P4, I am currently working on a Leopard 2A6 and did the whole lower hull and wheels on 2.5 pots of tamiya acrylic through the airbrush. Each pot is 10ml, the cans are 100ml.
You have less control with a can and they do lay the paint on quite thick. I have a tamiya battery powered airbrush kit and its very controllable and preserves surface details better than the cans.
The cans cost about £7 in a local shop, the pots are £1.65. I think I would have used 2 cans to do the leopard hull and wheels so would have cost me about £14. As it is it cost £4ish.
I thin my paint with 99.9% alcohol off ebay, about £10 for 5ltrs.
I think I will use the airbrush more in the future, better result and cheaper too

Re: Panzer IV Ausf F1 to H Build
Posted: Sun Nov 22, 2015 1:35 am
by philipat
Cool...thanks. I used a can on my PzIII. Touch-ups with the pot had a slightly different hue. So, I'm thinking I'll use the pots and airbrush for the PzIV. Sounds like I'll get better and more efficient coverage as well as consistency in the hue.
Re: Panzer IV Ausf F1 to H Build
Posted: Sun Nov 22, 2015 4:12 am
by panzer man
KTRob wrote:Thanks Panzer Man, yes it was sprayed on direct from a Tamiya Can.
I just started using an airbrush to spray complete hulls, which seems to be a more economical way of doing it (the cans are quite pricey).
I have used Tamiya spray paints before & although pricey, they are a quality product. I always warm the can first using tap water & spray multiple light coats. Patience is the key. I think the basecoat color turned out well & looks very close to various pics of restored German armor & vehicles I have seen on the net. I think I'm going with the Tamiya spray for the basecoat & a airbrush for the camo. In 1/35 scale, Tamiya dark yellow would require lightening with the color white for scale effect but it looks right here on a larger scale model. Where did you get the retaining chains on your Panzer IVl? I need some like chains for my Tiger I.
Re: Panzer IV Ausf F1 to H Build
Posted: Sat Nov 28, 2015 11:09 pm
by KTRob
Hi Panzerman, the chains were made out of chain from one of those craft shops that sell stuff to make jewelry. I used thin wire looped through the end and glued into holes drilled into the hull so it wont fall off.
As you say the tamiya paints are very good quality. I have started restoring a leopard 2a6 and this is the first build where I have used an airbrush to do all the spraying.
Hope this helps
Re: Panzer IV Ausf F1 to H Build
Posted: Mon Nov 30, 2015 7:13 pm
by edpanzer
Looks the mutts nuts in the flesh nice job mate hope my p4 looks as good see you sunday
Re: Panzer IV Ausf F1 to H Build
Posted: Wed Dec 02, 2015 12:19 am
by KTRob
Thanks Ed, see you Sunday
Re: Panzer IV Ausf F1 to H Build
Posted: Sat Nov 26, 2016 8:37 am
by Aussie
PainlessWolf wrote:Herman,
*Orders you up a new pair of Cheaters* Look at the photo, you don't see the white band running across the tops of all of those and down the side of the outermost one? The cans in the front.
You need a good night's sleep, Sir and a rest for the eyes from the Octo patterning.
warm regards,
Painless
That's not a white stripe old son , it's a piece of timber threaded through the handles and sticking out the end.
Also , brilliant P4 blog with great pictures, very well done.
Re: Panzer IV Ausf F1 to H Build
Posted: Sat Nov 26, 2016 11:42 am
by Tiggr
KTRob wrote:
I'm about ready to call this one finished
:
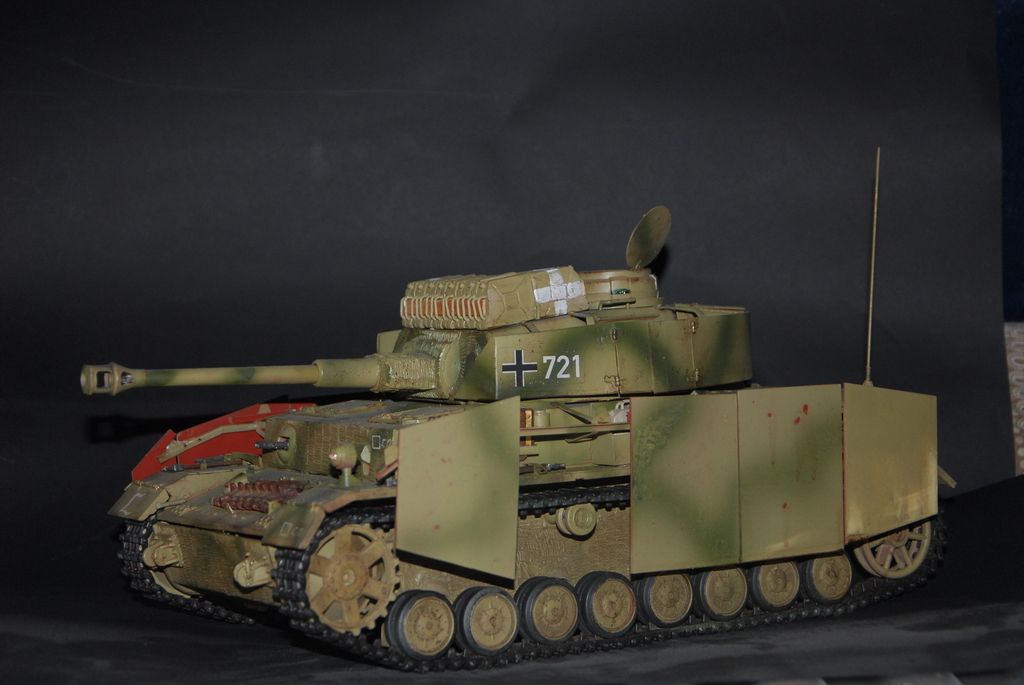
That is a great looking tank.
