wibblywobbly wrote:Its neither, it's printed as one set of five tracklinks, with the pins printed inside of the tracks, no assembly at all, just pull the assembly off the printer and they are like you see in the video. I can't even pull the links apart??
Wow so you could possibly print a full set right and left or am I wrong?
The problem is that a print bed won't allow a complete set to be printed in one run, so they would have to be printed say 10-12 at a time, and then joined with track pins. It could be done. The problem I have found is that because I am copying the design of PIII tracks there are some 'very' thin areas of plastic that are quite weak. If I get curious I will redesign the links to match the Comet ones and see if they are better.
The downside is that I could print a whole stack of these and fit them, and then find that they disintegrate when I run the tank. Bearing in mnd that £20 will probably buy me two sets of PIII or PIV tracks that will fit flawlessly, it is low on my list of priorities at the moment, but might be worth a go just to see if it works or not.
The pins aren't full length, they are really printed pre-clipped together, but the pin stubs are big enough and strong enough to stop them pulling apart. This also means that clipping two runs together is possible but might take a bit of either brute force, or designing the joints to make them easier to clip into each other.
And yes, the cleats and patterns need to be printed separately, otherwise there is a chore to remove support material. I tried a bed with the track links orientated in all directions, and no option would print a link neatly.
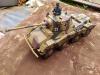
Got a bit more done, working on the turret now. Lots of small bits and pieces to go on there. I sprayed the upper hull grey to see what the finish was like, but gave it a going over with plastic weld beforehand to give it an old tank patina effect.
Attachments
IMG_20170308_190934.jpg (78.01 KiB) Viewed 4761 times
IMG_20170308_190949.jpg (77.3 KiB) Viewed 4761 times
IMG_20170308_191018.jpg (62.72 KiB) Viewed 4761 times
IMG_20170308_191034.jpg (50.48 KiB) Viewed 4761 times
Busy, busy, busy.....that's the turret done. Ran out of the white primer and grey undercoat that was giving a nice smooth surface, and discovered yesterday that the local DIY store has neither in stock...aaaargh!
Included a couple of pics next to a Tiger so that you can see how similar they are.
Attachments
IMG_20170310_084701.jpg (43.67 KiB) Viewed 4736 times
IMG_20170310_084725.jpg (52.43 KiB) Viewed 4736 times
IMG_20170310_084028.jpg (70.61 KiB) Viewed 4736 times
IMG_20170310_084114.jpg (60.86 KiB) Viewed 4736 times
Mr Wibbly I must admit I had no idea that this piece of armour was so big compared to the mighty Tiger! You have done an incredible job designing and building this masterpiece
Congrats on the build can't wait to see it finished
The design team originally wanted to upgun the Cromwell, but realised that the turret wasn't big enough, so they had to design a new turret...that was too big for the Cromwell hull, lol. Hence they had to extend the Cromwell hull lengthways and widthways slightly, but then the Cromwell engine wasn't powerful enough so they had to use a Meteor aircraft engine, at which point the tracks wouldn't stay on, so they had to fit return rollers...and bigger tracks. They then discovered that the wheels collected mud and threw the tracks, so these were redesigned, This is why it looks very similar to a Cromwell, but is really pretty much a completely new tank. Interestingly the Centurion is pretty much a redesigned Comet, and according to the member of a tank crew that I had a chat with whilst sat in a Challenger, the Challenger is based on the Centurion. he also told me that the Challenger couldn't do anything that a Tiger couldn't do, eg drive around and fire a big gun?? lol.
The gun that ended up in the Comet was used because it could fire tungsten shells, no explosive charge just solid metal that could penetrate thick armour. It was smaller than the 88mm but just as effective. It never saw real service, by the time they had built them and trained the crews, the advance across France was well underway, and the crews made good use of the road speed to trundle all the way to Berlin. They were used in the victory parade but there was a look of horror on the faces of the US and Brit commanders when the Russians sent a whole fleet of the huge IS3's thundering down the road. The allies had no idea that they existed.
There was a plan to manufacture a Comet with sloped armour and a bigger gun, but it never even got as far as the drawing board.
After reprinting the sprockets (twice - over two hours for each one) I am now happy that they are pretty close to the originals. I also did hubcaps for the sprockets, roadwheels and idlers, just the return rollers to do now. I will be glad when this tank is finally completed, it has been a rather long journey just to get this far.
Attachments
IMG_20170312_142351.jpg (80.12 KiB) Viewed 4696 times
IMG_20170312_142413.jpg (69.22 KiB) Viewed 4696 times
Wibbly all your hard work is paying off as evidenced in the photos. I have so much admiration for you fellas that go the extra mile to create these one off designs and watch you work through all the changes and updates as you go along. I'm very fortunate to have one of Alwyn's creations and I can say without a doubt when I get a chance to run it at a meet I will have a bit of extra pride and joy that it's a very unique and hand built piece!
It may have been a long road, but there will be a huge sense of satisfaction when it is finished. I predict that when you fire it up for the first time and it all works, a huge smile will spread across your face.
Richard
Tamiya Tiger 1, Taigen FlakPanzer IV,Torro M16 half-track, Tamiya Panther,WSN/Torro T34,Taigen M41 Bulldog,H/l/Taigen Sherman M4A3,H/L T90, Haya M3 Grant, Metal Origins 234/2 Puma, Nashorn by Alwyn. I was only going to have one tank - honest!
Well having discovered that neither of the local branches of B&Q have either the white primer or the matt dark grey in stock, I have had to respray everything in a different grey primer, that's almost £30 in sodding spray cans and it isn't even painted yet!
I re-did the return rollers which was a complete pain, I have no idea whether I was abducted by aliens who implanted false memories when I did the originals but they were totally the wrong design, ... and they didn't print very well. I had numerous attempts at printing the new design, tried both printers, must have printed about 30, and managed to get 10 that I could use. They are so small and so thin walled, I should use smaller allen bolts but I can't change them now as the mounts and hull have both been designed and drilled to take these.
Vallejo surface filler is on the way, so that will hopefully fill the 3D ridges, and give me that thick armour look, it brushes on neat or diluted, sets and can be sanded.
Attachments
IMG_20170314_224253.jpg (62.05 KiB) Viewed 4662 times
IMG_20170314_224253.jpg (62.05 KiB) Viewed 4662 times
IMG_20170314_224325.jpg (75.07 KiB) Viewed 4662 times
IMG_20170314_224344.jpg (69.49 KiB) Viewed 4662 times
IMG_20170314_224422.jpg (72.58 KiB) Viewed 4662 times