ALPHA
Heng Long Pershing Rebuild
Re: Heng Long Pershing Rebuild
You just love that fine drilling  ....I'll have to try that one day.............. one day
ALPHA
ALPHA
-
PainlessWolf

- Colonel
- Posts: 7863
- Joined: Sun Feb 26, 2012 9:09 pm
- Location: Southern Colorado Rocky Mountains
Re: Heng Long Pershing Rebuild
Alpha, it certainly helps to add fine detail. ;o) Last night's work was done around midnight so I waited til I was awake and cognizant again to add the few pictures from then. I'm hoping to find the other pair of metal road wheels in the Post today. Everything I needed will be here then. ;o) Pictures:
- Attachments
-
- Rear engine crane mount
- Rear engine crane mount.JPG (90.71 KiB) Viewed 3570 times
-
- A tip on drilling out the engine crane mounts
- A tip on drilling out the engine crane mounts.JPG (85.88 KiB) Viewed 3570 times
-
- In place. So easy to type, in reality, four episodes of looking for tiny parts on the floor before they went together.
- In place. So easy to type, in reality, four episodes of looking for tiny parts on the floor before they went together..JPG (72.53 KiB) Viewed 3570 times
-
- Loader hatch latch made out of half of a Tamiya .50 cal barrel lock base
- Loader hatch latch made out of half of a Tamiya .50 cal barrel lock base.JPG (80.98 KiB) Viewed 3570 times
...Money!? What's that!?...
Re: Heng Long Pershing Rebuild
Helps my eyes go wonkyPainlessWolf wrote:Alpha, it certainly helps to add fine detail.
ALPHA
-
PainlessWolf
- Colonel
- Posts: 7863
- Joined: Sun Feb 26, 2012 9:09 pm
- Location: Southern Colorado Rocky Mountains
Re: Heng Long Pershing Rebuild
Alpha, Take care of those eyes. Nothing great accomplished in the last couple of days. Been giving my eyes a break too. Will start again tomorrow with wiring the spot and assembling the canvas cover frame. After that, I can give the turret a break and move back to the lower hull. All the metal should be here by then. Pictures:
- Attachments
-
- Progress is slow but steady
-
- The turret detail is almost done.
-
- a working as original Loader's Hatch catch
- a working as original Loader's Hatch catch.JPG (85.15 KiB) Viewed 3547 times
...Money!? What's that!?...
-
PainlessWolf
- Colonel
- Posts: 7863
- Joined: Sun Feb 26, 2012 9:09 pm
- Location: Southern Colorado Rocky Mountains
Re: Heng Long Pershing Rebuild
Last of the Post came in today ( at least until I dream up something else that I think I need ) with two more metal road wheels, a steel helmet and attachment screws. Work this evening consisted of preparing the spot housing and wiring it up to work. I did a couple of other turret odds and ends then before calling it a night. Pictures:
- Attachments
-
- Drilled out the hasp for the Loader's Hatch
- Drilled out the hasp for the Loader's Hatch.JPG (82.89 KiB) Viewed 3534 times
-
- A brace for the side turret rack from plasticard
- A brace for the side turret rack from plasticard.JPG (95.68 KiB) Viewed 3534 times
-
- This required some sanding and gluing a Tamiya lens into place on a lengthened spot housing. I got the spacer by cutting off the front of a spare spot housing.
- This required some sanding and gluing a Tamiya lens into place on a lengthened spot housing. I got the spacer by cutting off the front of a spare spot housing..JPG (82.98 KiB) Viewed 3534 times
-
- Threaded a long 2 pin plug and wires beside the airgun and out the hole in the turret roof. A spot of solder and there was a working spot.
- Threaded a long 2 pin plug and wires beside the airgun and out the hole in the turret roof. A spot of solder and there was a working spot..JPG (92.96 KiB) Viewed 3534 times
-
- Painted the inside of the housing silver and let it dry
- Painted the inside of the housing silver and let it dry.JPG (80.04 KiB) Viewed 3534 times
-
- Drilled out the housing and a wiring access hole in the turret roof with a small carbide bit
- Drilled out the housing and a wiring access hole in the turret roof with a small carbide bit.JPG (86.76 KiB) Viewed 3534 times
-
- Taigen goodies sent from The Tank Army in OZ
...Money!? What's that!?...
Re: Heng Long Pershing Rebuild
I'm thinking you should change your name to Patient Wolf Painless...that's some tedious stuff you are doin
ALPHA
ALPHA
-
Jake79
- Warrant Officer 2nd Class
- Posts: 1062
- Joined: Mon Aug 11, 2014 9:10 pm
- Location: Essex,Colchester, UK
Re: Heng Long Pershing Rebuild
Lovely detail Painless... 
Tamiya: 2 King Tigers
H/L,Taigen :Initial Tiger 1, Panzer III, Kv 2, Panther G, Bulldog, Leo 2A6
H/L,Taigen :Initial Tiger 1, Panzer III, Kv 2, Panther G, Bulldog, Leo 2A6
-
PainlessWolf
- Colonel
- Posts: 7863
- Joined: Sun Feb 26, 2012 9:09 pm
- Location: Southern Colorado Rocky Mountains
Re: Heng Long Pershing Rebuild
Good Morning, Gentlemen,
Thank you, Alpha, Jake. ;o) The tiny detail is very satisfying once it is done and can be viewed from further than 2 inches away. The hand wringing and numerous opportunities to exercise my 'vocabulary' at the top of my lungs never fail to give meaning to my afternoons. ;o)
regards,
Painless
Thank you, Alpha, Jake. ;o) The tiny detail is very satisfying once it is done and can be viewed from further than 2 inches away. The hand wringing and numerous opportunities to exercise my 'vocabulary' at the top of my lungs never fail to give meaning to my afternoons. ;o)
regards,
Painless
...Money!? What's that!?...
-
PainlessWolf
- Colonel
- Posts: 7863
- Joined: Sun Feb 26, 2012 9:09 pm
- Location: Southern Colorado Rocky Mountains
Re: Heng Long Pershing Rebuild
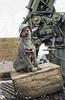
This evening saw the assembly of the mantlet canvas cover frame completed. I used 1/16 square brass strip and a pack of 2mm crimp beads to make a scratch version of the Schumo offering for the Pershing. It's not as elaborate or polished but am pretty pleased with it. The turret detailing is almost finished now. Just some loader hatch work and the Tamiya .50 cal left to do. Pictures:
- Attachments
-
- It's not Schumo but it's not too shabby.
- It's not Schumo but it's not too shabby..JPG (97.01 KiB) Viewed 3579 times
-
- Some sixty pieces of the beads were required
-
- 2mm steel crimp beads substituted for bolt heads and snaps
-
- Careful bending and roughening of the brass aided in matching and gluing it to the mantlet
-
- one sixteenth square brass strip measured and fitted
...Money!? What's that!?...
-
jackalope

- Lieutenant
- Posts: 3882
- Joined: Fri Jun 20, 2014 7:42 pm
- Location: Communist State of Maryland, United States.
Re: Heng Long Pershing Rebuild
Wow man the level of detail your doing is amazing! I swear I don't know where you guys come up with stuff, wish I did. 
