Hi Saxondog, I had seen your post before and liked the idea. I have plenty of Revell tins to use if I ever get the metal hatches but the main point of some of the mods like this one is seeing if it is possible for as little as possible.
What I wanted to ask you was are your hatches touching the deck when closed like the real Tiger?
Cheers,
Dave
Ambush Tiger #188
-
MarkofZollo
- Corporal
- Posts: 328
- Joined: Mon Jul 05, 2010 6:16 pm
- Location: Honiton, East Devon
Re: Ambush Tiger #188
There is always a fifth Sherman

Re: Ambush Tiger #188
They are very close,the inner circle rim of the hatch fits into the center of the two rolled edges of the Humbrol tins.This keeps the hatches stable,the have a very small gap, not quit resting on the deck. I did use the baking soda finish which raised the deck height slightly. Saxondog
- The hinge access allows the hinges to mount correctly to the hull yet still open.
- Humbrol paint tin hatches 002.JPG (246.58 KiB) Viewed 7344 times
- The hatches closed almost a perfect fit,nearly flush.
- Humbrol paint tin hatches 005.JPG (249.09 KiB) Viewed 7344 times
-
MarkofZollo
- Corporal
- Posts: 328
- Joined: Mon Jul 05, 2010 6:16 pm
- Location: Honiton, East Devon
Re: Ambush Tiger #188
That looks pretty cool. I would like to do that but the plastic origional hatches dont have that lip that the Humbrol tin fits into.
I edited the first post on here also 'cos I didnt say my hatch hinges came from a 1/24 Ford Explorer front door so yeah that mod was the price of a little glue and putty
Cheers
I edited the first post on here also 'cos I didnt say my hatch hinges came from a 1/24 Ford Explorer front door
Cheers
There is always a fifth Sherman
-
MarkofZollo
- Corporal
- Posts: 328
- Joined: Mon Jul 05, 2010 6:16 pm
- Location: Honiton, East Devon
Re: Ambush Tiger #188
Right, been fiddling last couple weeks trying to get Tiger looking a bit more realistic. Firstly I removed the turret escape hatch and seperated hatch from hinge, then drlled a hole through for a rod. Made the inner mechanism so it would lock in place;


it does actually lock in position, I can reach the slide through the loaders hatch.
Have produced tools from the sprue that comes with Jagdpanther, removed all handles and replaced with cocktail sticks, and shaped them to look more like real counterparts. Also made jacking block from balsa. Varnished them along with some barrel cleaner rods I had made (pic is before varnishing);

Ground off moulded tools and jack block, filled hole;

will repaint area.
There are a few other things that are not quite finished so will be shown later.
All for now Dave
Dave
it does actually lock in position, I can reach the slide through the loaders hatch.
Have produced tools from the sprue that comes with Jagdpanther, removed all handles and replaced with cocktail sticks, and shaped them to look more like real counterparts. Also made jacking block from balsa. Varnished them along with some barrel cleaner rods I had made (pic is before varnishing);
Ground off moulded tools and jack block, filled hole;
will repaint area.
There are a few other things that are not quite finished so will be shown later.
All for now
Last edited by MarkofZollo on Wed May 16, 2012 9:17 am, edited 1 time in total.
There is always a fifth Sherman
-
[ICE]monkey

- 2nd Lieutenant
- Posts: 2669
- Joined: Wed Sep 10, 2008 5:58 pm
- Location: pluckley ,ashford ,kent
Re: Ambush Tiger #188
very nice, love the tool handles
ice
ice
-
majordisastor

- Lance Corporal
- Posts: 208
- Joined: Fri Apr 23, 2010 5:24 pm
- Location: Llantrisant, South Wales
Re: Ambush Tiger #188
Nice work !! I alaways like posts like these where models are customised.
Its alwas good to see a model lifted to a higher standard. I agree those black and white pics really look the part
Its alwas good to see a model lifted to a higher standard. I agree those black and white pics really look the part
It always gets darkest before it goes completley black......
-
MarkofZollo
- Corporal
- Posts: 328
- Joined: Mon Jul 05, 2010 6:16 pm
- Location: Honiton, East Devon
Re: Ambush Tiger #188
Cheers guys  . Okay so after painting and varnishing all tools and jack block, I made the headlamp wires from some 1mm thick steel wire;
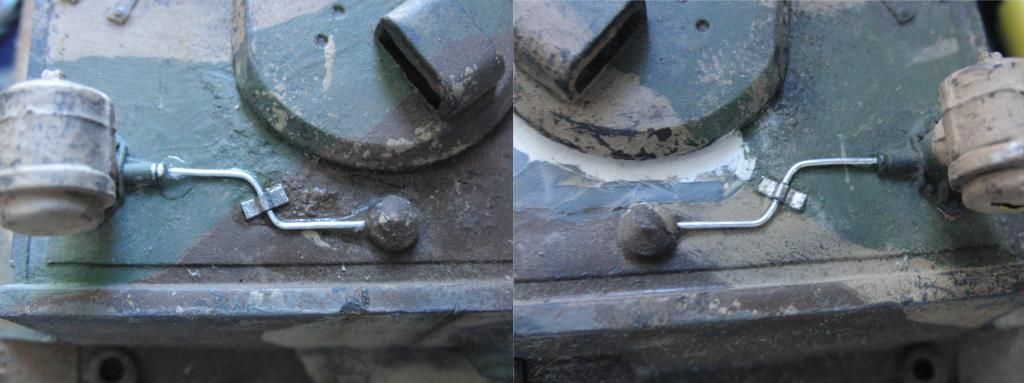
Last night I made all the attachments for the tools on the hull, made in a way they can still be removed, added those and painted the odd bits back to camo. Gave all wooden bits another coat of varnish but they still stand out a bit too much for me, maybe some weathering may help?
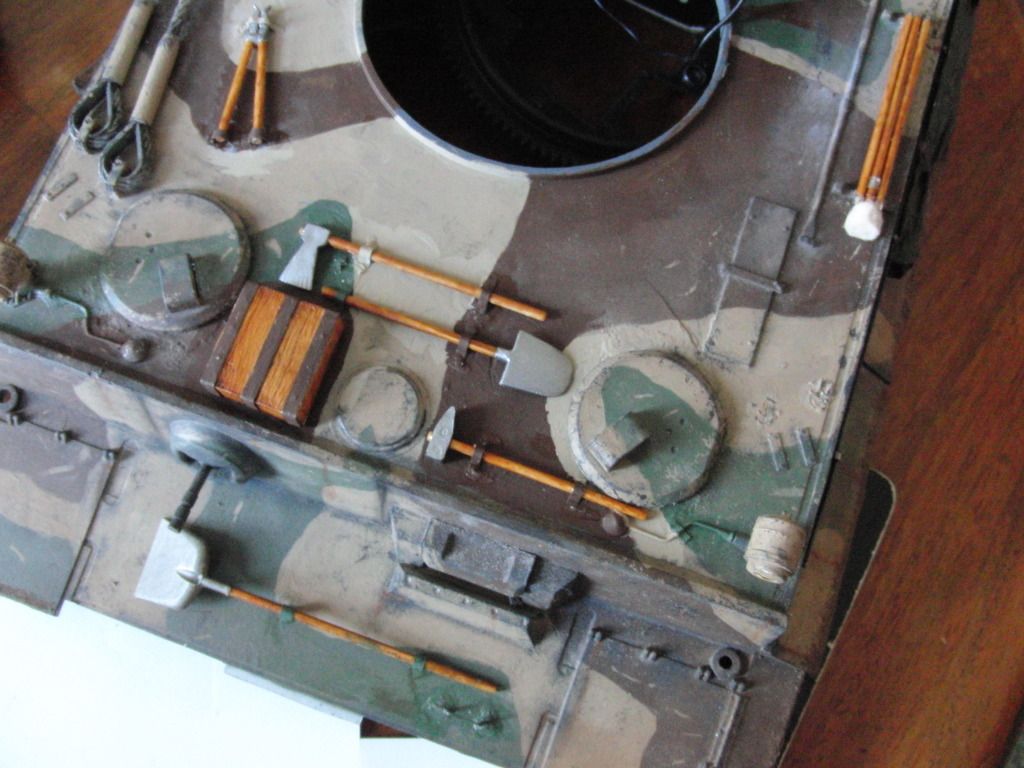
At bottom of that pic is one of the handles for climbing up onto the Tank, the foot bit is on the lower hull, as per some Tigers.
Been doing bits to turret too today, including the loaders periscope (made from scratch) and sorting the loaders and commanders hatch entries. Started work on the turret bins but not fineshed to show yet.
Im just going through a long list of things I want to sort on the tank but at a snails pace
Last edited by MarkofZollo on Thu Jan 01, 2015 6:32 pm, edited 2 times in total.
There is always a fifth Sherman
-
MarkofZollo
- Corporal
- Posts: 328
- Joined: Mon Jul 05, 2010 6:16 pm
- Location: Honiton, East Devon
Re: Ambush Tiger #188
Spent some time on the turret bin lids yesterday, removed the moulded ones first;
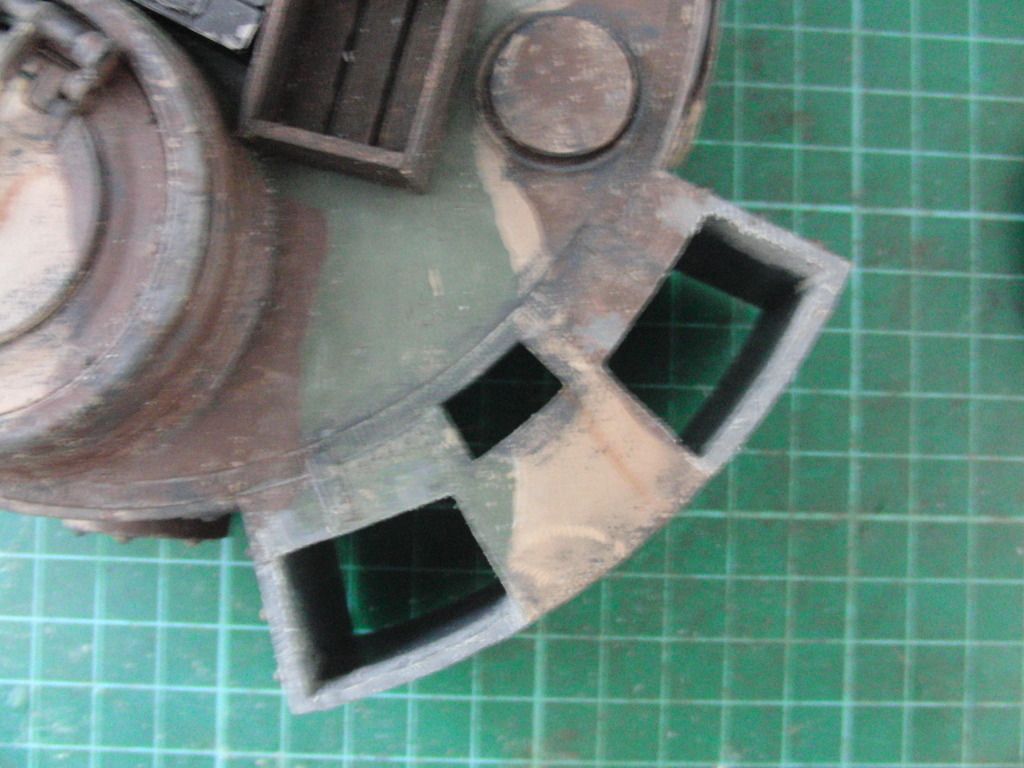
And made my own, flippin frustrating making the hinges!! I nearly gave up on it but when the first was done I thought it was ace, so persevered.
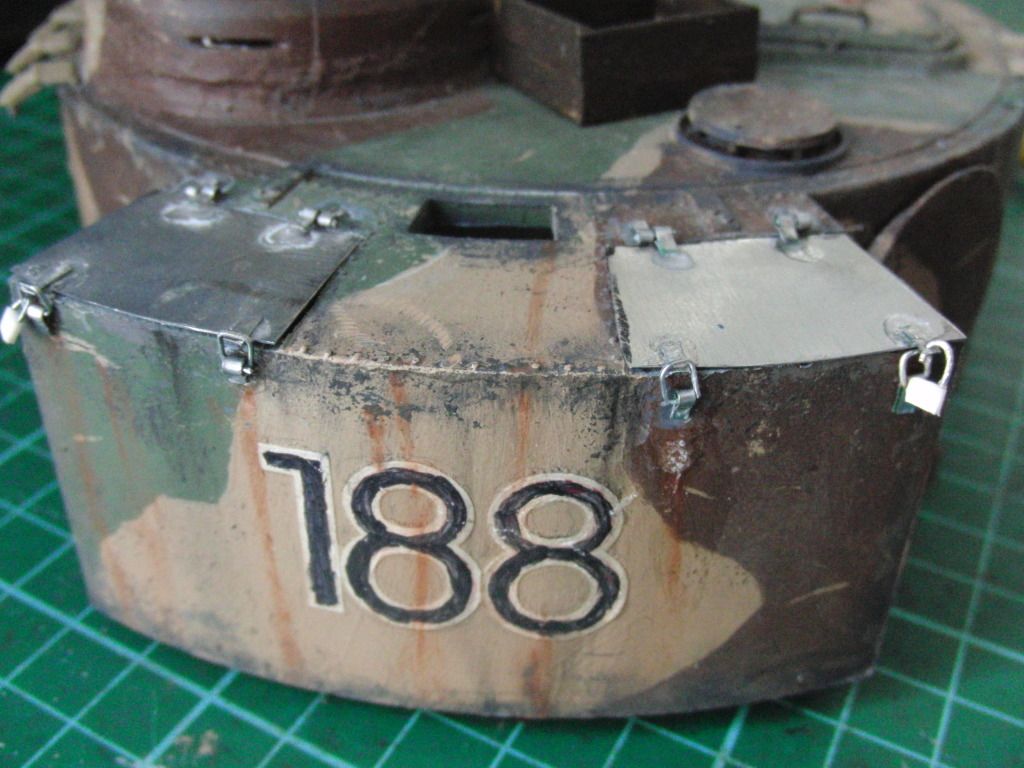
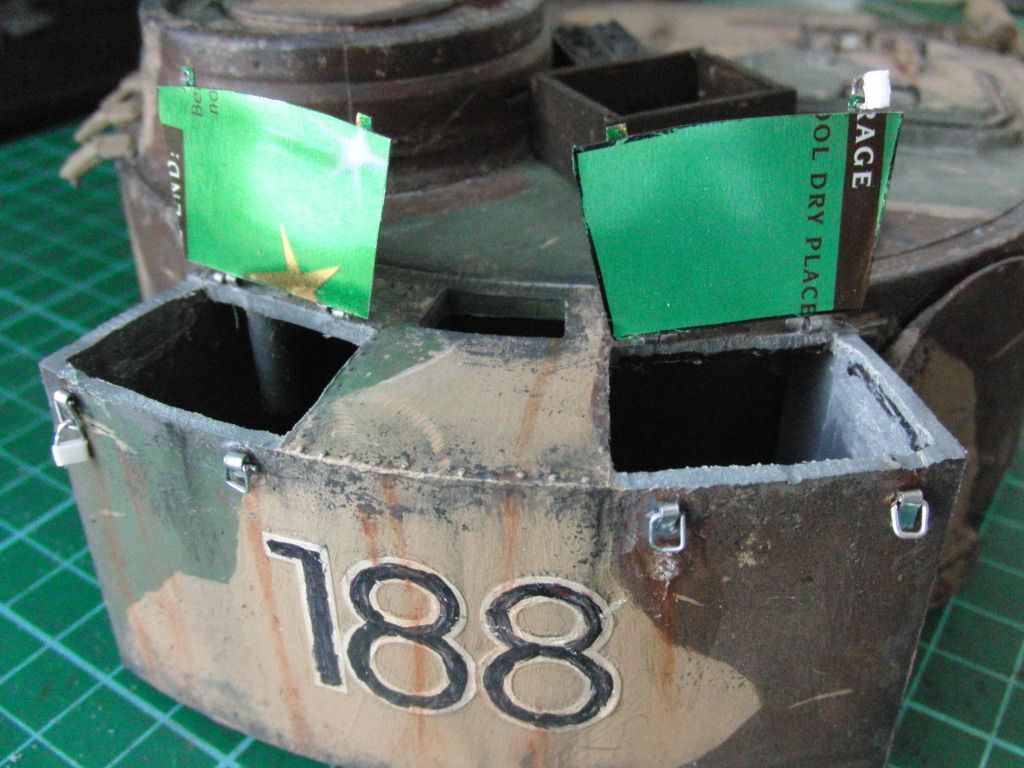
As you can see I got a little carried away with the usable holders and padlock bits, but I am pretty chuffed with the outcome, I almost dont want to paint over it
I also finished the loaders periscope, put some clear plasticard backed with foil in the reflector positions so it almost works lol
Still so much to do, hope I can have it finished by next weekend but wont hold my breath!!!
Last edited by MarkofZollo on Thu Jan 01, 2015 3:10 pm, edited 1 time in total.
There is always a fifth Sherman
-
MarkofZollo
- Corporal
- Posts: 328
- Joined: Mon Jul 05, 2010 6:16 pm
- Location: Honiton, East Devon
Re: Ambush Tiger #188
Naturally I didnt finish, spent four days of last week trying to adjust the ride height after installing the softer torsion bars. Very fiddly process and constantly messing up but settled with the first two sets and the last set of wheels on each side being a notch tighter (quarter turn of screwed anchor) than all others. May need to be a bit higher but will do for now I guess. Have also finalised a few bits and details here and there, plus spent a couple days trying to do the engine hatches but not finished also made a recharging switch. Will update with pics soon I hope but always seeing more I could do..........
There is always a fifth Sherman
-
MarkofZollo
- Corporal
- Posts: 328
- Joined: Mon Jul 05, 2010 6:16 pm
- Location: Honiton, East Devon
Re: Ambush Tiger #188
Updating images as they were spoiled by the upload site.
This build continues here;
viewtopic.php?f=22&t=9837
This build continues here;
viewtopic.php?f=22&t=9837
There is always a fifth Sherman
