1/10th Stridsvagn 103C
Re: 1/10th Stridsvagn 103C
I have been giving the suspension a lot of thought still not sure possibly Servos but hydraulics would be great
Tiger 1
Mowag Piranha 3C
Stridsvagen 103C
Mowag Piranha 3C
Stridsvagen 103C

Re: 1/10th Stridsvagn 103C
You could also use some kind of a lead screw connected to a motor and ESC to do the elevation. Connect the lead screw to the front wheels. It would give you both elevation and depression if you adjust it so the middle setting is in the middle of the lead screw.
Derek
Too many project builds to list...
Too many project builds to list...
Re: 1/10th Stridsvagn 103C
It’s been a while ,life got in the way again. I changed jobs and thought a Monday to Friday job would give me more time in the shed , I was wrong !
I have been able to get so,e real work done here and there. I am trying to make parts using the materials I have already. I was given a bout 30kg of metal off cuts , brass Ali and steel a few months ago and they have been put to good use on both the Tank, other projects and repairs on friends bits and bobs.
A few years ago I bought a big stab of Perspex from eBay. In every really used it for my boats. It has been very useful for some of the large detail parts.
Perspex machines quite well , although it does make a mess it can be can be polished back to glass clear.
Below are the exhaust, and the boxes mounted on the front of the hull. The right hand box contains the machine guns . My model just has the barrels mounted with no further internal detail.
Bit of a mess on the mill
The exhaust
Machine gun box
Hopefully the images are better quality, I’ve not found an image Resizer I like for the iPad as yet.
I have more pics of other parts and I have still not started on the wheels or given more thought to how the suspension will work.
I have been able to get so,e real work done here and there. I am trying to make parts using the materials I have already. I was given a bout 30kg of metal off cuts , brass Ali and steel a few months ago and they have been put to good use on both the Tank, other projects and repairs on friends bits and bobs.
A few years ago I bought a big stab of Perspex from eBay. In every really used it for my boats. It has been very useful for some of the large detail parts.
Perspex machines quite well , although it does make a mess it can be can be polished back to glass clear.
Below are the exhaust, and the boxes mounted on the front of the hull. The right hand box contains the machine guns . My model just has the barrels mounted with no further internal detail.
Bit of a mess on the mill
The exhaust
I have more pics of other parts and I have still not started on the wheels or given more thought to how the suspension will work.
Tiger 1
Mowag Piranha 3C
Stridsvagen 103C
Mowag Piranha 3C
Stridsvagen 103C
Re: 1/10th Stridsvagn 103C
Hello,
A few more interesting pics of some parts I have made so far.
I have reworked some of the, several times after seeing the quality of the other builds on here, very inspiring. Most of my modelling has been boats so far but getting very into tanks.
I have managed to get my wife to agree to a trip to Bovington next month too .
A lot of the items are just placed in position and are not fixed in place yet. I have filled the screw holes on the top shell and put a coat of primer on.
Bart
Tiger 1
Mowag Piranha 3C
Stridsvagen 103C
Mowag Piranha 3C
Stridsvagen 103C
Re: 1/10th Stridsvagn 103C
Hi,
Stunning brass work, this is going to be an exceptional model when completed.
Regards.
Sub.
Stunning brass work, this is going to be an exceptional model when completed.
Regards.
Sub.
-
HERMAN BIX

- Major-General
- Posts: 11943
- Joined: Sun Jan 12, 2014 12:15 am
- Location: Gold Coast,Australia
Re: 1/10th Stridsvagn 103C
Id almost like to see it NOT painted and completed !!
such a shame to hide that magnificent brass work under paint
How about a just a clear coat
such a shame to hide that magnificent brass work under paint
How about a just a clear coat
HL JAGDPANTHER,HL TIGER 1,HL PzIII MUNITIONSCHLEPPER, HL KT OCTOPUS,HL PANTHER ZU-FUSS,HL STuG III,HL T34/85 BEDSPRING,
HL PZIV MALTA,MATORRO JAGDTIGER,HL F05 TIGER,TAMIYA KT,HL PANTHERDOZER,HL EARLY PANTHER G,TAIGEN/RAMINATOR T34/76,
HL AN-BRI-RAM SU-85
HL PZIV MALTA,MATORRO JAGDTIGER,HL F05 TIGER,TAMIYA KT,HL PANTHERDOZER,HL EARLY PANTHER G,TAIGEN/RAMINATOR T34/76,
HL AN-BRI-RAM SU-85
-
Shagnifico
- Lance Corporal
- Posts: 137
- Joined: Sat May 22, 2021 1:03 am
Re: 1/10th Stridsvagn 103C
That is amazing! I envy your skill, and workshop.
Re: 1/10th Stridsvagn 103C
Thank you for your kind words,
The brass looks nice in contrast with the aluminium ,I don’t plan to do much more painting until the model is almost completed.
I wanted to fill the screw holes on the top shell and just see how well good the finish was. One benefit of brass and aluminium is that a few dents make it look realistic.
The brass looks nice in contrast with the aluminium ,I don’t plan to do much more painting until the model is almost completed.
I wanted to fill the screw holes on the top shell and just see how well good the finish was. One benefit of brass and aluminium is that a few dents make it look realistic.
Tiger 1
Mowag Piranha 3C
Stridsvagen 103C
Mowag Piranha 3C
Stridsvagen 103C
Re: 1/10th Stridsvagn 103C
It’s been a while since my last update, in my defence I did break my arm and it took a while to get full use of my right hand back.
Since then I have been making some good progress in the workshop an hour here and an hour there. It would also help if I had not changed my mind half way through building the suspension build.
I finalised my design for now. With the problem being that the suspension has to move but I also need to move the suspension in order to raise and lower the hull.
Hopefully this explanation makes sense. But the videos should help.
My solution is to have the road wheel arm being fixed to a shaft. This shaft has two arms in board . One of these arms is fixed to the shaft . The other floats on the shaft and between the two is a torsion spring, this gives the suspension movement when being driven.
To raise the suspension the floating arm is pushed this forces the torsion spring to push against the arm fixed to the shaft arm moving the road wheel arm. Releasing the pressure on the spring will lower the arm.
I found linear actuators on Ali express for quite a reasonable price. These do the pushing or pulling. In the video I only have two fitted actuators in the videos, but each side has two. The inner arms also need to move in an opposite direction the fore and aft most arms when lowering or raising.
Each suspension set needs a few components
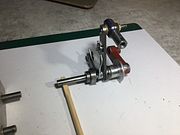
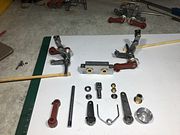
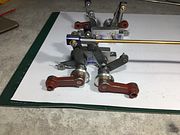
The arm that links the two arms has a threaded centre section , to enable the fixed arms to be set in position for track tension / preload.
Does any of that make sense ?
I have yet to fix the inner arms on the shaft and set the preload I want to get the hull near to its final weight , I may fine the springs are not good enough. They came from from some hand clamps I found in a local hardware store.
Since then I have been making some good progress in the workshop an hour here and an hour there. It would also help if I had not changed my mind half way through building the suspension build.
I finalised my design for now. With the problem being that the suspension has to move but I also need to move the suspension in order to raise and lower the hull.
Hopefully this explanation makes sense. But the videos should help.
My solution is to have the road wheel arm being fixed to a shaft. This shaft has two arms in board . One of these arms is fixed to the shaft . The other floats on the shaft and between the two is a torsion spring, this gives the suspension movement when being driven.
To raise the suspension the floating arm is pushed this forces the torsion spring to push against the arm fixed to the shaft arm moving the road wheel arm. Releasing the pressure on the spring will lower the arm.
I found linear actuators on Ali express for quite a reasonable price. These do the pushing or pulling. In the video I only have two fitted actuators in the videos, but each side has two. The inner arms also need to move in an opposite direction the fore and aft most arms when lowering or raising.
Each suspension set needs a few components
The arm that links the two arms has a threaded centre section , to enable the fixed arms to be set in position for track tension / preload.
Does any of that make sense ?
I have yet to fix the inner arms on the shaft and set the preload I want to get the hull near to its final weight , I may fine the springs are not good enough. They came from from some hand clamps I found in a local hardware store.
Last edited by Barthez on Thu Aug 07, 2025 10:47 pm, edited 1 time in total.
Tiger 1
Mowag Piranha 3C
Stridsvagen 103C
Mowag Piranha 3C
Stridsvagen 103C
