Heng Long M1A2 TUSK2 Abrams Metal Hull Build
Re: Heng Long M1A2 TUSK2 Abrams Metal Hull Build
I had been trying to get some of that mesh fence (O scale chain link fence off of eBay) to stick to the bustle rack with thin and thick CA glue and it just will not stick. Do you have any advice on how to make it work?

Re: Heng Long M1A2 TUSK2 Abrams Metal Hull Build
Yup...CA activator. Use something to hold it in place, spray it with the activator/kicker, and let it go. It will stick.
Derek
Too many project builds to list...
Too many project builds to list...
-
HERMAN BIX

- Lieutenant-General
- Posts: 12048
- Joined: Sun Jan 12, 2014 12:15 am
- Location: Gold Coast,Australia
Re: Heng Long M1A2 TUSK2 Abrams Metal Hull Build
Whats the 0-scale sizing ?
I have brass mesh which might work for the larger scale your Abrams is?
The brass stuff responds very well to super glue without activator.
I have brass mesh which might work for the larger scale your Abrams is?
The brass stuff responds very well to super glue without activator.
HL JAGDPANTHER,HL TIGER 1,HL PzIII MUNITIONSCHLEPPER, HL KT OCTOPUS,HL PANTHER ZU-FUSS,HL STuG III,HL T34/85 BEDSPRING,
HL PZIV MALTA,MATORRO JAGDTIGER,HL F05 TIGER,TAMIYA KT,HL PANTHERDOZER,HL EARLY PANTHER G,TAIGEN/RAMINATOR T34/76,
HL AN-BRI-RAM SU-85
HL PZIV MALTA,MATORRO JAGDTIGER,HL F05 TIGER,TAMIYA KT,HL PANTHERDOZER,HL EARLY PANTHER G,TAIGEN/RAMINATOR T34/76,
HL AN-BRI-RAM SU-85
Re: Heng Long M1A2 TUSK2 Abrams Metal Hull Build
This is what I was talking about for the 1/16 scale
https://www.ebay.com/itm/282823215994? ... media=COPY
So for my 1/8 Abrams I just went to Home Depot and bought some appropriate sized metal screen, the fit is so tight that I didn’t need to put any kind of adhesive with that.
Thanks for the advice about the CA activator!
https://www.ebay.com/itm/282823215994? ... media=COPY
So for my 1/8 Abrams I just went to Home Depot and bought some appropriate sized metal screen, the fit is so tight that I didn’t need to put any kind of adhesive with that.
Thanks for the advice about the CA activator!
Re: Heng Long M1A2 TUSK2 Abrams Metal Hull Build
Continuing the work on the Abrams...
I busted out the 3D printer and made some 6.3mm plugs for the mounting holes. I then cut them flush and sanded them to match the bottom contours.

And slapped some paint on it. I didn't care about completely hiding the plugs incase I ever have to remove them to replace a magnet. I think that's as good as the bottom is going to get. I just want to finish this project and the bottom won't be seen very much.

I got the barrel refit to the new metal recoil mechanism. I had to remove some material from the inner bore of the mantlet as this never had a recoil from the 2014 production date. I was going to install one of the Special Ops barrels, but it was going to be a pain to install so the original will have to do. See previous notes... I also installed the Taigen High Intensity LED. The LED is too big to fit through the metal recoil tube that holds the barrel so I cut the wires and soldered them back together rather than desoldering them from the PCB. I would've had to cut or remove the heatshrink from the PCB so cutting and soldering the wires after they were fed down the barrel was a much more expedient solution.

And the LED slightly protrudes from the end of the barrel. A little bit of Blutac holds it in place.

I replaced my home made bolts holding the spare wheel/sprocket in place with real brass hex head bolts.

I originally had the Armoured prints add-on turret TUSK bits mocked up, but since I ordered a TUSK 1 kit for my other Abrams, I decided that the HL bits were better looking. Been working on the gun shield for the Commander's .50 cal. Inserted some acrylic in the windows and some angle styrene to frame it in.

Also been adding "glass" to the Commander's add on armor. Used some real bolts so that I can remove the Commander's protection to reinsert the cupola "glass" after painting. Had to adjust the size of the window holes so that the thick windows could be fitted correctly.

Installing the "glass" in the loader's add-on protection. Still need to add the mesh behind the loader's glass that is facing forward.

I added the mud holes to the drive sprockets as the sprockets with the retaining rings don't have the mud holes installed. The sprockets are not the most accurate things in the world, but the ones with the rings are more reliable keeping the tracks on.

And finally some paint on the lower hull.

Next...wheel painting, finish the turret pieces, paint the turret, and whatever else I find.
That's all for now...
I busted out the 3D printer and made some 6.3mm plugs for the mounting holes. I then cut them flush and sanded them to match the bottom contours.
And slapped some paint on it. I didn't care about completely hiding the plugs incase I ever have to remove them to replace a magnet. I think that's as good as the bottom is going to get. I just want to finish this project and the bottom won't be seen very much.
I got the barrel refit to the new metal recoil mechanism. I had to remove some material from the inner bore of the mantlet as this never had a recoil from the 2014 production date. I was going to install one of the Special Ops barrels, but it was going to be a pain to install so the original will have to do. See previous notes...
And the LED slightly protrudes from the end of the barrel. A little bit of Blutac holds it in place.
I replaced my home made bolts holding the spare wheel/sprocket in place with real brass hex head bolts.
I originally had the Armoured prints add-on turret TUSK bits mocked up, but since I ordered a TUSK 1 kit for my other Abrams, I decided that the HL bits were better looking. Been working on the gun shield for the Commander's .50 cal. Inserted some acrylic in the windows and some angle styrene to frame it in.
Also been adding "glass" to the Commander's add on armor. Used some real bolts so that I can remove the Commander's protection to reinsert the cupola "glass" after painting. Had to adjust the size of the window holes so that the thick windows could be fitted correctly.
Installing the "glass" in the loader's add-on protection. Still need to add the mesh behind the loader's glass that is facing forward.
I added the mud holes to the drive sprockets as the sprockets with the retaining rings don't have the mud holes installed. The sprockets are not the most accurate things in the world, but the ones with the rings are more reliable keeping the tracks on.
And finally some paint on the lower hull.
Next...wheel painting, finish the turret pieces, paint the turret, and whatever else I find.
That's all for now...
Derek
Too many project builds to list...
Too many project builds to list...
Re: Heng Long M1A2 TUSK2 Abrams Metal Hull Build
Actually a lot of progress on the finishing work. I removed the spare wheel and sprocket for painting as I think those are going to be painted NATO green. You can also see that the anti-sniper .50 cal junction box and hardware was installed.

I finally replaced my homemade styrene bolts with brass bolts. The spares will be painted and reinstalled.

Had to delete the old junction hardware behind the doghouse to install the anti-sniper secondary junction. Since I had already scratch built the wire protectors going back to the BlueForce box in the rear of the turret and the protection for the smoke discharger, I cut the end of the metal piece off adapting it to my scratch building.

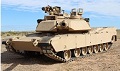
The turret isn't permanently attached and there are still some tan touchups that need to be done, but this is how she stands today. I was going to finish detailing my DUKE system in the turret basket, but then I remembered T-Rex made on in resin so I bought it and installed it instead. I found that they discontinued a lot of their Abrams products so if you are looking for T-Rex parts, get them now or they will be gone for good.


Been hoping to finish this project to a point where I can take it out to Fort Hood this next weekend as that's where they do a lot of Abrams training.
That's all for now...
I finally replaced my homemade styrene bolts with brass bolts. The spares will be painted and reinstalled.
Had to delete the old junction hardware behind the doghouse to install the anti-sniper secondary junction. Since I had already scratch built the wire protectors going back to the BlueForce box in the rear of the turret and the protection for the smoke discharger, I cut the end of the metal piece off adapting it to my scratch building.
The turret isn't permanently attached and there are still some tan touchups that need to be done, but this is how she stands today. I was going to finish detailing my DUKE system in the turret basket, but then I remembered T-Rex made on in resin so I bought it and installed it instead. I found that they discontinued a lot of their Abrams products so if you are looking for T-Rex parts, get them now or they will be gone for good.
Been hoping to finish this project to a point where I can take it out to Fort Hood this next weekend as that's where they do a lot of Abrams training.
That's all for now...
Derek
Too many project builds to list...
Too many project builds to list...
Re: Heng Long M1A2 TUSK2 Abrams Metal Hull Build
I'm actually getting excited now to paint. This is the most complete this tank has been in 11 years. Still lots of work to be done, but it's starting to come together.


Derek
Too many project builds to list...
Too many project builds to list...

Re: Heng Long M1A2 TUSK2 Abrams Metal Hull Build
She's really coming along. That's quite a bit of added detail. Love your work as always. I'm looking forward to your painting too 
"Charlie don't surf"- Lt. Col. Bill Kilgore
-
Meter rat
- Warrant Officer 1st Class
- Posts: 2073
- Joined: Wed Aug 05, 2020 7:33 pm
- Location: By the sea in Argyle and Bute
Re: Heng Long M1A2 TUSK2 Abrams Metal Hull Build
That is some detailed work.
You don’t get wiser as you get older. You just run out of stupid things to do.
-
Herr Dr. Professor

- Major
- Posts: 6262
- Joined: Mon Apr 22, 2019 10:48 pm
- Location: Southern Wisconsin USA
Re: Heng Long M1A2 TUSK2 Abrams Metal Hull Build
As always, Derek, I am watching and cheering. I have the upgrades, too, so someday I will get to them. Given your build here and the books I have, I should be able to tell what goes where. Well, I hope I will be able to tell... 

