Page 2 of 4
Re: Tiger 1 winter camo
Posted: Sat Jan 06, 2018 9:36 pm
by Alfa Three Five
Burger_Patrol1 wrote:Nice job on the on the winter camo....Looking Good

What method are you using for the weathering of the winter camo?
Hi, thanks for your comment.
First I get the tank the "original" camo, once dry (at least 24h) I sprayed 2 layers of satin varnish in order to protect the paint from the hairspray (some can be too strong and damage the paint) You can use also chipping fluids that you apply with an air brush. I prefer the hairspray as I'm old school but also a big can cost me about £1.5 only.
Once it is fully dried, I used hairspray followed by a coat of tamiya white. I did a kind of mapping with some areas with less paint. The tamiya is a good paint for the scratches or chips, I don't recommand you the Vallejo acrylics due to the composition they are more "flexible" meaning it will be harder to get the small chips or wear effects.
Tamiya paint like acrylics are very quick to dry that's why I m working by areas and I m not covering the entire model at once.
So once dry, I'm using a flat brush and tap water. The brush must be barely wet. With it I m passing on the areas where I want to get my chips. With vertical movements from top to bottom on the sides or inclines areas like the top of the turret or with circular movements like on the cupola. The same circular movements on the most used areas like on top where the crews are passing or climbing.
Depending on the effect you want to achive, from less chips to an almost "washed" aspect you will use less or more water. More water or more movements you are doing more paint will be removed.
If you want I can make a quick tutorial about it too.
Re: Tiger 1 winter camo
Posted: Sat Jan 06, 2018 9:41 pm
by Alfa Three Five
Another thing is this is just the beginning: painted chips, rainmarks, washes, filters or various streaks will be used later on.
This technique can be used for other camo not just for the white one.
For the vehicles used in the desert too. The paint, due to the wind and the sand, will reveal the previous layer of paint. We can see that with the Afrika Korps tanks or like the tanks and vehicles normaly painted in NATO colours having a light desert tone painted over it used in Irak or Afghanistan.
Re: Tiger 1 winter camo
Posted: Sun Jan 07, 2018 4:47 pm
by Burger_Patrol1
Alfa Three Five wrote:Another thing is this is just the beginning: painted chips, rainmarks, washes, filters or various streaks will be used later on.
This technique can be used for other camo not just for the white one.
For the vehicles used in the desert too. The paint, due to the wind and the sand, will reveal the previous layer of paint. We can see that with the Afrika Korps tanks or like the tanks and vehicles normaly painted in NATO colours having a light desert tone painted over it used in Irak or Afghanistan.
Thanks for the in depth explanation...Alfa Three Five....Its very inspiring
and I would like to produce this type of Snow Camo results possibly on a future build. I will be following your post,

excited to see the steps and end end results!!!

Have a great Sunday!!!
Re: Tiger 1 winter camo
Posted: Sun Jan 07, 2018 4:53 pm
by Ad Lav
Very nice - I do like a good white washed tank!
Re: Tiger 1 winter camo
Posted: Sat Jan 13, 2018 8:22 pm
by Alfa Three Five
Re: Tiger 1 winter camo
Posted: Sat Jan 13, 2018 8:31 pm
by c.rainford73
Alfa just brilliant work my friend

You are a very talented painter!
Re: Tiger 1 winter camo
Posted: Sun Jan 14, 2018 11:48 am
by HERMAN BIX
I like the white wash finish using hairspray.
Its fairly easy to do and results can be decided by your own self depending on how worn you want the finish to look.
Using common sense to apply areas of extra grubbiness where foot traffic and high use areas would be is also gratifying.
Nice work Mr A.3-5
Re: Tiger 1 winter camo
Posted: Mon Jan 15, 2018 7:50 am
by Alfa Three Five
HERMAN BIX wrote:I like the white wash finish using hairspray.
Its fairly easy to do and results can be decided by your own self depending on how worn you want the finish to look.
Using common sense to apply areas of extra grubbiness where foot traffic and high use areas would be is also gratifying.
Nice work Mr A.3-5
Thank you.
Few tips:
I'm working one area at a time so the hairspray isn't too dry so it's facilitate the chipping.
I'm not using only tap water but a ''wash''. I've got various recipients with water to clean my brushes when I'm using acrylic paint. One for the dark yellow, another for the darker colours like green or black and finally I'm not throwing the tainted water. I let the paint settle the bottom over night. On the next day, I'm removing the excess of water and my wash is ready. I'm using an old Tamiya bottle to store them, when I need it, I've only to shake the bottle before use.
Re: Tiger 1 winter camo
Posted: Mon Jan 15, 2018 7:56 am
by Alfa Three Five
The hupper hull wash is done now and I'm starting the bare metal scratches.
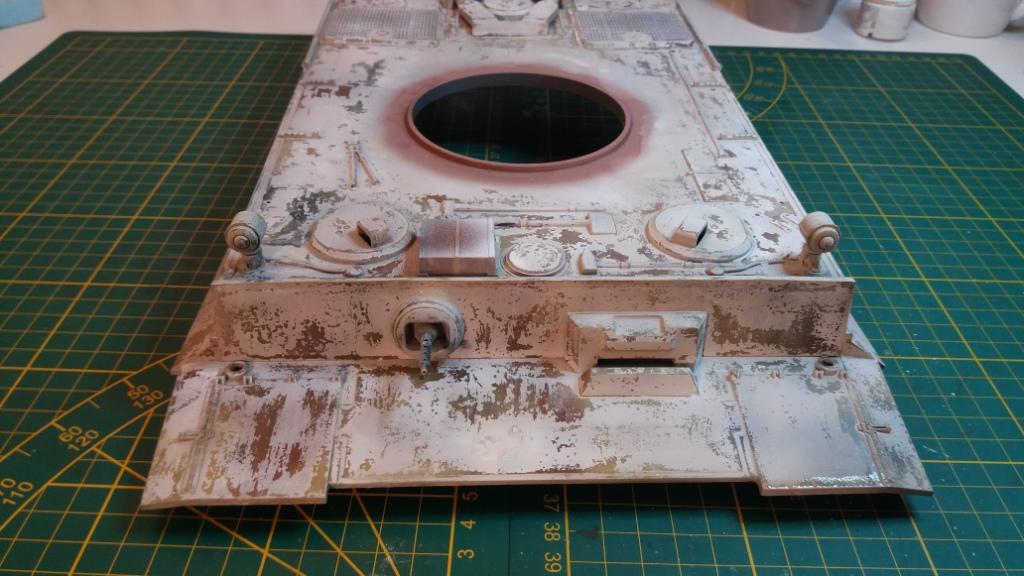
- 20180111_131739.jpg (97.27 KiB) Viewed 4895 times
Re: Tiger 1 winter camo
Posted: Mon Jan 15, 2018 8:00 am
by Alfa Three Five
Here are my home made smoke pots for the smoke dischargers:
Using a piece of plastic, heated and then pressed on a flat surface, a small hole drilled in the middle and painted in dark yellow.
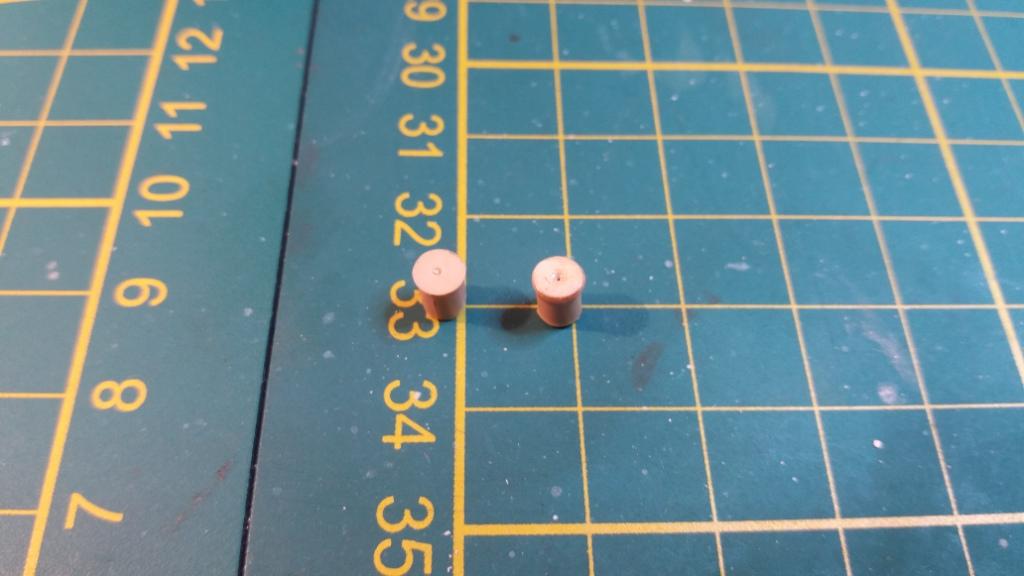
- 20180110_215047.jpg (65.38 KiB) Viewed 4894 times
And the result:
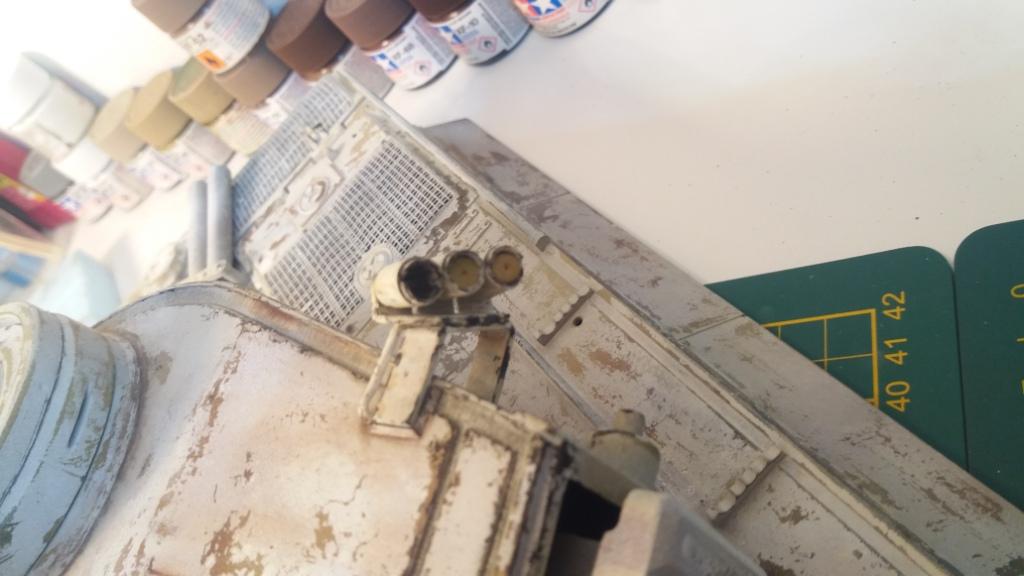
- 20180112_133446.jpg (66.5 KiB) Viewed 4894 times