Thanks Alpha,more to come.Getting settled into a better shop,I hope? Least I now have heat and A/C better lights,better all around shop for Large scale. Leaving my small Patio shop for detailing work,and the 1/16 scale tanks.
Just been a long road guys. Long road.
One more Goal to clear, the ARMORTEK EXPERIENCE, no not a Tank kit but a set of Armortek tracks and sprockets now several years in the box(Thanks John) and many Tiger parts (Thanks Mike) to build the ultimate Tiger S13 Early version.
But first lets finish the Jagdpanther hey.


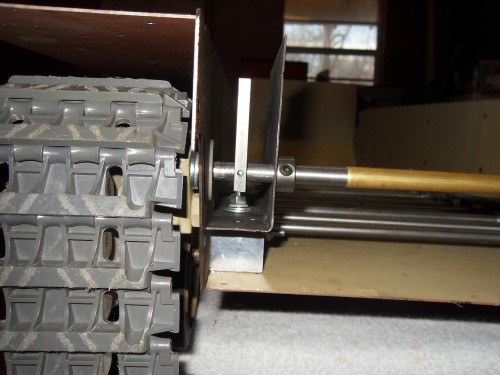
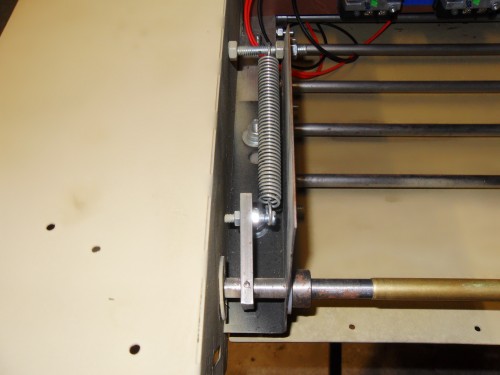
- Machined Parts for drive and tension assembly. The tension assembly uses roll pins and simple fulcrum lever technology. I measure spring tension with a tension scale to find the point at which the track pins/clevis sections fractured,then applying levers of the same length so they balance out the effect of movement I was able to tune the tension system to always relieve pressure before track damage. This problem was causing some to break the FOA Tracks . They determined the tracks were to weak. So this solution of applying basic engineering principles to solve the problem worked,and to some degree vindicated my view of an engineered approach. Lets just say the smarter guys lost. wasting a year and much money applying ever increasing tension to solve the problem. And breaking tracks ,tracks and more tracks. BTW,The scale a simple tension scale,sometimes used in Tennessee to weigh FISH! Ok I used a slightly better version at the campus lab,but same principle. Obviously from my fast and furious video it worked.

- Tension lever,support bracket and shaft. The twin rail suspension system mounting bolts also retain the tension bracket.Simple yet effective solutions.

- Tension assembly,simple yet effective solution to variable track pressure caused by terrain changes.The shaft mounts in to a small flange bearing same as the wheel bearings. once inserted the shaft has a set collar which slides against a thrush washer press fitting the bearing in place.The Rail mounted bracket uses a set collar to further lock the assembly in place.The shaft can freely pivot,but is retained by the collars from side to side movement,This also provides rear hull strength against flexing.Once the back plate is attacked the strength exceeds the tension wheels torque having negative effect on the pitch or angle of the wheel. Bottom line ,no thrown tracks.The shafts meet in the hull center,and are held in position by a brass sleeve. This allows each side independant rotation.

- Lower bearing support plate,this plate will support a range of narrow housing pillow block bearings. The Glacis clearance to shaft center less than .75" with a .50 shaft. Basically every German med/heavy tank.The twin rails again allowing a secure mounting,and creating a strength which allows large scale motor mounting,easy adjustment and by using longer bolts here and nuts to secure the first plate,a second plate mounts above which is slotted,allowing for easy drive chain adjustment.

- Outer shaft bearing,now I have since moved these inside, I chose these over the smaller bearings because this is the weak point of the drive.The larger flange creates a wider area mounting to absorb the torque of the drive sprockets. Some believed shaft flex was an issue,By using a simple bead of plasticard gauge material secured at this point I was able to gauge the metal flexing in this area. The solution others chose hardened drive shafts and larger diameter shafts actually increased the flex of the round type insert bearings. The flange remove the flex and created a rigid strength. By mounting the bearings inside the outer hull Hub covers can be used and will not crack or distort once mounted as these are resin pieces of the original FOA Kit.

- Drive mounting before adjustment

- Battery box and airtank mounting. Also structual bulkhead supports. completing the rigid strength of the lower hull. Again using the twin rails as a foundation. padding and rubber seals complete the enclosures features.

- Component brace panel. This allows access through the engine hatch,the velcro makes a great shock absorbent material and allows component removal in the field.wiring is protected from chaffing by rubber conduit guides.later I will add flexible conduit material.

- Remember my super smokers,formally sold by RCTANKWARS? Ok I admit possibly some hand in that adventure,sure miss Phil.God guy,Patriot who served this Nation as a Marine. R.I.P
Well hey I had to go bigger as well.

- The large scale version at idle,note the damage from the video? Yes I crashed ,last 7 seconds I hit a car just off screen. Smokers will be back on the market by Christmas guys.After Phil died I just stopped making them for a while.One member has though improved on the 1/16 scale version and sells them on his site.
Another marine many of you know. I got a thing for Marines.LOL

- Rear deck coming together ,and then I wreck it and have to repair the damage.
I am changing the drive to the FOA-Tanks drive,with my 17 tooth sprocket design and Loic's hubs and excellent detailed metal sprocket bolt rings and shaft covers.
The drive will give me more torque,yet slower speeds. with the 250watt no reduction motors the tank hit the car at, well a good 15+mph and survived pretty darn well, just do not ask the storage box to second that statement. removed ,hammered flat and reshaped the part looks fine now.

- Nice shot of my shoes, and the new 1/6th scale Super Smoker design. These units work very well,are proportional and run on fogger fluid just like the 1/16 scale version.
Dual feed or single feed in three sizes and voltage ranges of 12-24vdc. Refillable from a small hidden tube using a syringe like the original units.
Run times vary,and hopefully a marine friend will have some good news about a special control device and an auto shut off feature when fluid is low. I shall post an announcement when these are available,where to buy etc.
The exhaust system is made from obviously PVC. For the Jagdpanther these seems almost a perfect scale exhaust. Once painted and weathered the appearance is very good.
Even though simple solutions these parts still had to be found ,cataloged,and purchased.The metal hull designed in the flat in 2d autocad,sent to the laser cutter and cut,then the rails had to first be designed and sketched in autocad 2d.Sent to a machine shop for manufacture,materials purchased and all the hardware determined and purchased. I have a very detailed list with the instructions on where and what exactly to purchase.
The competition having more money obviously would have benefited from my work. So I have remained silent. Recently I conceded,and joined forces. We shall see if this relationship benefits the Hobby as I hope.
Seeing the dream of large scale armor offered on the market at lower prices as a basic armor kit??
Mobility first,detailed features second. With many optional component packages the limits of creativity are only restrained by the wife's grip on the purse.


Special thanks to Dietrich my partner for many months,hard times and terrible events. We never stopped trying to achieve our goal,we simply did not realize how completely foolish some people could be, or how others could be so deceitful simply because they lacked the inventive nature to resolve basic engineering problems. And would rather waste years of fruitless effort than to simply say I do not know how to do that......
And for the record,I'm not a bright guys,massive head injury at a young age. So if this can crawl from my brain, then certainly anyone who applies themselves and is not afraid to ask questions or admit they are not all knowing can build a 1/6th scale kit.
The only limit being you.And the purse. More to follow. And an announcement as well,will know tomorrow.cheers Blake