once upon a time I got a Torro-Tiger I. It is a used one coming without electronics.
The mechanical parts were still existing.
The missing electronic system was not a problem. I wanted to use Elmod anyway.
Well, lets start the details.
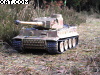
This was the cat before starting the work:

Here you can see my Elmod combined with an EGS in a clip-on-box. The advantage is it can be used in different vehicles. So I only need one Elmod and many vehicles with standardized plugs.

To mount the box to the Tiger, I had to empty the vehicle. I mounted a base plate to the chassis to get a flat ground. Because I used a 5mm thick plate, I also reinforced the chassis. The other reason for mounting the plate was to raise the bottom, because the box is a little to big to fit between the suspensions.

As you can see, I already prepared the gearbox with the standardized plugs.
To get a good chassis bottom without any disturbing openings, I screwed/glued a 1mm thick Poly-plate to it.

I also had to use another loudspeaker. This one is mounted in the back of the Tiger in front of the battery. Therefore it can fix the battery. That one fits perfectly between the two fittings of the rear.

That is how the chassis looks completely assembled. Of course, it is not finished yet, but working.

Now, lets continue with the upper hull.
I removed all disturbing parts. The headlight and the turret rotating device are prepared with the standardized plugs.

I moved the antenna to the right position.

Further changes will follow after everything is working properly.
The most difficult part yet is the turret section.
I wanted to use the HL-barrel-recoil-system, because the original installed one has got the wrong function. Slow in and fast out.


First I removed all disturbing parts. I have to design new fittings anyway.

To make the ups and downs possible, I had to connect the lever to the barrel.

The disturbing parts of the mounting pin had to be removed.

I also had to shorten the back part of the barrel (see red mark).

Now I had to create a new mounting area for the recoil unit. I need 10mm of thickness. To make the unit removable, I had to use two plates 5mm. One half must be glued to the turret roof, the other half to the recoil unit. Now you can screw them together.


The recoil unit now is positioned directly behind the barrel fitting.

And again, I have to prepare the wiring for the box. To make sure the wires are centered to the turrets rotation point, I designed a cable guide.


Then the recoil unit needed a rewiring. After the function was tested, it was mounted, fixed to the barrel and connected to the box.

Before closing the turret, I wanted to add the missing third turret lifting point. I used the head of a nail to simulate the lifting point.

I drilled a hole to the small box in the storage box and glued the nails head to it.


Well, now I can connect the turret.

Report continues.
Greetings
Birger


