First i rotated the copula and put in the gun barrel extension.
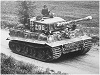
My First Tiger Build
My First Tiger Build
I decided to share my first build and post pictures of the progress.
First i rotated the copula and put in the gun barrel extension. The next step was to get rid of those pesky cheap looking tools and the two front hatches as i plan to put working ones in. I managed to cut them off mostly with a scalpel knife. I decided to leave the storage box as i will detail it later and make some additions to it. I filled the rough parts, covered the lights as i wanted to use the existing ones instead of ordering replacements. I also covered the hole for where the antenna was as i am relocating it to the correct position. Now it was time for the fun stuff. I started working on the extras and detailing. First i added handles to the copula and painted it on the inside. Here are my new front hatches which i detailed and attached periscopes. Now i can't take credit for painting the tools as my GF did that and i have to say that they turned out great especially the fire extinguisher. (they look shiny on the picture but they are not). I plan to attach a 200L oil drum to my tiger but i couldn't justify paying 15quid for one so decided one will have to be made. I filled it with liquid for that extra effect. Right now its black but i will weather and detail it later. I also thought that the rear stowage suitcase looked pretty basic so my GF detailed it by putting clamps on and a padlock, again further detailing will be done at the end. I made my own metal cable and will also make the two tow cables out of metal later.
First i rotated the copula and put in the gun barrel extension. The next step was to get rid of those pesky cheap looking tools and the two front hatches as i plan to put working ones in. I managed to cut them off mostly with a scalpel knife. I decided to leave the storage box as i will detail it later and make some additions to it. I filled the rough parts, covered the lights as i wanted to use the existing ones instead of ordering replacements. I also covered the hole for where the antenna was as i am relocating it to the correct position. Now it was time for the fun stuff. I started working on the extras and detailing. First i added handles to the copula and painted it on the inside. Here are my new front hatches which i detailed and attached periscopes. Now i can't take credit for painting the tools as my GF did that and i have to say that they turned out great especially the fire extinguisher. (they look shiny on the picture but they are not). I plan to attach a 200L oil drum to my tiger but i couldn't justify paying 15quid for one so decided one will have to be made. I filled it with liquid for that extra effect. Right now its black but i will weather and detail it later. I also thought that the rear stowage suitcase looked pretty basic so my GF detailed it by putting clamps on and a padlock, again further detailing will be done at the end. I made my own metal cable and will also make the two tow cables out of metal later.

Re: My First Tiger Build
Welcome and Nice work,seems well in hand,you might consider reviewing the tips and tricks section.You can use KITE STRING for cutting the plastic yet leave a smother edge and is easier on cutting circles or difficult shapes. You are off to a good start.
Saxondog
Saxondog
My First Tiger Build
Next was the weld detailing. I thought that i would add a bit more realism to the model.
Further weld detailing, you can also see the cable that i added to the light in the background.
I also put metal screws on the front fenders. They are a little bit bigger than i hoped but i still think that they are a nice addition.
Even though it will be hard to see once the wheels and tracks are back on i figured that i couldn't hurt to put a bit of texture in there.
It was also time to rough up the side skirts and the exhaust. I guess that i forgot to mention that i added the engine grills and primed them for later.
I have to say that i did not do much on the inside of the tank. So far i just got rid of the cheap MG and attached one with a high intensity LED. I also upgraded the speaker and i am extremely glad that i did because it sounds so much deeper then the standard HL speaker. I wanted to fit something considerably bigger so i had to move the receiver board and move the smoker system a little forward.
.
In the next couple of days i plan to finally paint my Tiger and finish up the detailing, I will keep the pictures coming.
In the next couple of days i plan to finally paint my Tiger and finish up the detailing, I will keep the pictures coming.
Re: My First Tiger Build
Thanks Saxondog,Saxondog wrote:Welcome and Nice work,seems well in hand,you might consider reviewing the tips and tricks section.You can use KITE STRING for cutting the plastic yet leave a smother edge and is easier on cutting circles or difficult shapes. You are off to a good start.
Saxondog
Unfortunately i did that before i discovered this forum. Ifind the tips and tricks section very useful its great for new techniques.
Lucas
Re: My First Tiger Build
Some nice details, the fender bolts are a first. Does seem to enhance the look.
Saxondog
Saxondog
Last edited by [ICE]monkey on Fri Jan 21, 2011 11:07 pm, edited 1 time in total.
Reason: removed pt2 in subject box
Reason: removed pt2 in subject box
-
Wizzard033

- Corporal
- Posts: 339
- Joined: Thu Sep 30, 2010 4:51 am
- Location: Lubbock, Texas


-
[ICE]monkey

- 2nd Lieutenant
- Posts: 2669
- Joined: Wed Sep 10, 2008 5:58 pm
- Location: pluckley ,ashford ,kent
Re: My First Tiger Build
great start with the tiger1 , nice to hear your girlfriend helps , shes one to keep 
ice
ps ive merged your topics .
ice
ps ive merged your topics .
-
MarkofZollo
- Corporal
- Posts: 328
- Joined: Mon Jul 05, 2010 6:16 pm
- Location: Honiton, East Devon
Re: My First Tiger Build
Great start to the build!  A lot of attention to detail too, wish I had that much on starting lol. Looking forward to more progress pics
Dave
Dave
There is always a fifth Sherman
Re: My First Tiger Build
Thanks for merging the topics. Yeah i'm really glad that she gets involved, usually throws in some good suggestions.[ICE]monkey wrote:great start with the tiger1 , nice to hear your girlfriend helps , shes one to keep
ice
ps ive merged your topics .
Lucas
Re: My First Tiger Build
LOL, I like that.fynsdad wrote:I'd love a GF that helped with my builds
Frank
