Yes, thank you, you are right. I had not checked before i put the belt on for the test shot. However, i found the Aber belt strip to be extremely weak, it broke a bit later. I had to replace the extremely thin etched strip by a stronger one in order to be later glued in place and survive as an RC model. Flipping it around to show on top makes it more obvious that the strip is thicker than i should, no choice. I took the opportunity to rework the belt a bit, making sure the spacing is better. This Aber ammo belt is complicated. I am not sure i will do another.Marco Peter wrote: ↑Wed Apr 17, 2024 9:18 pm First of all: WOW! What a hell of a job!
Butt ehhh... I don't want to be a critic, but isn't the MG34 supposed to be other way around in the belt? The links should be on top?
Easily corrected if you have not glued the ammo to the gun yet...
The following posts are for the painting and weathering, part 1.
As it is standard for me now, i used the Perma Blue gun bluing solution on the Impact metal tracks. It worked well, the track is blued after two applications. Looks good.
- 1/16 PzKpfw III Ausf M - Trumpeter/Heller kit with Taigen hull integration - Build
- 1.jpg (2.54 MiB) Viewed 165 times
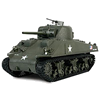
The tank is given a two color camo, dunkelgelb and dark gree.
- 1/16 PzKpfw III Ausf M - Trumpeter/Heller kit with Taigen hull integration - Build
- 3.jpg (2.3 MiB) Viewed 165 times
Notice how the 2 main tank hull components have been setup for opening and access the electronics.
- 1/16 PzKpfw III Ausf M - Trumpeter/Heller kit with Taigen hull integration - Build
- 4.jpg (1.53 MiB) Viewed 165 times
Its the lower mount points on the flexible schurzen that snap in place and locks the upper hull on the chassis. Just need to pull the schurzen from the bottom to release the upper hull and raise it.
- 1/16 PzKpfw III Ausf M - Trumpeter/Heller kit with Taigen hull integration - Build
- 5.jpg (1.73 MiB) Viewed 165 times
The chassis is given a very basic weathering with black pigments, it is mostly hidden by the schurzen.
- 1/16 PzKpfw III Ausf M - Trumpeter/Heller kit with Taigen hull integration - Build
- 6.jpg (2 MiB) Viewed 165 times
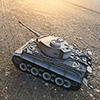
Some test pictures for me to analyze and check how the weathering is coming. There are quite a few things that annoy me and need rework. The model is not finished yet but it gives a good idea of how it will look.
- 1/16 PzKpfw III Ausf M - Trumpeter/Heller kit with Taigen hull integration - Build
- 7.jpg (1.77 MiB) Viewed 165 times
Note that i had to use the Trumpeter plastic track links for the spares, Impacts provided just 6 metal spares.
- 1/16 PzKpfw III Ausf M - Trumpeter/Heller kit with Taigen hull integration - Build
- 9.jpg (1.77 MiB) Viewed 165 times
- 1/16 PzKpfw III Ausf M - Trumpeter/Heller kit with Taigen hull integration - Build
- 10.jpg (1.98 MiB) Viewed 165 times
- 1/16 PzKpfw III Ausf M - Trumpeter/Heller kit with Taigen hull integration - Build
- 11.jpg (2.08 MiB) Viewed 165 times
- 1/16 PzKpfw III Ausf M - Trumpeter/Heller kit with Taigen hull integration - Build
- 12.jpg (1021 KiB) Viewed 165 times