Thank you Barry and Herman.
HERMAN BIX wrote:What gets me on each build is the creative solutions to otherwise confounding problems.
On each build, i am exploring new solutions, improving skills as well. I am working on subjects i have not seen before for the specific purpose of creating challenge.
The next 2 posts are for the turret core, minus the more fragile details that will be added later as these could be damaged through manipulations as the build is far from over.
The Scorpion turret as seen on the web. Notice the overlaid armored plate, angles and reinforcement that must be studied for an accurate dressing up of the turret.
- M-113 M113 M-113A1 MRV 1/16 RC Scorpion Turret Australian Army build
- Capture1a.JPG (43.47 KiB) Viewed 3819 times
Sanding and polishing the 3D printed parts takes a good two hours, the process is creating fine dust requiring the mandatory wearing of a N95 mask and thorough cleanup of the work area. The plastic is soft so it helps getting to a flat, smooth and acceptable finish. The sanding of the parts, which requires most built-in details to be erased, is essential. Otherwise, the heavy 3D printed lines will make the finished model look like a freak, painting will only make the printed lines show even more. As for the built-in detail, it is ok to erase it all with the sanding because most of it is not accurate for the MRV anyway.
 Viewed 3819 times")
- M-113 M113 M-113A1 MRV 1/16 RC Scorpion Turret Australian Army build
The installation of the armored plates went surprisingly well, starting with the lower sections. The parts dimensions are good. Only the back plate required an extension to fit.
 Viewed 3819 times")
- M-113 M113 M-113A1 MRV 1/16 RC Scorpion Turret Australian Army build
 Viewed 3819 times")
- M-113 M113 M-113A1 MRV 1/16 RC Scorpion Turret Australian Army build
The upper plates installation also went well. The whole thing only requires some adjustments here and there to fit, and almost no putty.
 Viewed 3819 times")
- M-113 M113 M-113A1 MRV 1/16 RC Scorpion Turret Australian Army build
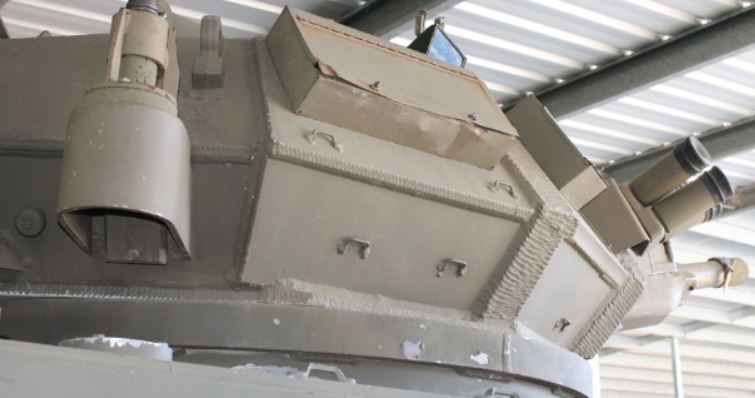
The main corrections are for the angled plates at the back, it cannot be glued flush with the middle plate. It must be recessed as per reference picture. Also, the weld reinforcements at the front sides need to be created with plasticard, with metal cutting and welding simulations.
 Viewed 3819 times")
- M-113 M113 M-113A1 MRV 1/16 RC Scorpion Turret Australian Army build
The sanding of the turret roof is difficult but doable. Again, most of the small built-in details were erased in the process and will need to be reproduced in plasticard.
 Viewed 3819 times")
- M-113 M113 M-113A1 MRV 1/16 RC Scorpion Turret Australian Army build
Small magnets will keep the turret roof in place and removable for easy access to the electronics.
 Viewed 3819 times")
- M-113 M113 M-113A1 MRV 1/16 RC Scorpion Turret Australian Army build
My first shot at creating the heavy cut and weld lines.
 Viewed 3819 times")
- M-113 M113 M-113A1 MRV 1/16 RC Scorpion Turret Australian Army build
The turret core, minis its small detail that will be added later, such as the Infra red light on the right of the mantlet, smoke grenade launchers on both sides, brackets of all kinds, the two radio antennas, machine gun mounts, etc.
 Viewed 3819 times")
- M-113 M113 M-113A1 MRV 1/16 RC Scorpion fire support Turret Australian Army build
More views on following post