M1A1HA, 9/18/23 update. Delay of Game, two week penalty!
-
silversurfer1947
- Lieutenant
- Posts: 3337
- Joined: Tue Oct 27, 2015 9:54 pm
- Location: Bristol, UK
Re: M1A1HA, 7-30 Update, Mantel mounted 50cal
If ever I had gone for a job as a model maker, it would not have meant me turning the job down for not enough money, but them turning me down for a lack of ability. I stand in awe of what I see presented here.
Richard
Tamiya Tiger 1, Taigen FlakPanzer IV,Torro M16 half-track, Tamiya Panther,WSN/Torro T34,Taigen M41 Bulldog,H/l/Taigen Sherman M4A3,H/L T90, Haya M3 Grant, Metal Origins 234/2 Puma, Nashorn by Alwyn. I was only going to have one tank - honest!
Tamiya Tiger 1, Taigen FlakPanzer IV,Torro M16 half-track, Tamiya Panther,WSN/Torro T34,Taigen M41 Bulldog,H/l/Taigen Sherman M4A3,H/L T90, Haya M3 Grant, Metal Origins 234/2 Puma, Nashorn by Alwyn. I was only going to have one tank - honest!

Re: M1A1HA, 7-30 Update, Mantel mounted 50cal
The Crosswind Sensor proved to be a little challenging due to the Latch assemblies used to lock into the deployed position and be operable to allow it to stow. I also could not find a good photo of them due to them being located between the Sensor and the EAPU.


There is also the bracket used to secure the sensor in the stowed position.

TAFN,
Barry
There is also the bracket used to secure the sensor in the stowed position.
TAFN,
Barry
"Details make perfection, and perfection is not a detail."
Leonardo Da Vinci
Leonardo Da Vinci
-
Son of a gun-ner
- Lieutenant-Colonel
- Posts: 7652
- Joined: Sun May 07, 2017 8:49 pm
- Location: Lancashire UK
Re: M1A1HA, 7-31 Update, Crosswind Sensor
No good pictures available 
Now I think you're just inventing detail items to make to avoid painting
Now I think you're just inventing detail items to make to avoid painting
Mick - The grit in the underpants of life!
Always happy to spare the bytes
Apparently my mind works in mysterious ways
TOTM needs YOU support YOUR TOTM competition, I'm doing my part, are YOU?
Always happy to spare the bytes
Apparently my mind works in mysterious ways
TOTM needs YOU
Re: M1A1HA, 7-31 Update, Crosswind Sensor
Son of a gun-ner wrote:No good pictures available
Now I think you're just inventing detail items to make to avoid painting

"Details make perfection, and perfection is not a detail."
Leonardo Da Vinci
Leonardo Da Vinci
Re: M1A1HA, 7-31 Update, Crosswind Sensor
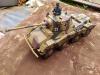
Now for the Exhaust Deflector,
It is used when doing recovery work to prevent the “roasting” of crew members. Or during times when the engine is left idling while the crew or others are moving around the rear of the tank. It will be stowed, hung on the railings along the side stowage bins.
It did not present any real problems aside for getting the angles to “look” right. The interior mount bars and brackets were elusive because after spending hours searching, I found only one photo showing them, but it was a good one.


Here it is shown in position on the engine grill.


Cheers,
Barry
It is used when doing recovery work to prevent the “roasting” of crew members. Or during times when the engine is left idling while the crew or others are moving around the rear of the tank. It will be stowed, hung on the railings along the side stowage bins.
It did not present any real problems aside for getting the angles to “look” right. The interior mount bars and brackets were elusive because after spending hours searching, I found only one photo showing them, but it was a good one.
Here it is shown in position on the engine grill.
Cheers,
Barry
"Details make perfection, and perfection is not a detail."
Leonardo Da Vinci
Leonardo Da Vinci
Re: M1A1HA, 8-1 Update, Exhaust Deflector
Grenade Launchers, these are the ones from AFV-Models for the M1 Abrams. There was a fair amount of rework and detailing to improve their accuracy. The basic shape of the launchers is good but required some epoxy putty accurize them more. I used nut & washers castings from MasterClub.

The PE mounts are a big plus and really cranks up the detail level. I used several sizes of brass tubing telescoped together for the hull mounting standoffs as well as the launcher to mount standoffs.

Using resin Electrical Connectors from Top Studios and a piece of brass rod I made up the firing connector. I created the flex boot by winding .010” brass wire then stretching it to shape and placing it inside the shrink tubing before shrinking it down. The small grounding wire is a piece of plated wire.

The finished look, I have Hex Cap bolts made by T2M inbound from BNA and they will be used to mount the launchers to the PE mounts.


TTFN,
Barry
The PE mounts are a big plus and really cranks up the detail level. I used several sizes of brass tubing telescoped together for the hull mounting standoffs as well as the launcher to mount standoffs.
Using resin Electrical Connectors from Top Studios and a piece of brass rod I made up the firing connector. I created the flex boot by winding .010” brass wire then stretching it to shape and placing it inside the shrink tubing before shrinking it down. The small grounding wire is a piece of plated wire.
The finished look, I have Hex Cap bolts made by T2M inbound from BNA and they will be used to mount the launchers to the PE mounts.
TTFN,
Barry
"Details make perfection, and perfection is not a detail."
Leonardo Da Vinci
Leonardo Da Vinci
Re: M1A1HA, 8-2 Update, Grenade Launchers, Mounts & Elect.
I have completed the EAPU and it is now ready for paint! 
I replaced the brass bolts with MasterClub castings.


Thanks for looking in.
Barry
I replaced the brass bolts with MasterClub castings.
Thanks for looking in.
Barry
"Details make perfection, and perfection is not a detail."
Leonardo Da Vinci
Leonardo Da Vinci
Re: M1A1HA, 8-6 Update, EAPU Complete! Ready for paint.
Pics of the Muzzle Reference Sensor (MRS). This is a Tritium device mounted on top of the barrel over the muzzle. It provide the gunner a quick reference of the muzzle actual aim point.
Anyone know of or have thoughts on how to make a 12 Point Bolt?


Back to the bench!
Barry
Anyone know of or have thoughts on how to make a 12 Point Bolt?
Back to the bench!
Barry
"Details make perfection, and perfection is not a detail."
Leonardo Da Vinci
Leonardo Da Vinci
-
kintaroukinji
- Lance Corporal
- Posts: 158
- Joined: Mon Feb 19, 2018 4:46 am
Re: M1A1HA, 8-5 Update, Muzzle Reference Sensor (MRS)
You did a great job! I can't believe making such a detailed muzzle model. I'm really surprised. How did you make it?
Re: M1A1HA, 8-5 Update, Muzzle Reference Sensor (MRS)
Thank you!kintaroukinji wrote:You did a great job! I can't believe making such a detailed muzzle model. I'm really surprised. How did you make it?
It is a combination of parts from Heng Long (green piece) and Trumpeter M1A1 kit (gray pieces) along with a piece of brass tubing and some styrene. The hardware is from Scale Hardware (bolts) and RB Motion (caps head bolts).
Now to figure out how the add the rifling land and groves.
Cheers,
Barry
"Details make perfection, and perfection is not a detail."
Leonardo Da Vinci
Leonardo Da Vinci
