Hi,
My next project will be the building of the Vandra RAM II Early model Sherman conversion.
The RAM II was a Canadian tank built in Montreal during the war. It was based on the M3 chassis and given a rotating turret with a 6pd gun. About 2000 were build but were replaced with mainstream Shermans before combat started in Europe. They are known as the M4A5 by the Americans. They were used for training and later for the RAM Kangaroo APC.
Ok, its not a pretty tank but its unique and available. Plus the machine gun on the lower turret will be interesting to operate.
The current plan for the build is to have the following features;
- Vandra Ram II resin conversion kit
- Heng Long Sherman Chassis and PZ III gearbox (planned)
- Clark TK-22 (M4) controller card (new thing for me), hooked to my new Flysky remote.
- Mato T74 metal tracks/sprocket
- M3 suspension
- Clark recoil for main gun, with flasher (also new for me)
- Rotating lower machine gun turret using servo, with flasher
- Mato Sherman headlights (modified)
- Hatches will open manually
I will have the help of a couple of books, and also my old Verlinden 1/35 Ram II that I built 30 years ago and still have. The shape and dimensions look good compared to references so It will be handy.
 Viewed 4195 times")
- Verlinden RAM II
 Viewed 4195 times")
- Verlinden RAM II
Here are the Vandra kit main parts. I am used to build their conversion kit so I know what I am getting into. They are not too expensive but require a lot of effort to make them complete and accurate. But with references, basic skills and patience, they can be turned into great and unique models.
 Viewed 4195 times")
- Vandra Ram II conversion kit
The kit is coming with black plastic and resin conversion parts for the M3 suspension. After my experience with the Shapeways M3 suspension, I know that a lot of work is required to make the suspension look good and solid. I am planning to use these parts but they are unlikely to remain as they are once I am done with them. I am also unsure whether the resin connector for the rollers will support metal tracks or remain in place with glue. I'll see.
 Viewed 4195 times")
- Vandra Ram II conversion kit
Having built other Vandra kit, I recognise many parts such as the 3 part transmission over, air filter, engine hatch,
 Viewed 4195 times")
- Vandra Ram II conversion kit
It does not take long to notice that something is definitely wrong with the upper hull. According to my calculating, it is 10mm too high, yes one whole centimeter... The lower deck for the machine gun turret is at the right height, its the rest which is too high or going down too low. So, the plan is to butcher the kit and make it accurate the best I can. I think i have identified most of the corrective measures. They involve cutting the main hull horizontally in two locations (different between front and back) and remove the required millimeters, glue the thing back together, use the dremel to rebuild the joints, shape and redo the cast finish with putty. We can call this plastic surgery... Cutting tanks in half does not scare me. The resin is quite thick so I should be able to make the whole operation seamless. This will be a special ops that will require additional planning. The machine gun turret, front bins and side doors that are equally too high will be adjustment accordingly, turret at the top, doors in two places, bins at the bottom. The ring for the machine gun turret also need to be reduce by 1mm. SImple... well, that's the plan at this time. I am telling you Dean, this will be a nice looking Ram.
 Viewed 4195 times")
- Vandra Ram II conversion kit
 Viewed 4195 times")
- Vandra Ram II conversion kit
As for the main turret, it is at least 7mm too high. So, the plan is to remove the shaded area at the bottom of the top part (easy), and then glue to the turret base. It should then have the right height. As for the gun mantlet, it is strangely exactly at the right height and should fit the lowered turret more accurately. This is good news because cutting the mantlet would have been difficult.
 Viewed 4195 times")
- Vandra Ram II conversion kit
Some bump at the rear deck needs to be removed. I have not seen this in references.
 Viewed 4195 times")
- Vandra Ram II conversion kit
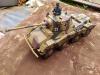
The kit came with two half figures which look good.
 Viewed 4195 times")
- Vandra Ram II conversion kit
All measurements and corrective actions will be detailed more accurately in following steps. I question myself why Vandra does not use a ruler in their measurements. Maybe the extra mm in height are required because of some reason that i am about to find out (gearbox height, HL chassis fit, gun elevation ??), we'll see.
For now, let's enjoy Christmas with family.
Merry Christmas everyone.
Regards, Louis