Aww c'mon Mr Barry !!.................thats just off the planet dedication
I reckon if you got a few sets done you could make a small return on them selling to those that have no way of staying focused long enough to do their own
You got the raised grips really to look very good, even excellent Even most photos of the real thing don't really make them very obvious unless you really study the pics.
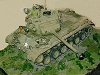
Though I have been on “radio silence” I have been quite busy with the holiday season and working on the Abrams. After reworking the original Aft Armored Fuel Hatches, I needed a break from all the work on the Rear Deck so I shifted to the Fwd. Hull.
Since I was on a “fuel hatch” roll first up were the Fwd. Fuel Hatches, unlike the Aft Hatches the Fwd. ones were all but destroyed while removing them from the hull so scratch building was the only course. The hull mounted hinge points are let into the hull through rectangular holes. Unlike the aft ones which are styrene to styrene I was uncomfortable gluing these to the surface given the small glue surface coupled with the lack of bonding all glues seem to have to the HL plastic.
More.....
Last edited by BarryC on Mon Jul 17, 2017 1:43 pm, edited 1 time in total.
"Details make perfection, and perfection is not a detail."
Leonardo Da Vinci
Next up was the Driver’s Hatch which is completely scratch built using only the original “triangular” hatch piece. I basically sanded it smooth and removed all vestiges of the periscope “housing”. I built up the periscope platform using sheet styrene and epoxy putty. The periscope housing is built up using styrene sheet coping the Dragon Models and Rye Field Model 1/35 Abrams kits as well as dozens of photos. I need to find someone who can cast the periscope blocks from clear or tinted resin. I also epoxy putty to build up the Fwd. Hull profile between the turret ring and the Driver’s Hatch to more closely match the prototype and better fit the reworked hatch.
continued....
Last edited by BarryC on Mon Jul 17, 2017 2:01 pm, edited 1 time in total.
"Details make perfection, and perfection is not a detail."
Leonardo Da Vinci
While waiting on epoxy putty and glue to cure on the hatch I started working on the Fwd. Fenders. After thinking about it I decided to go ahead and make them movable. After scheming a way forward, I started with making the hinge points and getting them mounted to the movable sections on the fenders. I added a piece of .030” styrene to make the fenders the proper width. I also had to rebuild the outer side of the right fender where in my hast of removal I removed too much and eliminated the “flared” area. After shaping the hinge points out of brass I tacked them into place to establish the locations for the holes in the “fixed” sections. To accommodate the hinge bar, I planned to use I had to remove material from the underside of the fixed sections at the hole locations. Once all that was completed I located the hinge points and epoxied them into place. I also “pinned” the inner hinge plates using brass pins to relieve some stress from the epoxy joint as they are surfaced mounted. The outer hinges are in slots and epoxied into place from the under/inside, I think they will be sufficiently strong.
continued....
Last edited by BarryC on Mon Jul 17, 2017 2:16 pm, edited 1 time in total.
"Details make perfection, and perfection is not a detail."
Leonardo Da Vinci
I have also made the electrical conduits for the headlights and have temp located them so I can build up the headlights and their guards. The plan is to make them from annealed brass flat bar stock.
continued...
Last edited by BarryC on Mon Jul 17, 2017 2:23 pm, edited 1 time in total.
"Details make perfection, and perfection is not a detail."
Leonardo Da Vinci
I need to shift my attention back to the rear of the tank and build the engine exhaust area. I think the “bar grills” are going to prove to be challenging!
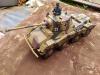
I have also ordered this kit from Chris Ludwig for the lateral/skirt armor. This should save me a ton for work. Now to figure a way to attach it without using the existing skirts as they are not the side plates used when the ARATs are used, always something!
TAFN, thanks for looking in,
Barry
Last edited by BarryC on Mon Jul 17, 2017 2:30 pm, edited 1 time in total.
"Details make perfection, and perfection is not a detail."
Leonardo Da Vinci
Your work takes the phrase "attention to detail" to a whole new level. Great work.
Richard
Tamiya Tiger 1, Taigen FlakPanzer IV,Torro M16 half-track, Tamiya Panther,WSN/Torro T34,Taigen M41 Bulldog,H/l/Taigen Sherman M4A3,H/L T90, Haya M3 Grant, Metal Origins 234/2 Puma, Nashorn by Alwyn. I was only going to have one tank - honest!