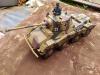
I managed to get the zimmerit completed, it turned out ok, and by using milliput it hardly cost anything at all. I prefer that uneven look as opposed to the uniform pattern that the Atak panels would have looked, it took forever to do though. A coat of Vallejo WW2 German Beige mixed 30/30/30 with matt varnish and water and it all came out quite nicely.
Taigen sprayed the wheels with some sort of hard as granite paint, presumably to prevent the paint chipping off, and this has pretty much welded the caps into the sprockets. Try as I might I can't get the caps out without seriously scuffing them, and that means I can't get the tracks off unless I remove a pin. They will stay in place for now and I will see how I can weather the tracks at some point in the future.
Just waiting for the paint to dry out properly and then I can put some German Green camo stripes on it.
Taigen King Tiger
-
wibblywobbly

- Major
- Posts: 6396
- Joined: Fri Oct 17, 2008 9:30 am
- Location: South Wales Valley
- Contact:
Re: Taigen King Tiger
- Attachments
-
- IMG_20160803_093505.jpg (89.95 KiB) Viewed 2989 times
-
-
- IMG_20160803_093416.jpg (87.23 KiB) Viewed 2989 times
Tiger 1 Late
Panther G
King Tiger
M36 B1
Panther G
King Tiger
M36 B1
-
silversurfer1947
- Lieutenant
- Posts: 3337
- Joined: Tue Oct 27, 2015 9:54 pm
- Location: Bristol, UK
Re: Taigen King Tiger
The zimmerit looks great. A sense of great satisfaction, I imagine.
Richard
Tamiya Tiger 1, Taigen FlakPanzer IV,Torro M16 half-track, Tamiya Panther,WSN/Torro T34,Taigen M41 Bulldog,H/l/Taigen Sherman M4A3,H/L T90, Haya M3 Grant, Metal Origins 234/2 Puma, Nashorn by Alwyn. I was only going to have one tank - honest!
Tamiya Tiger 1, Taigen FlakPanzer IV,Torro M16 half-track, Tamiya Panther,WSN/Torro T34,Taigen M41 Bulldog,H/l/Taigen Sherman M4A3,H/L T90, Haya M3 Grant, Metal Origins 234/2 Puma, Nashorn by Alwyn. I was only going to have one tank - honest!
-
wibblywobbly
- Major
- Posts: 6396
- Joined: Fri Oct 17, 2008 9:30 am
- Location: South Wales Valley
- Contact:
Re: Taigen King Tiger
Been busy these past few days, I am on a mission. Just need to do the wheels and that will be all of the painting and weathering done. Still a few things to do after that, but it's almost complete.
- Attachments
-
- IMG_20160804_175925.jpg (84.08 KiB) Viewed 2955 times
-
- IMG_20160804_175856.jpg (84.75 KiB) Viewed 2955 times
-
- IMG_20160804_175835.jpg (83.69 KiB) Viewed 2955 times
-
-
Tiger 1 Late
Panther G
King Tiger
M36 B1
Panther G
King Tiger
M36 B1
-
PainlessWolf

- Colonel
- Posts: 7858
- Joined: Sun Feb 26, 2012 9:09 pm
- Location: Southern Colorado Rocky Mountains
Re: Taigen King Tiger
W.W.,
Beautiful work all around. I am especially enjoying the detail work.
regards,
Painless
Beautiful work all around. I am especially enjoying the detail work.
regards,
Painless
...Money!? What's that!?...
-
fury
- Lance Corporal
- Posts: 117
- Joined: Tue Jun 07, 2016 8:52 pm
- Location: Bishop Auckland,County of Durham
Re: Taigen King Tiger
Hi WW an excellent job all round the weathering is spot on you should be pleased with the way this build is turning out. 
Kevin 

Re: Taigen King Tiger
Looking good rob, the two tone camo is a favourite
-
HERMAN BIX

- Major-General
- Posts: 11864
- Joined: Sun Jan 12, 2014 12:15 am
- Location: Gold Coast,Australia
Re: Taigen King Tiger
That Zimmerman job is monumental!
I'm sure when I look close at it I can see where you've sat up and gone "why !?"
Then leaned in & carried on
I'm sure when I look close at it I can see where you've sat up and gone "why !?"
Then leaned in & carried on
HL JAGDPANTHER,HL TIGER 1,HL PzIII MUNITIONSCHLEPPER, HL KT OCTOPUS,HL PANTHER ZU-FUSS,HL STuG III,HL T34/85 BEDSPRING,
HL PZIV MALTA,MATORRO JAGDTIGER,HL F05 TIGER,TAMIYA KT,HL PANTHERDOZER,HL EARLY PANTHER G,TAIGEN/RAMINATOR T34/76,
HL AN-BRI-RAM SU-85
HL PZIV MALTA,MATORRO JAGDTIGER,HL F05 TIGER,TAMIYA KT,HL PANTHERDOZER,HL EARLY PANTHER G,TAIGEN/RAMINATOR T34/76,
HL AN-BRI-RAM SU-85
-
jackalope

- Lieutenant
- Posts: 3882
- Joined: Fri Jun 20, 2014 7:42 pm
- Location: Communist State of Maryland, United States.
Re: Taigen King Tiger
W0W!  . that's all there is to say, just W0W!

Re: Taigen King Tiger
Wibbly, I am so very much indebted to you for this thread and your excellent work on this build - not least because you have highlighted a big mistake on my KT build which I shall now need to attend to!
What I refer to is the zimmerit application under the fender line which I, like jackalope, had mistakenly though would end at that line (and not extend behind the fender to the bottom of the side armour). I am particularly annoyed with myself about this because I made considerable effort to maintain some sense of historical accuracy and failed to spot this entirely. I had wrongly thought that the zimmerit would be applied after fitting the fenders at the factory and so in my example exposed red oxide primer only below the line of the missing fender panels.
What I failed to do (in addition to following another build wrongly executed) was pay more careful attention (as you did) to the field examples which clearly demonstrate that the fenders are fitted after zimmerit is applied. This is transparently obvious now, not only where you can clearly see the zimmerit coating but also in those pictures where the fenders are still in place, This is noticable because the zimmerit comes to far too cleaner line when meeting the fenders. It's now so glaringly, blatantly, obvious I can't believe I could have missed this,,,,,,,doh!!!!!!!
Oh well, we live and learn as they say!
Keep up the great work
-
wibblywobbly
- Major
- Posts: 6396
- Joined: Fri Oct 17, 2008 9:30 am
- Location: South Wales Valley
- Contact:
Re: Taigen King Tiger
It was just a thought that I had when browsing through archive pics, and none of them were very clear. I kept looking and then started delving into production history, and there it was, the zimmerit was applied at the factory, and it was applied before the fenders were mounted. This doesn't of course apply to all of the KT's with the production turret as zimmerit was discontinued.
My way of doing it was to use yellow milliput, make up a small amount at a time, and then press pea sized balls onto the surface and spread it wafer thin. do about 6" on a surface. I then cut a 10mm wide strip of 3mm styrene, and sanded the end into a chisel shape, it was this that I used to do the pattern. Only apply the pattern to 5", and then apply another 6", and so on.
It also helps to take time to only do one surface a day, as that way you don't end up touching soft milliput when handling the hull and turret.
I hope that this helps anyone else contemplating doing this themselves.
Tiger 1 Late
Panther G
King Tiger
M36 B1
Panther G
King Tiger
M36 B1
