Panzergruppe Tarraco scenery: the Panzodrom

Re: Panzergruppe Tarraco scenery: the Panzodrom
Herman- Do not drive a tank if you drunk! 

Jagdtiger the king, but a Jagdpanther the best! 
HL KV1e
HL Tiger
HL KV1e
HL Tiger
-
redlinemoto
- Recruit
- Posts: 26
- Joined: Tue Jun 02, 2015 4:25 pm
Re: Panzergruppe Tarraco scenery: the Panzodrom
great work were can any one get the brick / stone rollers from thanks
-
wibblywobbly

- Major
- Posts: 6396
- Joined: Fri Oct 17, 2008 9:30 am
- Location: South Wales Valley
- Contact:
Re: Panzergruppe Tarraco scenery: the Panzodrom
This is quite simply a work of art. I would love to be able to build a battlefield like this, but land in this part of the UK is high value and anything gets a house squeezed onto it.
Great use of materials to get the effects, out of all of the techniques the only ones that I have used are pva glue mixed with earth to surface a road bridge (it sets like concrete), and waterproof wall tile cement to surface stone walls. Scratch lines for the bricks while it is still wet, and paint with acrylics = Waterproof walls and a waterproof road.
There must be many envious tankers looking at this from around the world??
RobG
Tiger 1 Late
Panther G
King Tiger
M36 B1
Panther G
King Tiger
M36 B1

Re: Panzergruppe Tarraco scenery: the Panzodrom
Hello guys
Thank you very much for your comments and tips
Redlinemoto the rollers i got them from an online shop for pastrymaking tools
Best regards
Thank you very much for your comments and tips
Redlinemoto the rollers i got them from an online shop for pastrymaking tools
Best regards
Jussek
https://www.facebook.com/pages/Club-RC-Reus-Secci%C3%B3-de-Modelisme-Militar-Radiocontrolat-PzGr-Tarraco/639220812799552
https://www.facebook.com/pages/Club-RC-Reus-Secci%C3%B3-de-Modelisme-Militar-Radiocontrolat-PzGr-Tarraco/639220812799552
Re: Panzergruppe Tarraco scenery: the Panzodrom
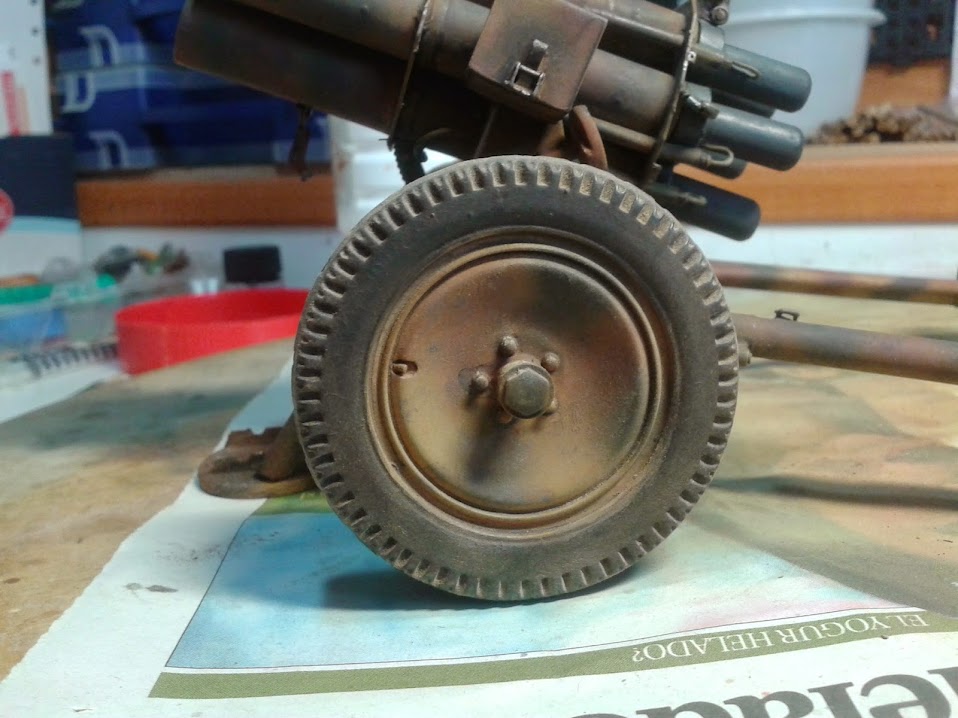
Hi again
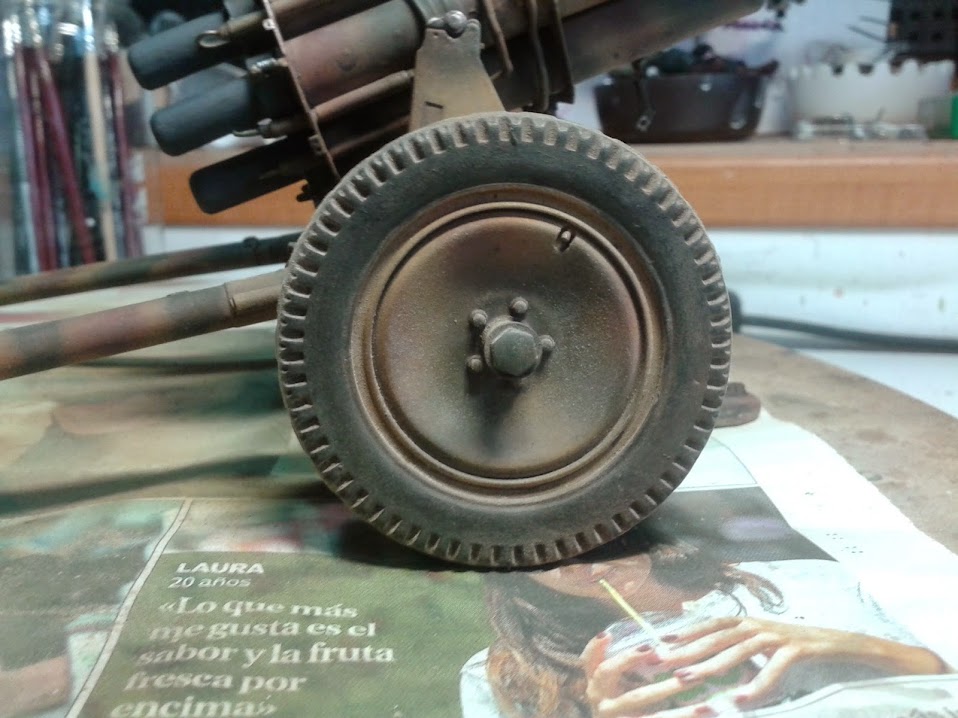
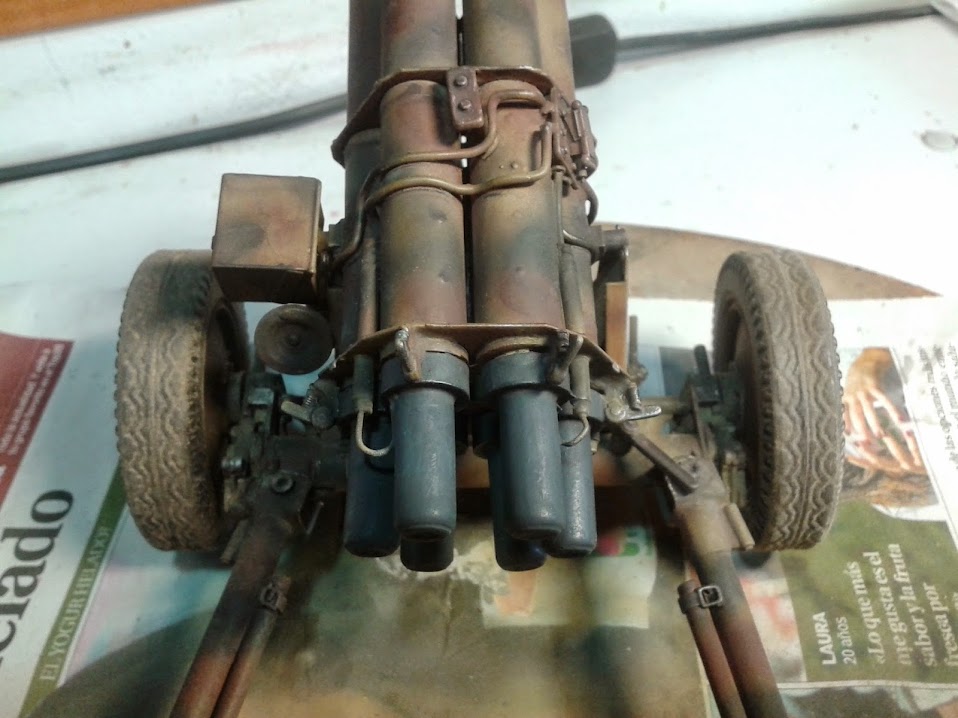
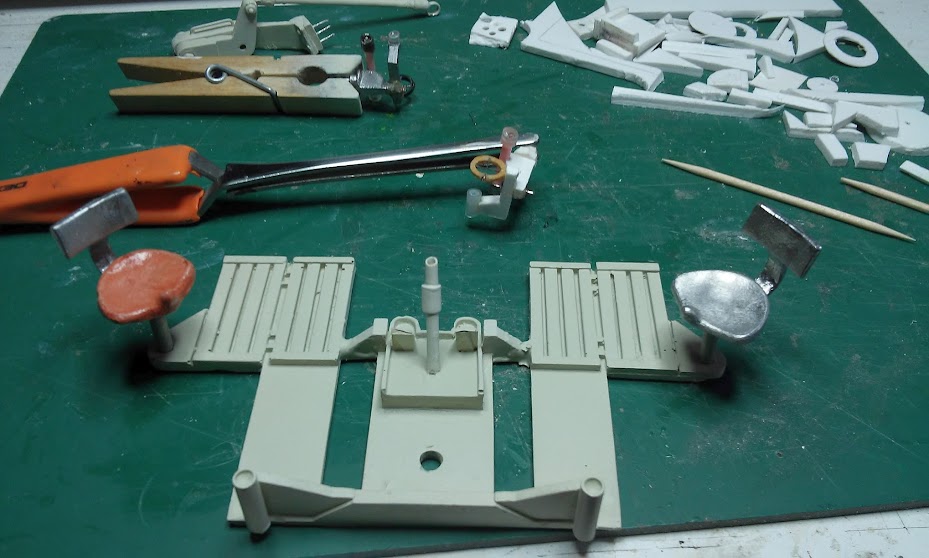
this time i will talk about the 15cm NbW41. We own 3 of these arty pieces. One of them we bought it already build, but it has broken and missing parts.
the nebelwerfer had their 'legs' broken so i had to repair the joint points to the carriage:


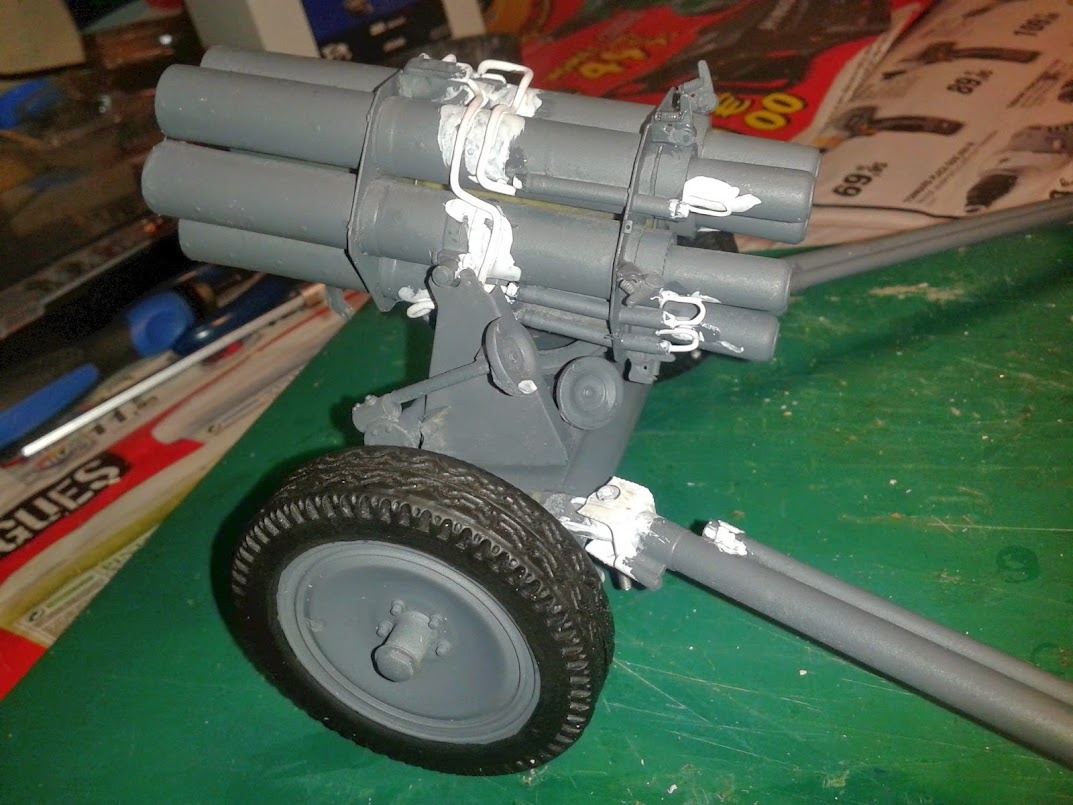
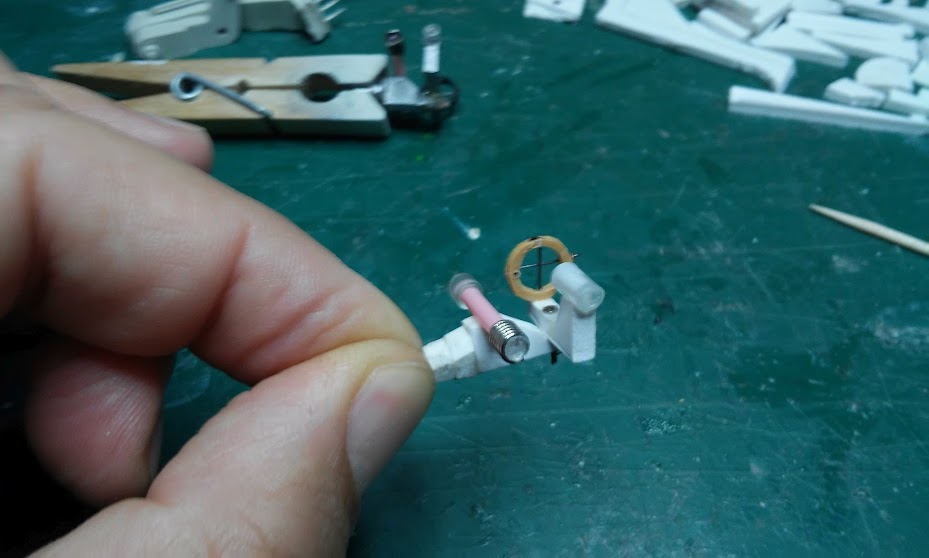
it haven't several pieces either, like these tubes or the control box:
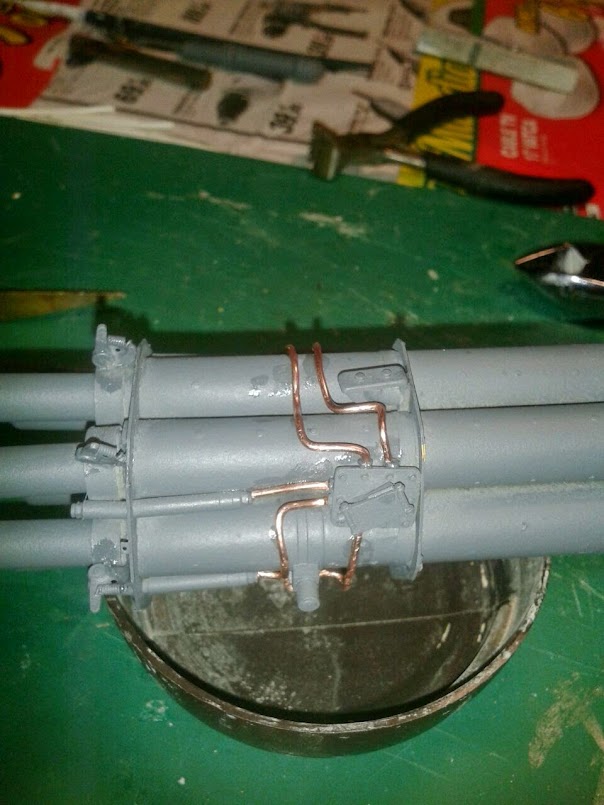
nor the connecting wires for fire every rocket located in the tubes:
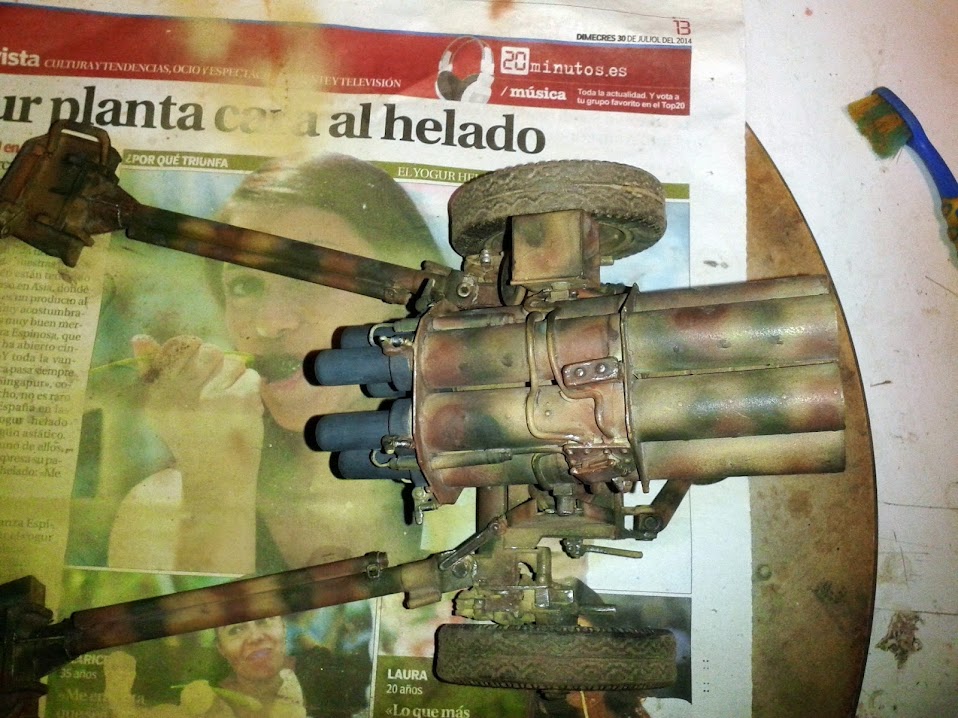
already primed and on the dio base were it will be installed to be put on the battlefield

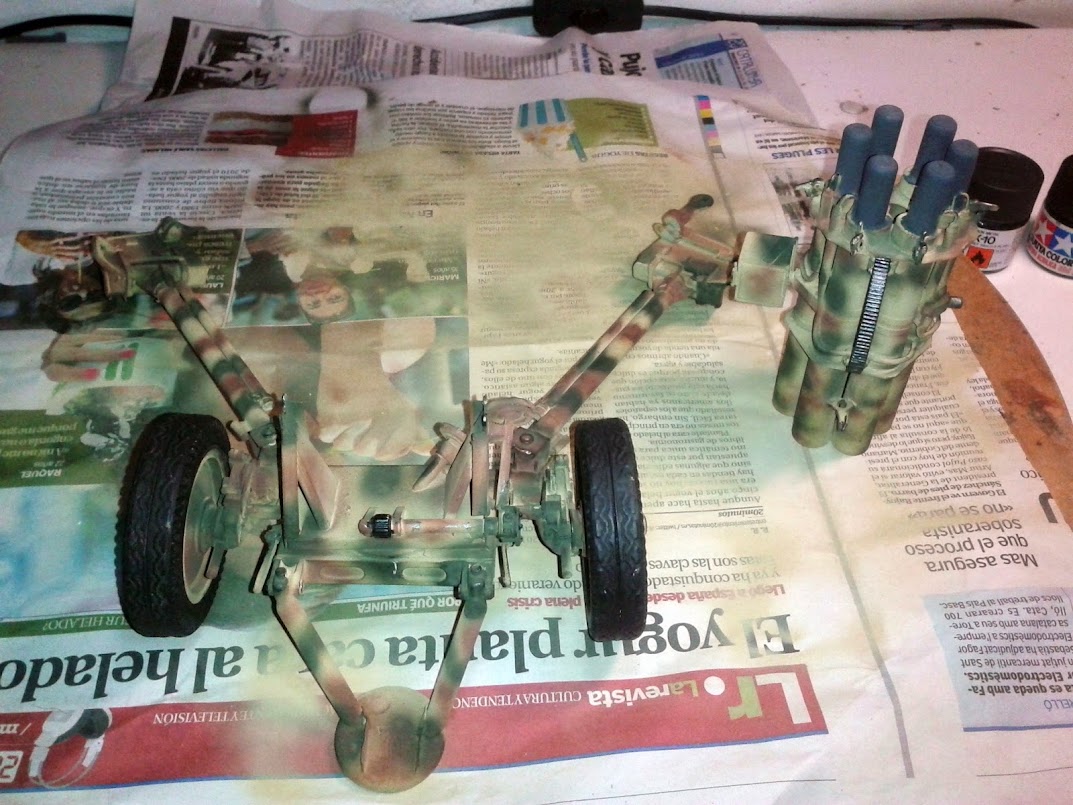
and now, and the paint job sequence:
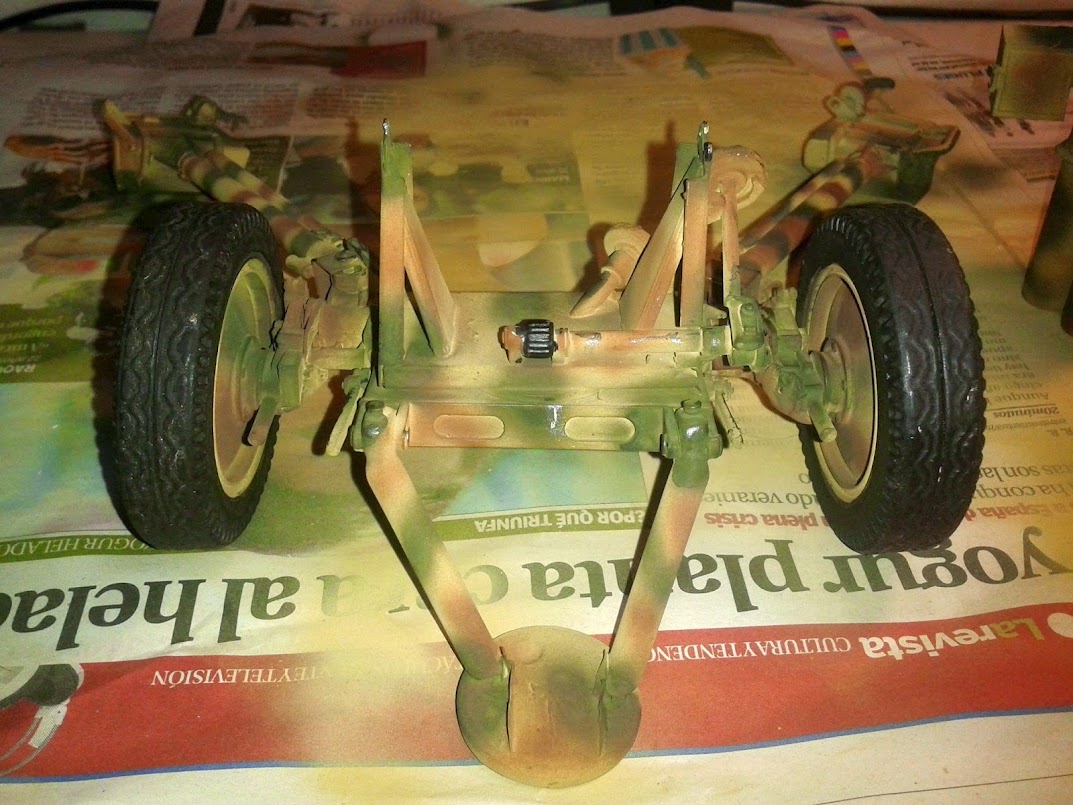

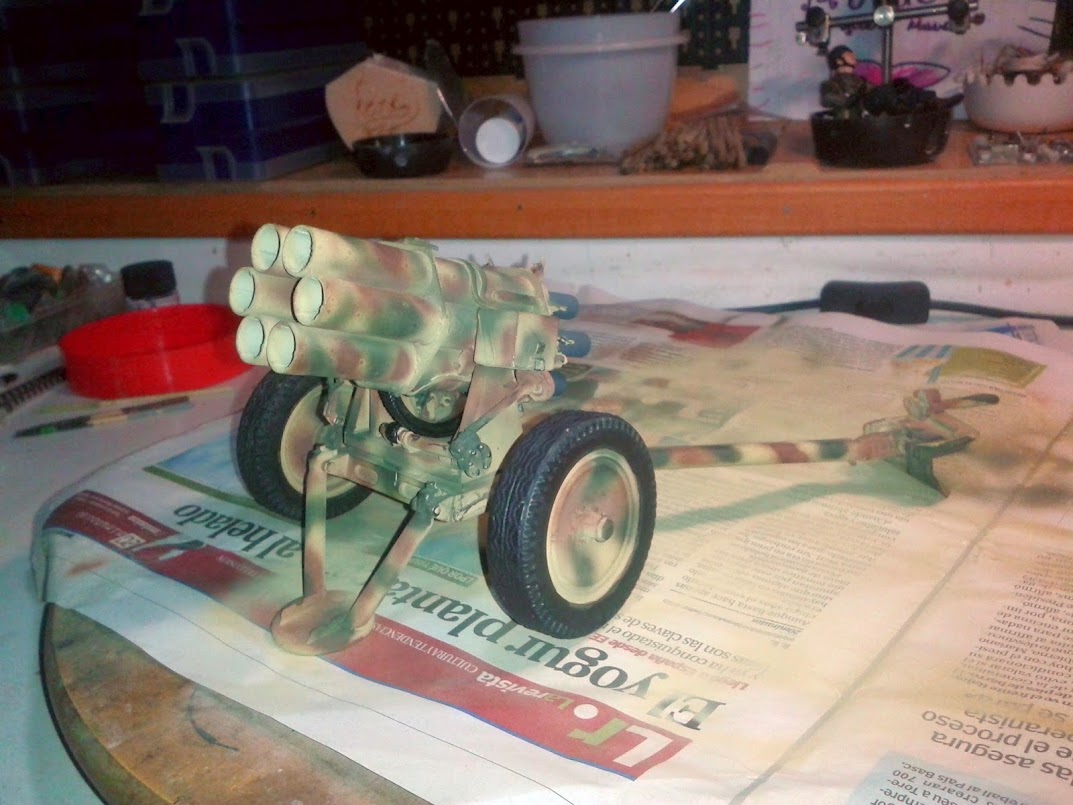
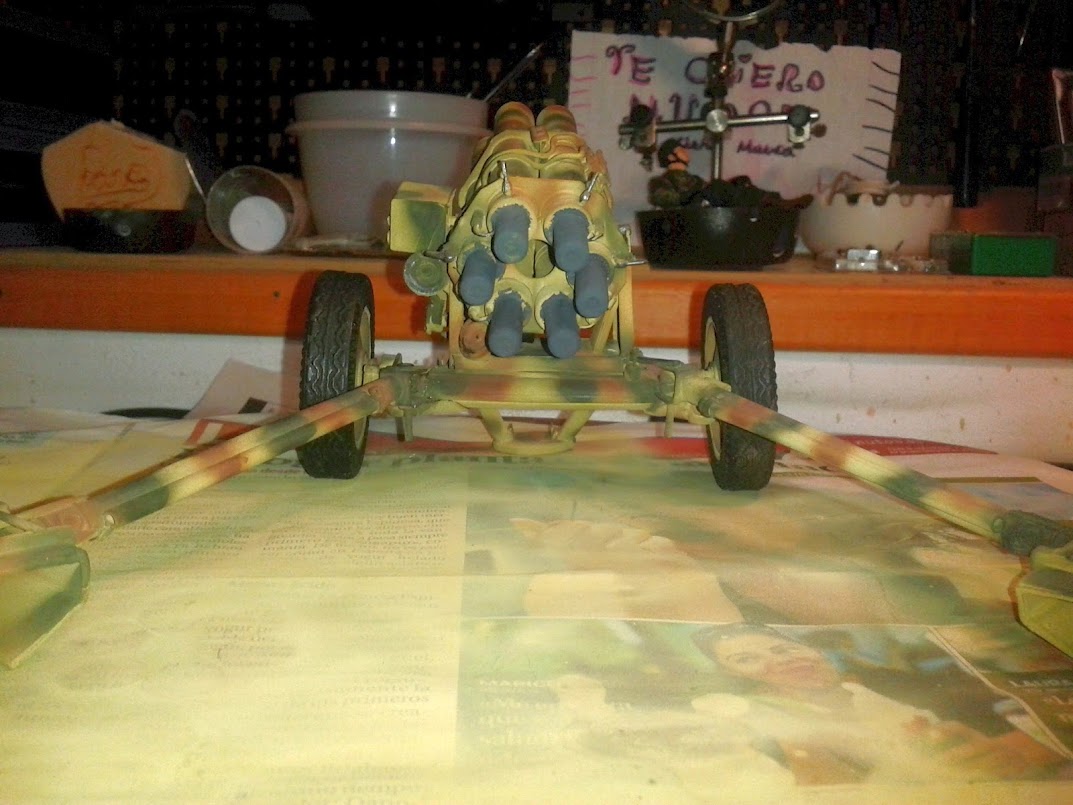
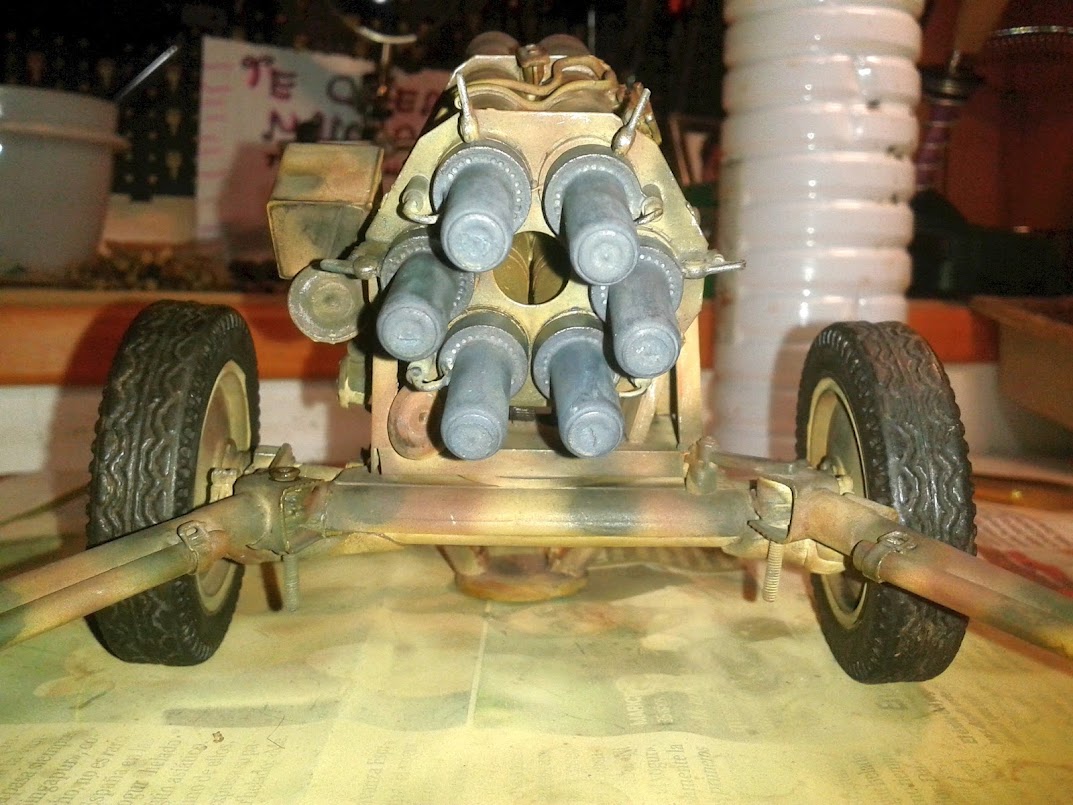


some weathering

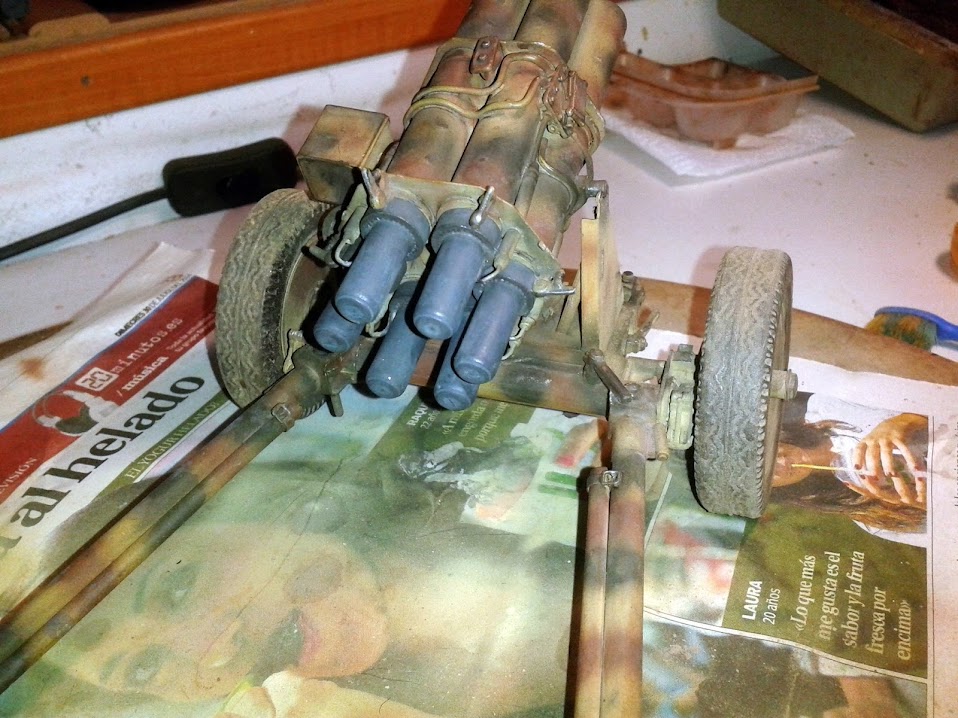
and here, already glued on the dio base, with some crew members and ground cover (still wet)
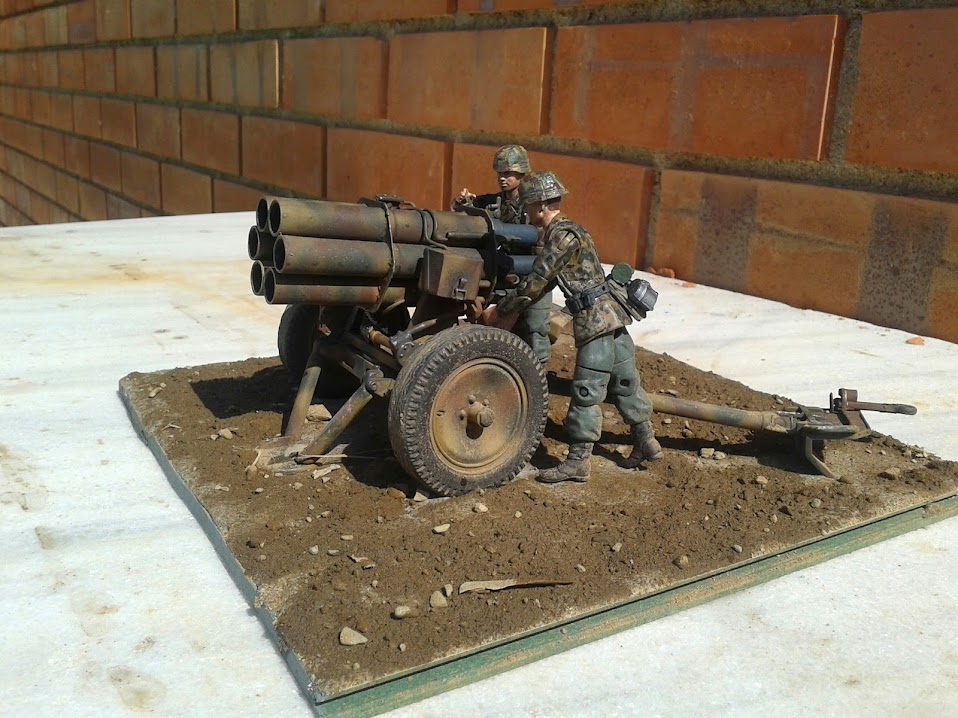
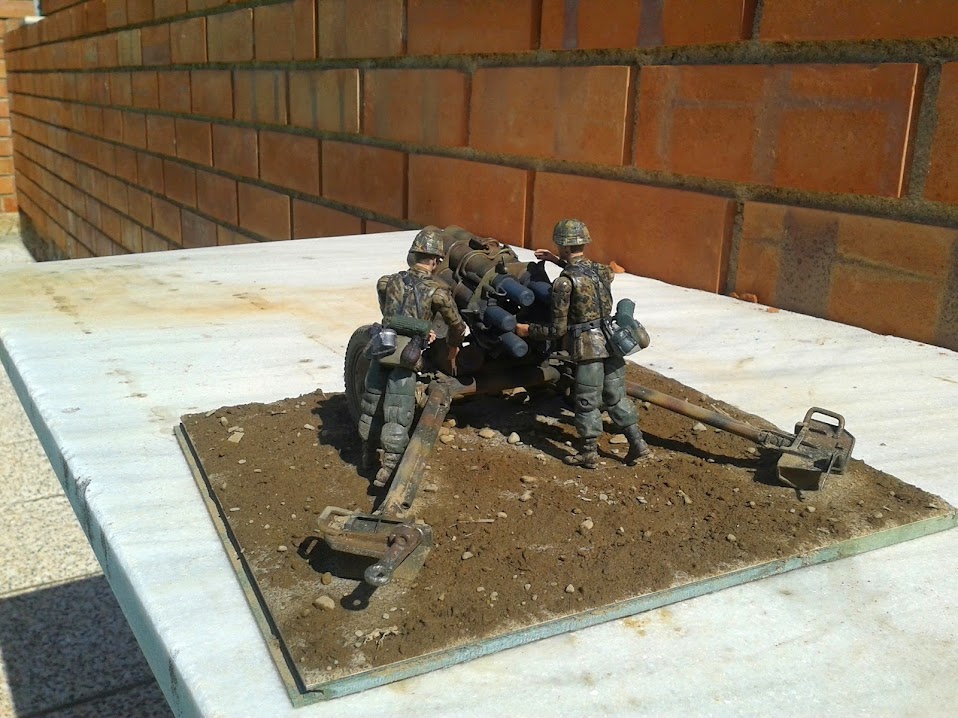
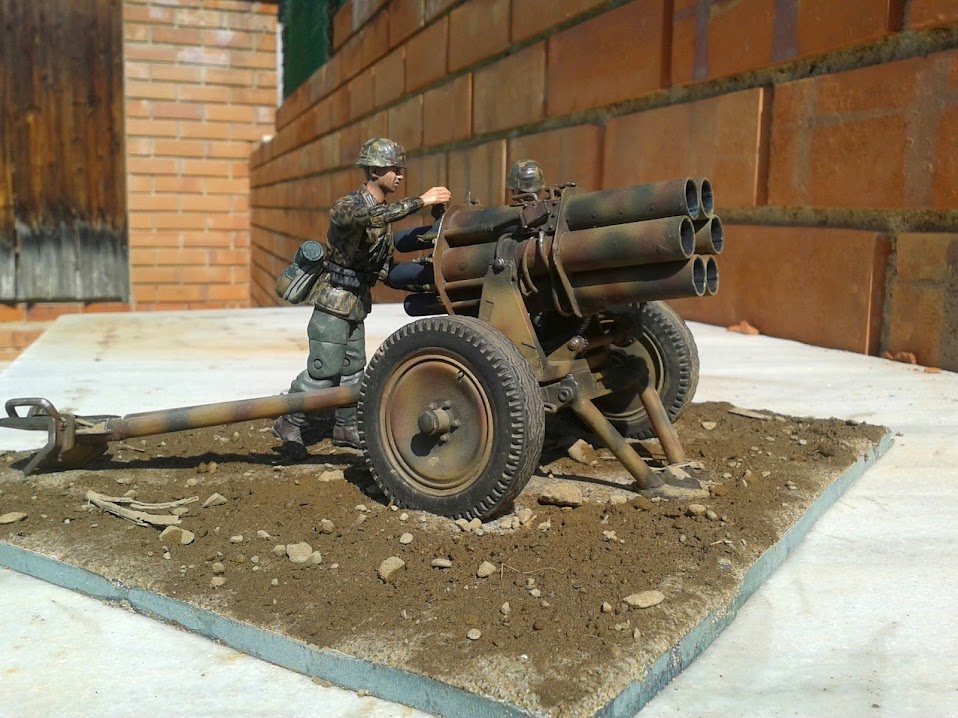
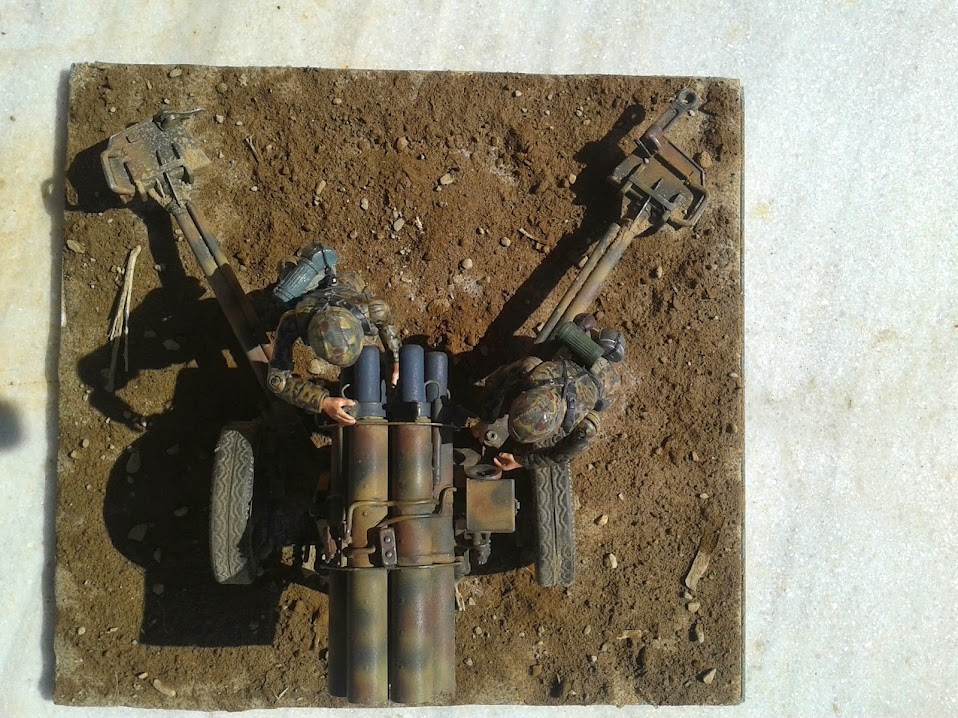
this one is finished, the rest of the crew with several ammo boxes will be made later in a separate base, to serve the entire battery (we will make 3 separated bases like this one)
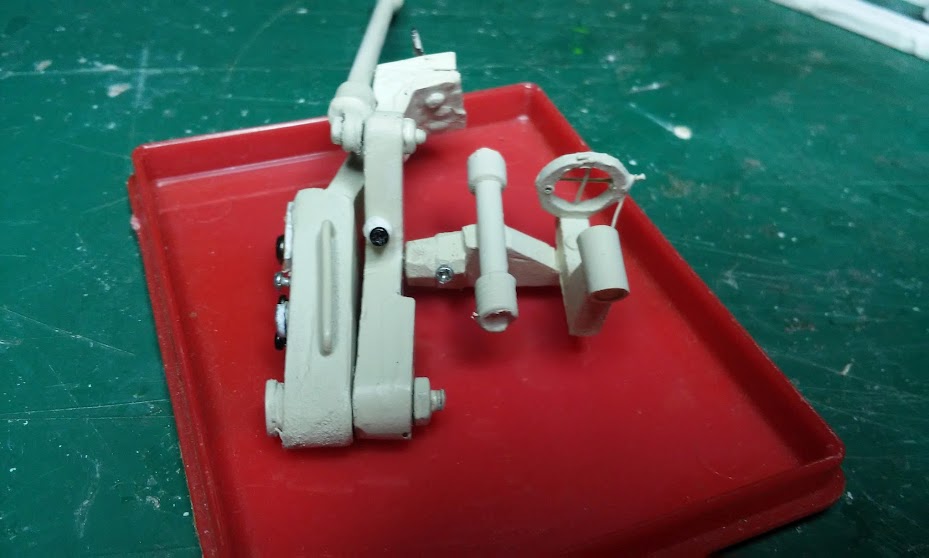
now i will post pics from the second nebelwerfer that another member of our club is building


some pieces had to be discarded and made from scratch, because this one it's being made to be towed (the wheels would be later made from rubber, so they could roll over every kind of terrain)


that's all, it's waiting for the paint works to be done
best regards!
this time i will talk about the 15cm NbW41. We own 3 of these arty pieces. One of them we bought it already build, but it has broken and missing parts.
the nebelwerfer had their 'legs' broken so i had to repair the joint points to the carriage:
it haven't several pieces either, like these tubes or the control box:
nor the connecting wires for fire every rocket located in the tubes:
already primed and on the dio base were it will be installed to be put on the battlefield
and now, and the paint job sequence:
some weathering
and here, already glued on the dio base, with some crew members and ground cover (still wet)
this one is finished, the rest of the crew with several ammo boxes will be made later in a separate base, to serve the entire battery (we will make 3 separated bases like this one)
now i will post pics from the second nebelwerfer that another member of our club is building
some pieces had to be discarded and made from scratch, because this one it's being made to be towed (the wheels would be later made from rubber, so they could roll over every kind of terrain)
that's all, it's waiting for the paint works to be done
best regards!
Jussek
https://www.facebook.com/pages/Club-RC-Reus-Secci%C3%B3-de-Modelisme-Militar-Radiocontrolat-PzGr-Tarraco/639220812799552
https://www.facebook.com/pages/Club-RC-Reus-Secci%C3%B3-de-Modelisme-Militar-Radiocontrolat-PzGr-Tarraco/639220812799552
Re: Panzergruppe Tarraco scenery: the Panzodrom
hi chaps
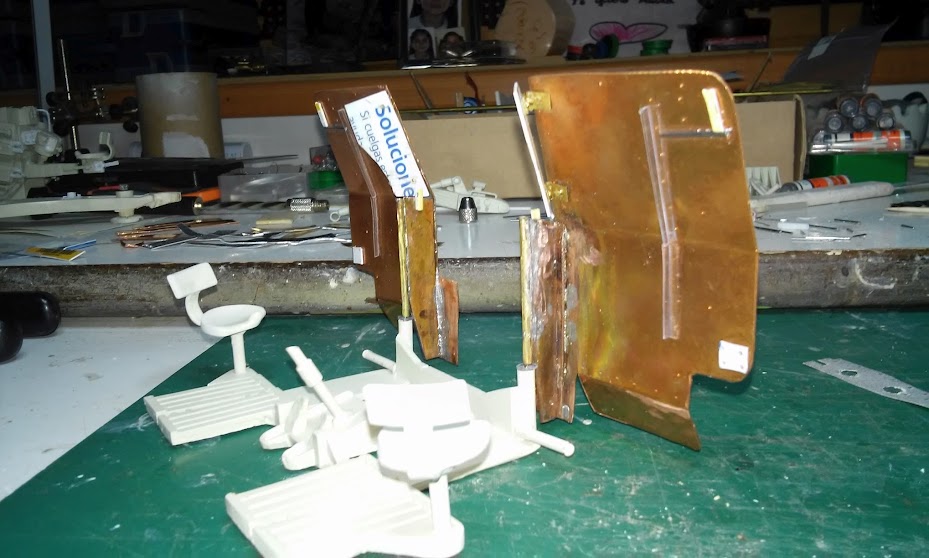
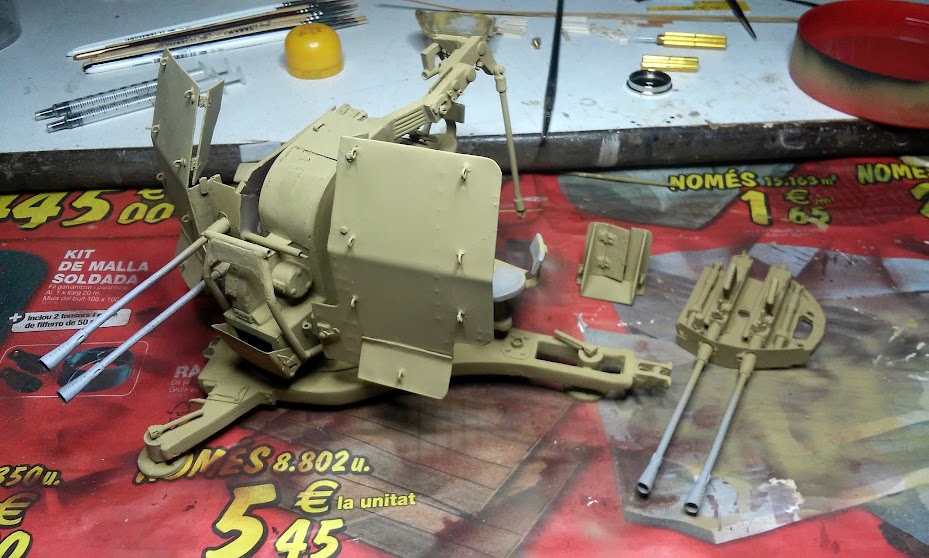
after several weeks of working, I've finished another piece for the Panzodrom, This time I've build a 2cm FlaK38 Vierling gun, and a lot of the components are scratch made (as you will notice ipso facto duet he lack of detail on some of them), the origin of this is that some years ago i brought a flak38 and a turret to build a Wirbelwind (this project is yet unfinished), but as the quality of quite a number of parts was 'poor' (to be gentle), and that i wanted to do it RC, i was left with a lot of 'useless' bits of hardware. But then i decided to build another FlaK position for our scenery, so i used some of these parts and also i scratch build some others.
So here you are several tons of pics…First, I started with the guns themselves, made from scratch except the gun tubes and gun muzzles; these are from the static kit I brought for the Wirbelwind.


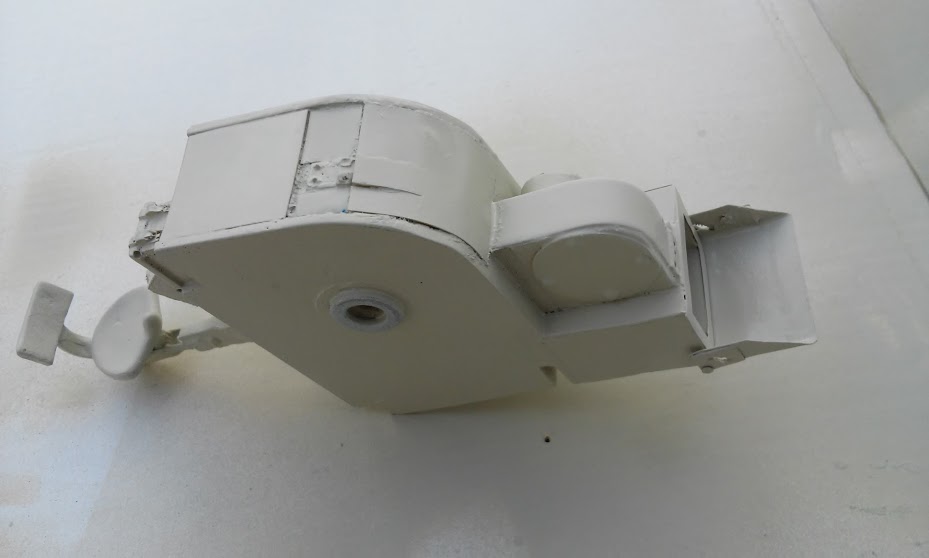
Here you are the guns already mounted on the ‘barbettes’ (I do not know how to name these pieces, sorry), these ‘barbettes’ I make them from an old cover of an electrical joint box (these boxes we have on the walls of our houses…), detailing the lower part of these barbettes will come later...


Making two clones from the original seats (i need six, si i've to make some), the way the ‘poor’ people do them, with children’s clay to make the mould and another type of hardening clay to do the seats

Gluing the guns and aligning them on the two ‘barbettes’


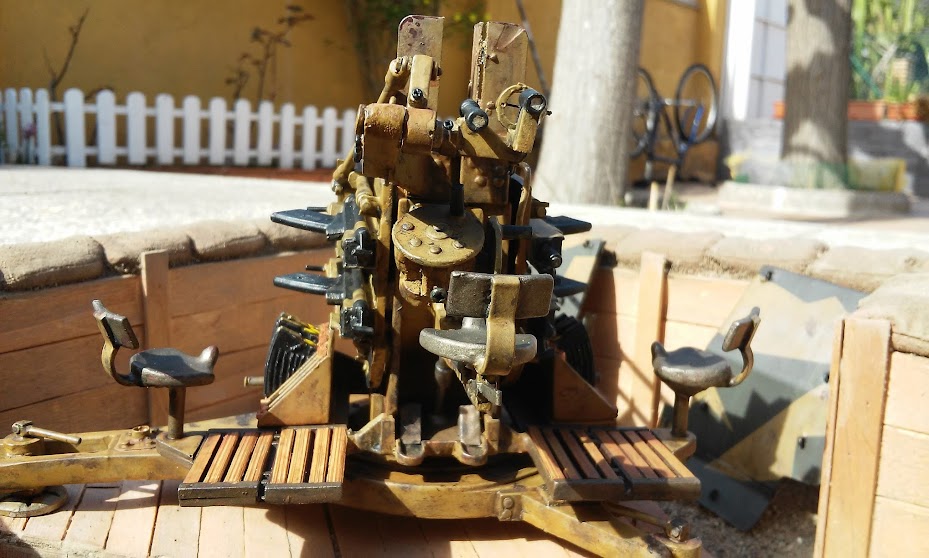
Checking several components and the way they interact together to look what to correct. You can see several components from the kit (laffette, main body) and several scratch build parts


The gunner’s seat and his support already put in place, also the elevation and traverse control wheels, and the ‘barbettes’ guides


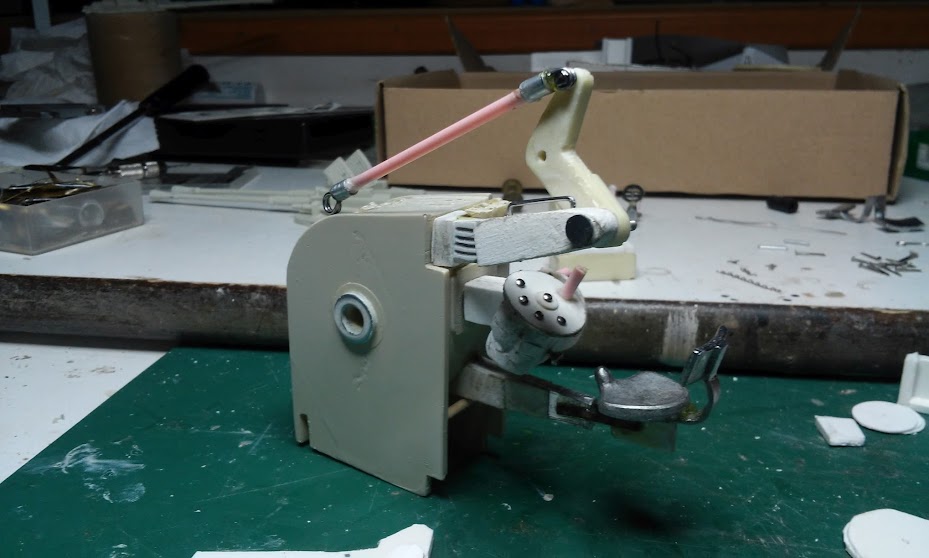
Making and putting in place the shells ejector


Once I did this part, I was aware that I made an error… the ejector from the kit is for it being used in the Wirbelwind turret, so it’s modified and shortened, I then had to ‘enlarge’ the shells container

The working door for the already fired shells box


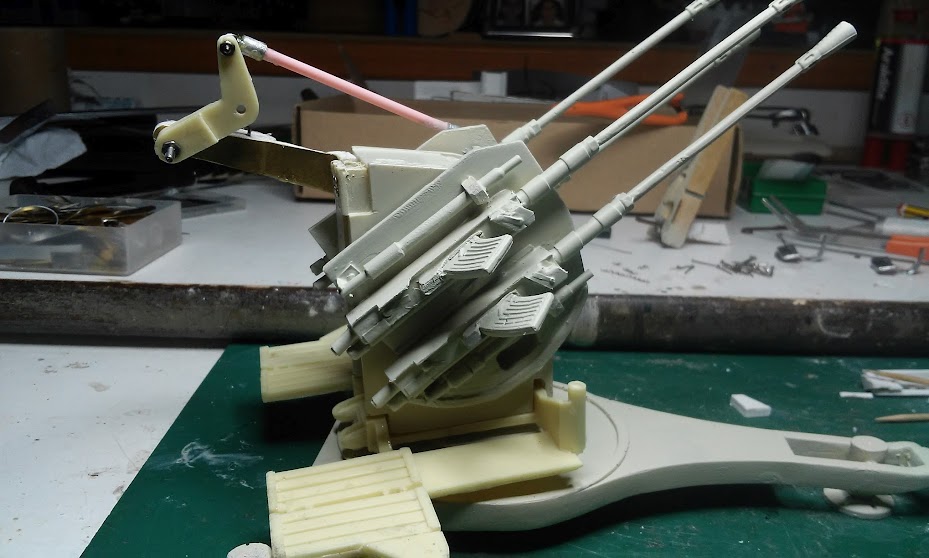
Several more components and parts already done and primed put in place to needed check corrections. The flakvisier is the one I did long ago for use in the Wirbelwind (the one that came with the kit was useless), later I will put pics of the flakvisier I will use in this flak


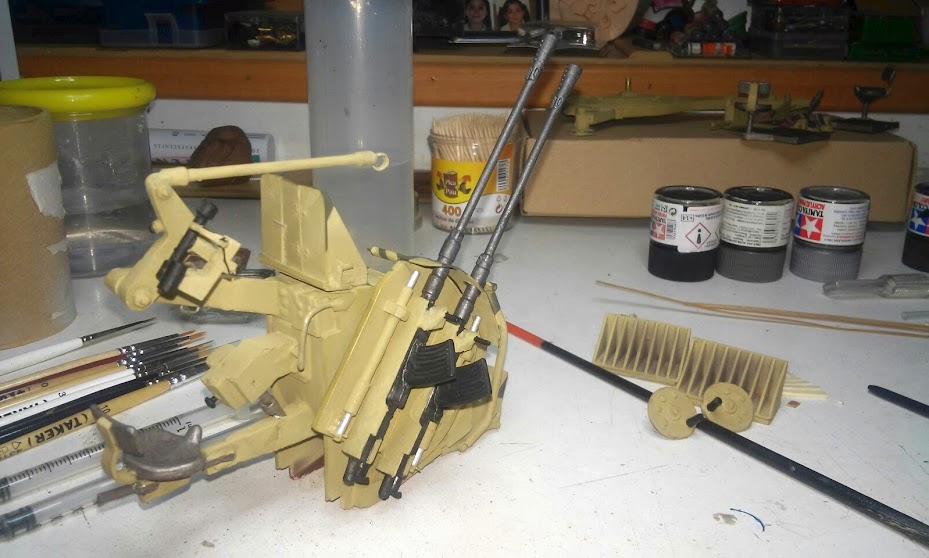
As I did not used putty to close the holes when it was time (my bad) I then had to use very thin plastic film to cover these imperfections

Building up the loaders seats, on the rear you can see the two flakvisiers (one for the Wirbelwind, the other for this flak gun)
Gun sight built and with some (only some) detailing, also the elevation arm


The blocking bar used when the gun was in travel mode


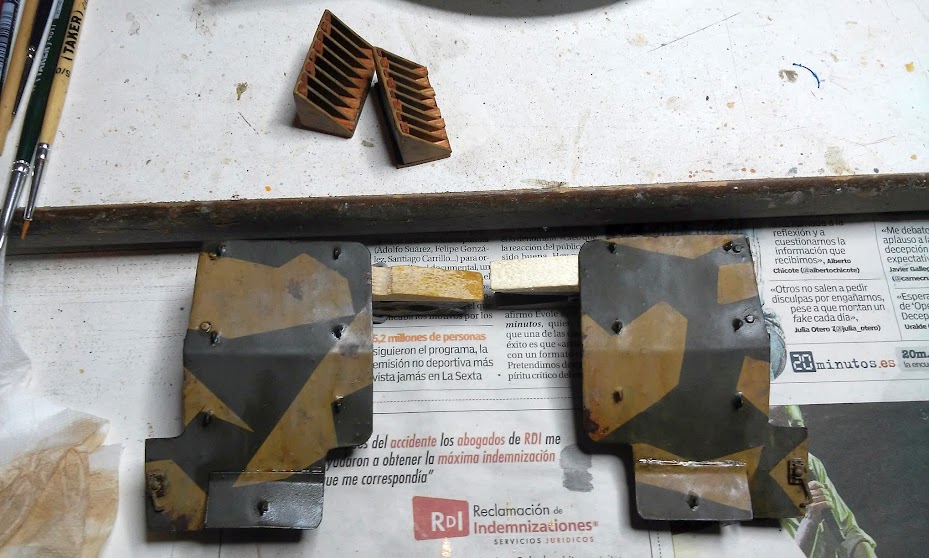
The Wood parts that will be located inside the ammo racks, and the ‘facial’ armour used when the gun was used in ground role


Several other components are visible here, the recuperators (or recoil absorbers), the mounting brackets for the upper armour, etc…


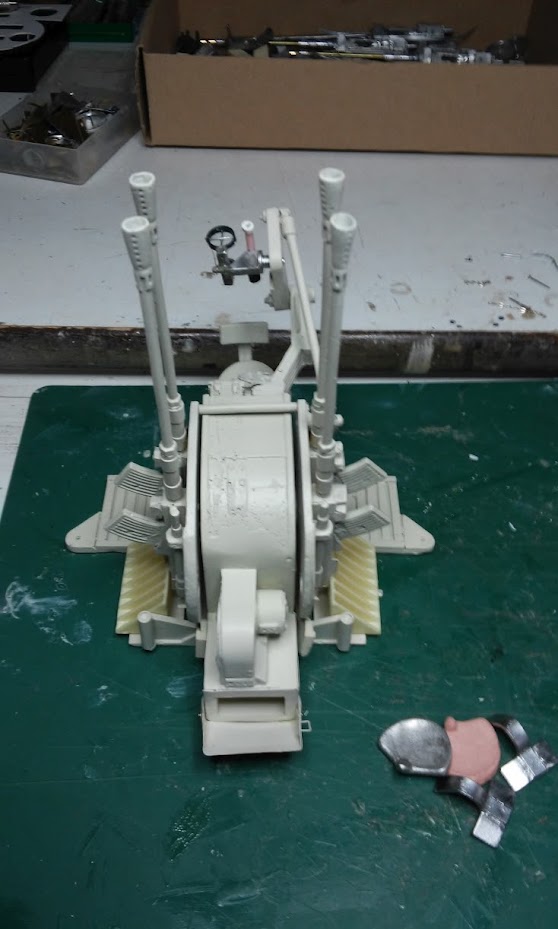
Adding several detailing to the laffette, screws, rivets, towing hooks, levers...


Also the dosennibelle

Here you can see several improvements on the barbette’s detailing

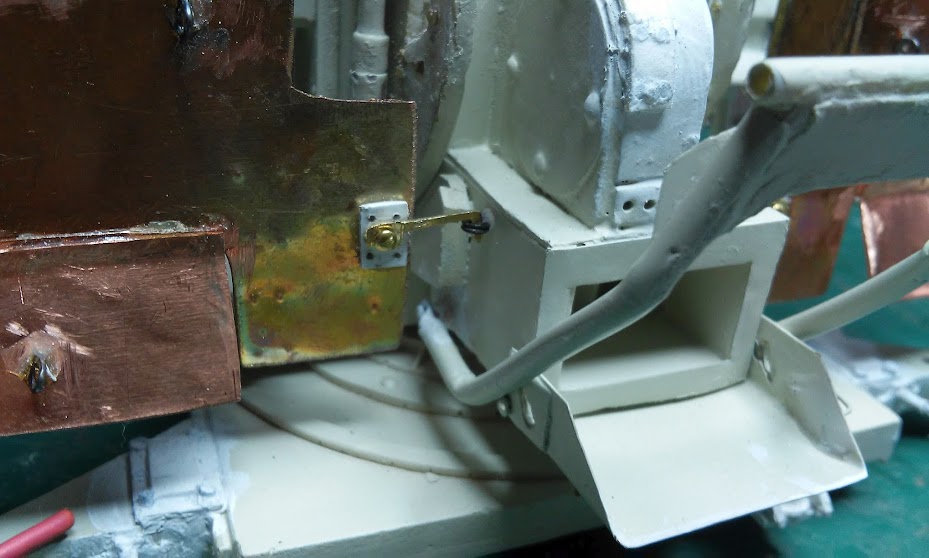
And now the ‘Dumbo’ armour…

I made these parts from 0.5mm copper sheet and 2mm brass tube


Testing how it looks


Folded

Adding some more detailing to the armour shields


Gluing the loops used to attach foliage

I was in lazy mode, and I didn’t wanted to do the deflector box armour, so I make only these loops to anchor the shields open

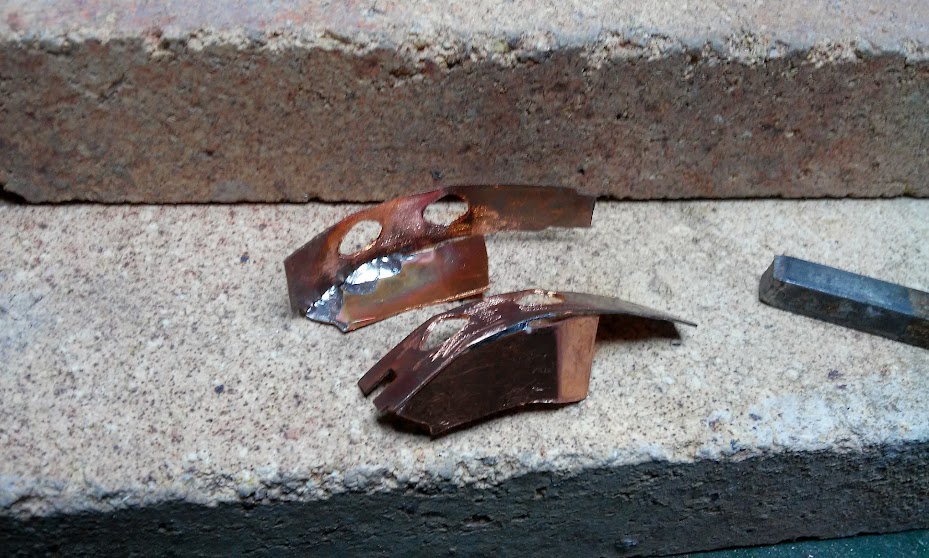
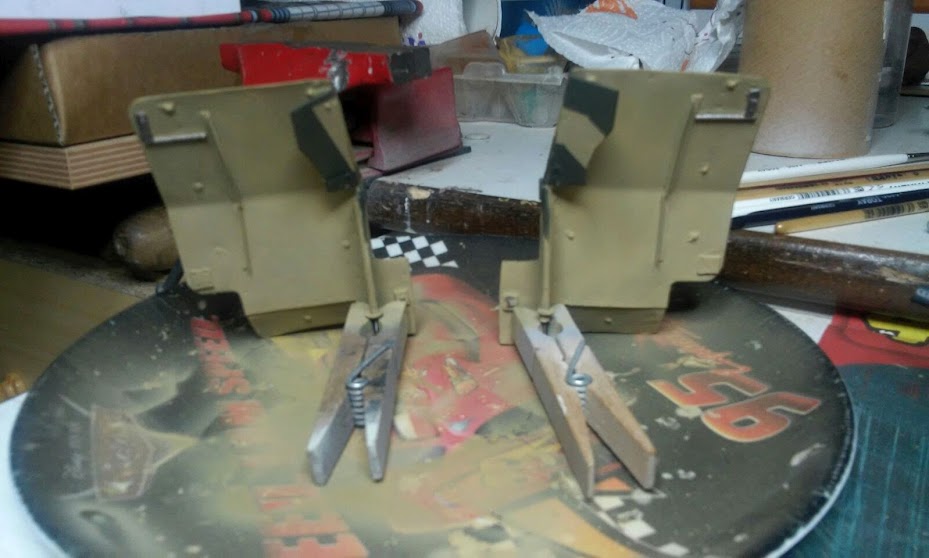
The fixed guns armour shields themselves. The parts are cut from copper 0.5mm sheet


Soldering the parts

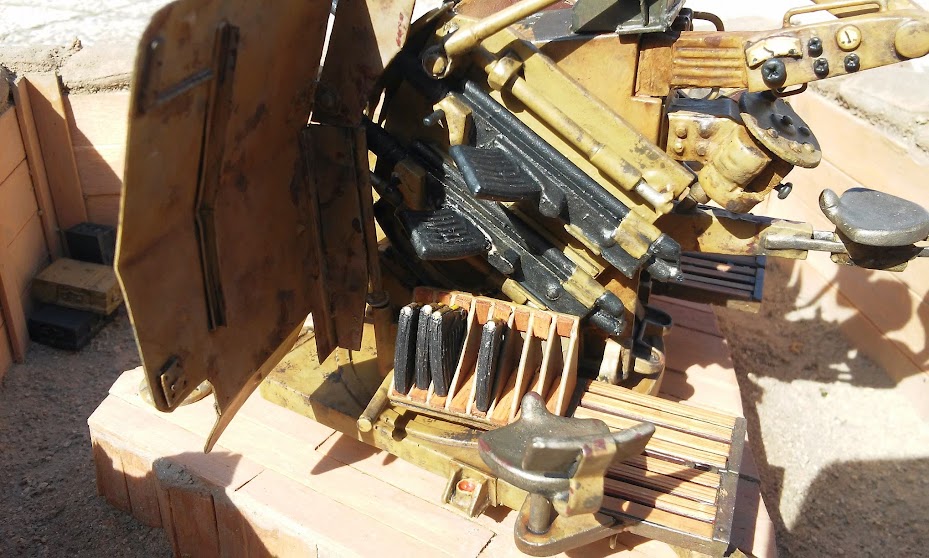
And finally, I call the gun build


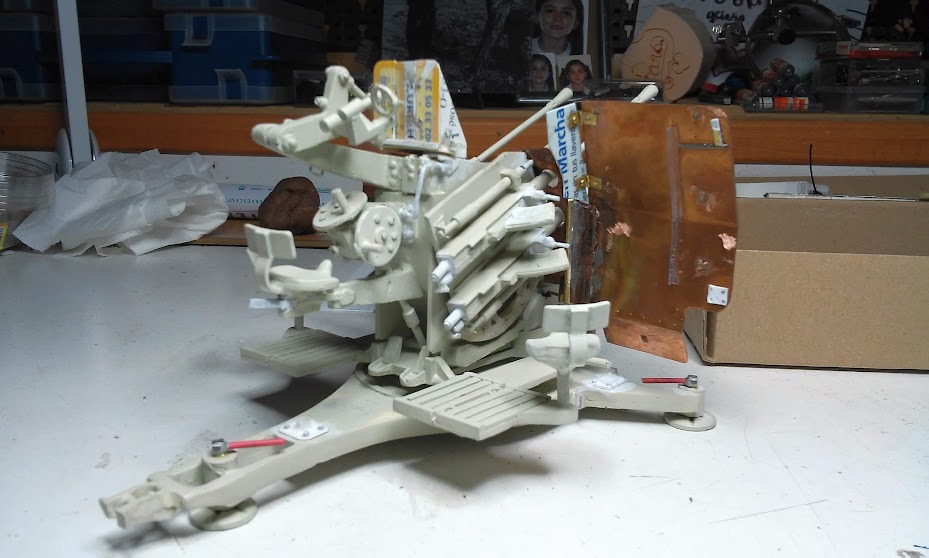
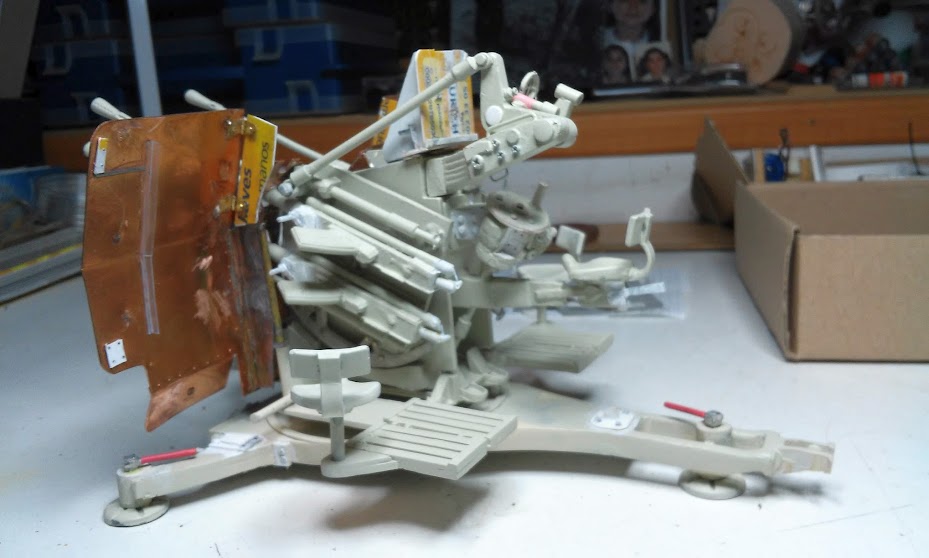
The painting process begins

In the previous pics, the ammo racks were not present because i will paint them and the wood parts they had separately, and only i will put them in place on the final stage

After painting several parts in red anti rust paint (these who normally were not covered in the guns normal paint) I made the first layer of dunkelgelb

Painting the guns and components of the ‘barbettes’

I have no current fictional references, but I wanted to do this camo

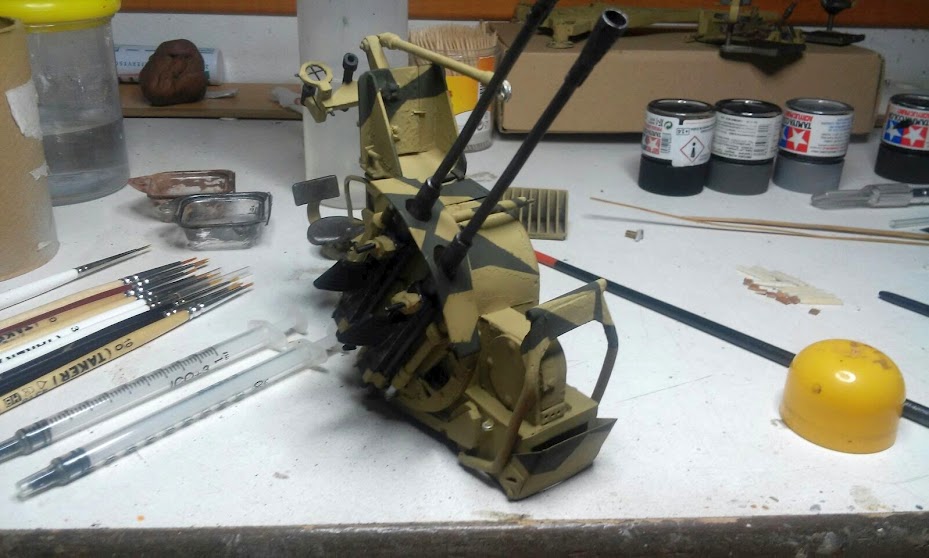


The real wood parts painted with oils and glued in place

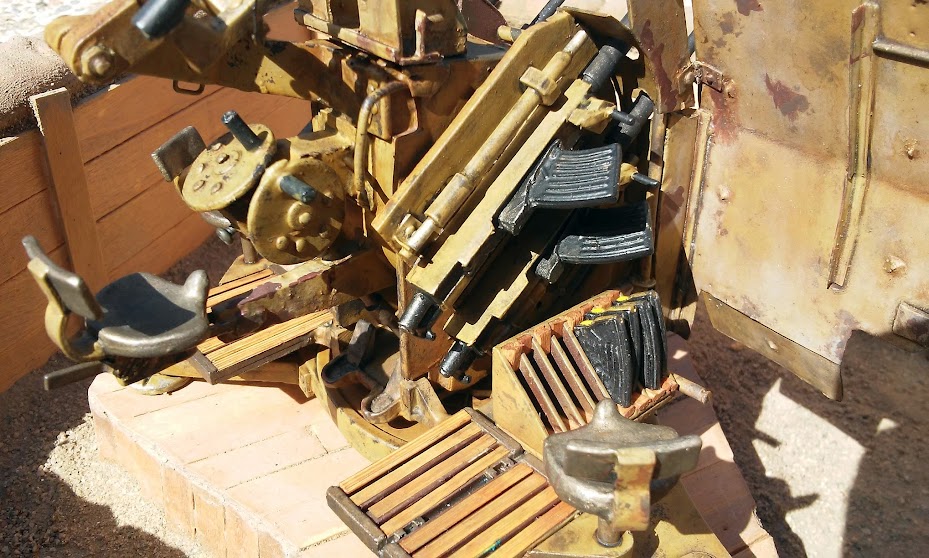
Several weathering days passed, filters, oils, etc…


And now, several final shots on the outside, with an emergency crew selected for the pic, I must modify the figures to fit the gun seats…


This position is designed to be buried on the ground of our Panzodrome, so the walls would be no visible at all, only the sand bags


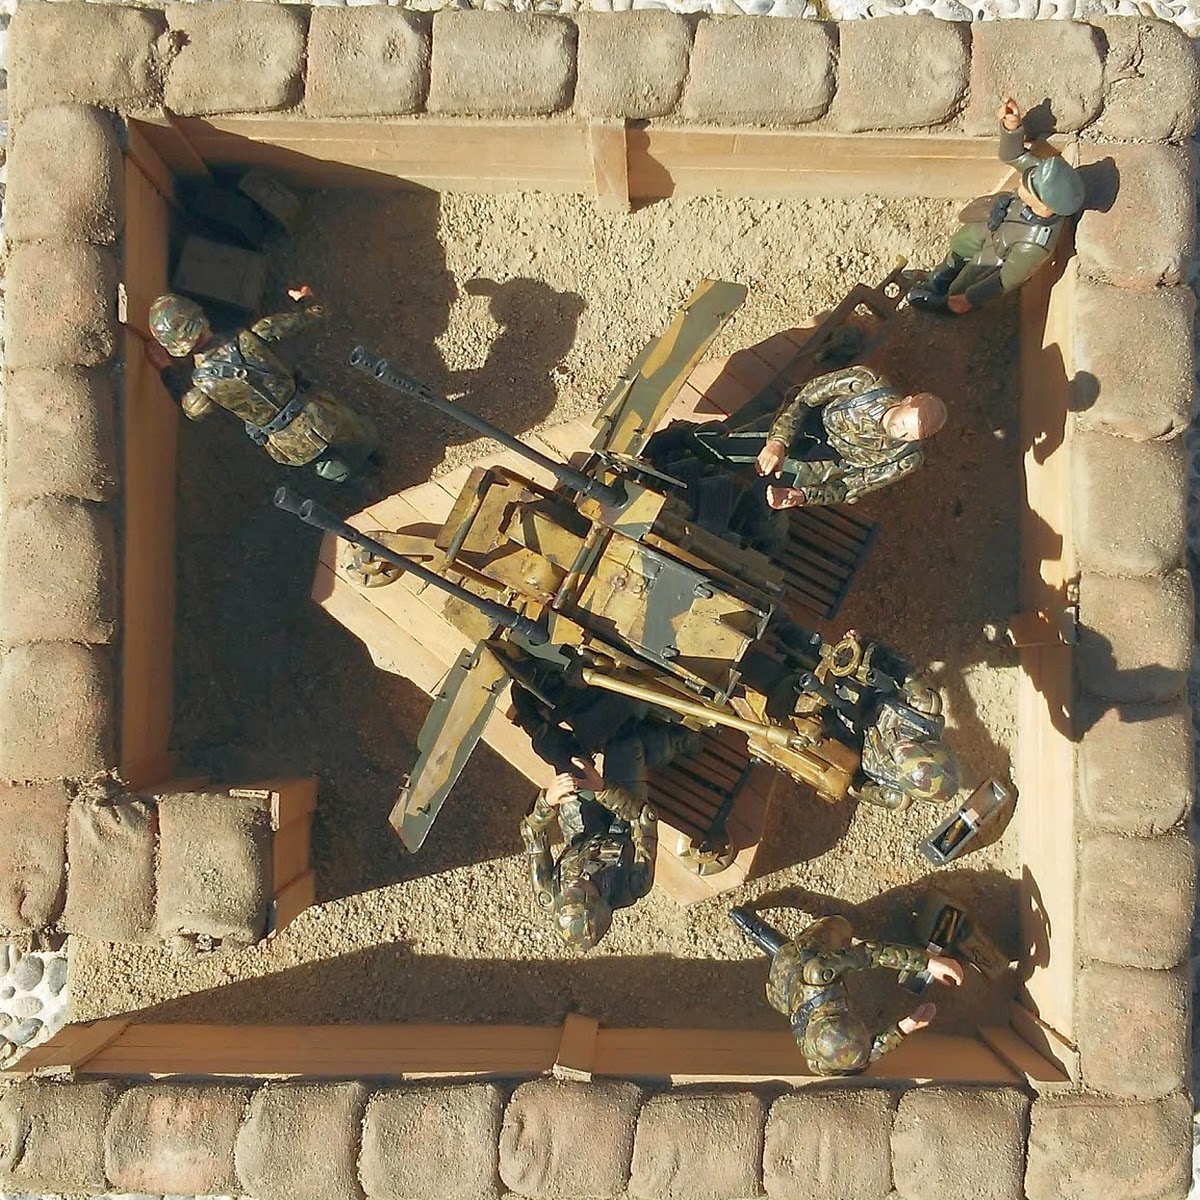
Without gun crew


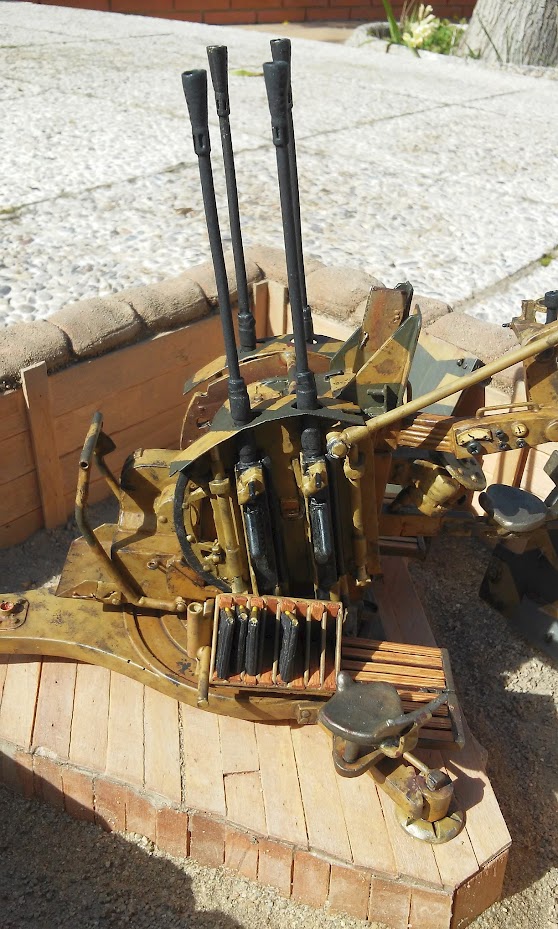

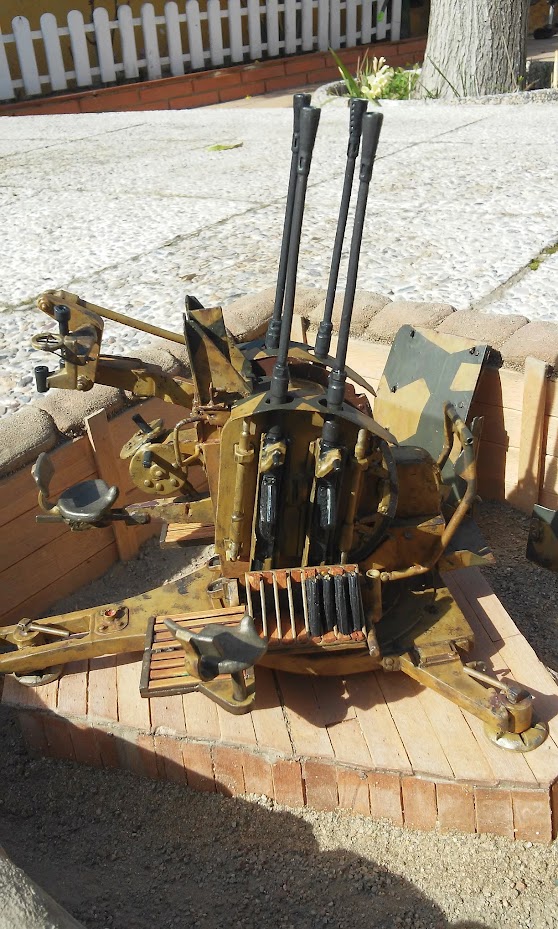

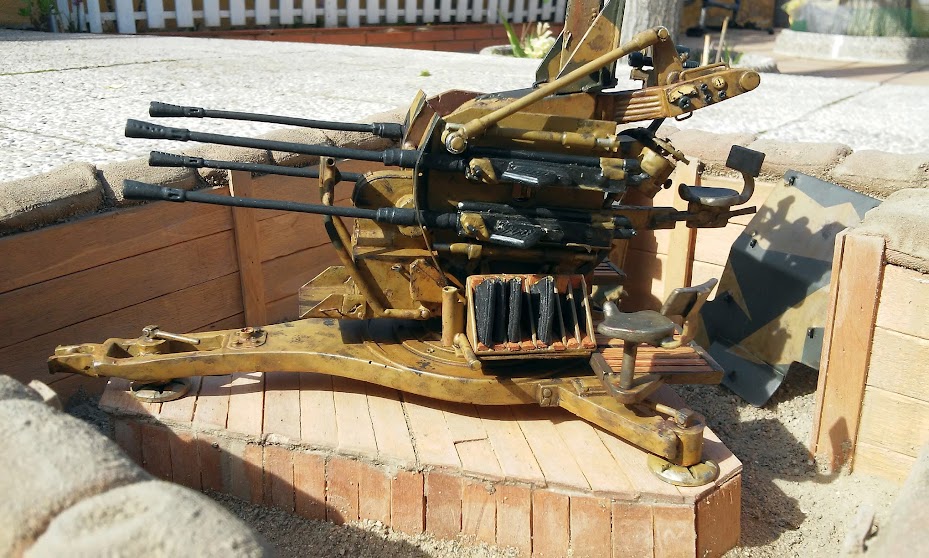
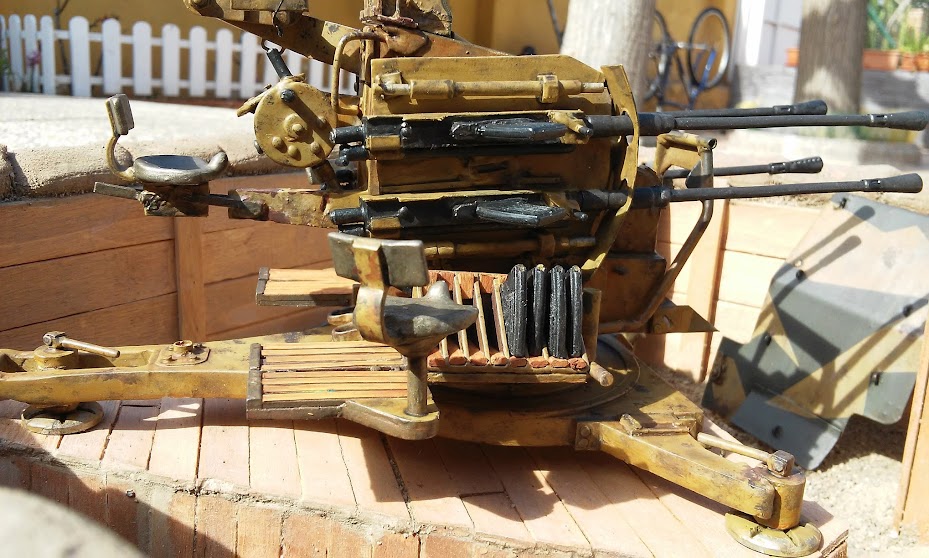
aaaand… that’s all for this gun!
Thanks for watching
Best regards
after several weeks of working, I've finished another piece for the Panzodrom, This time I've build a 2cm FlaK38 Vierling gun, and a lot of the components are scratch made (as you will notice ipso facto duet he lack of detail on some of them), the origin of this is that some years ago i brought a flak38 and a turret to build a Wirbelwind (this project is yet unfinished), but as the quality of quite a number of parts was 'poor' (to be gentle), and that i wanted to do it RC, i was left with a lot of 'useless' bits of hardware. But then i decided to build another FlaK position for our scenery, so i used some of these parts and also i scratch build some others.
So here you are several tons of pics…First, I started with the guns themselves, made from scratch except the gun tubes and gun muzzles; these are from the static kit I brought for the Wirbelwind.
Here you are the guns already mounted on the ‘barbettes’ (I do not know how to name these pieces, sorry), these ‘barbettes’ I make them from an old cover of an electrical joint box (these boxes we have on the walls of our houses…), detailing the lower part of these barbettes will come later...
Making two clones from the original seats (i need six, si i've to make some), the way the ‘poor’ people do them, with children’s clay to make the mould and another type of hardening clay to do the seats
Gluing the guns and aligning them on the two ‘barbettes’
Checking several components and the way they interact together to look what to correct. You can see several components from the kit (laffette, main body) and several scratch build parts
The gunner’s seat and his support already put in place, also the elevation and traverse control wheels, and the ‘barbettes’ guides
Making and putting in place the shells ejector
Once I did this part, I was aware that I made an error… the ejector from the kit is for it being used in the Wirbelwind turret, so it’s modified and shortened, I then had to ‘enlarge’ the shells container
The working door for the already fired shells box
Several more components and parts already done and primed put in place to needed check corrections. The flakvisier is the one I did long ago for use in the Wirbelwind (the one that came with the kit was useless), later I will put pics of the flakvisier I will use in this flak
As I did not used putty to close the holes when it was time (my bad) I then had to use very thin plastic film to cover these imperfections
Building up the loaders seats, on the rear you can see the two flakvisiers (one for the Wirbelwind, the other for this flak gun)
Gun sight built and with some (only some) detailing, also the elevation arm
The blocking bar used when the gun was in travel mode
The Wood parts that will be located inside the ammo racks, and the ‘facial’ armour used when the gun was used in ground role
Several other components are visible here, the recuperators (or recoil absorbers), the mounting brackets for the upper armour, etc…
Adding several detailing to the laffette, screws, rivets, towing hooks, levers...
Also the dosennibelle
Here you can see several improvements on the barbette’s detailing
And now the ‘Dumbo’ armour…
I made these parts from 0.5mm copper sheet and 2mm brass tube
Testing how it looks
Folded
Adding some more detailing to the armour shields
Gluing the loops used to attach foliage
I was in lazy mode, and I didn’t wanted to do the deflector box armour, so I make only these loops to anchor the shields open
The fixed guns armour shields themselves. The parts are cut from copper 0.5mm sheet
Soldering the parts
And finally, I call the gun build
The painting process begins
In the previous pics, the ammo racks were not present because i will paint them and the wood parts they had separately, and only i will put them in place on the final stage
After painting several parts in red anti rust paint (these who normally were not covered in the guns normal paint) I made the first layer of dunkelgelb
Painting the guns and components of the ‘barbettes’
I have no current fictional references, but I wanted to do this camo
The real wood parts painted with oils and glued in place
Several weathering days passed, filters, oils, etc…
And now, several final shots on the outside, with an emergency crew selected for the pic, I must modify the figures to fit the gun seats…
This position is designed to be buried on the ground of our Panzodrome, so the walls would be no visible at all, only the sand bags
Without gun crew
aaaand… that’s all for this gun!
Thanks for watching
Best regards
Jussek
https://www.facebook.com/pages/Club-RC-Reus-Secci%C3%B3-de-Modelisme-Militar-Radiocontrolat-PzGr-Tarraco/639220812799552
https://www.facebook.com/pages/Club-RC-Reus-Secci%C3%B3-de-Modelisme-Militar-Radiocontrolat-PzGr-Tarraco/639220812799552
-
silversurfer1947
- Lieutenant
- Posts: 3337
- Joined: Tue Oct 27, 2015 9:54 pm
- Location: Bristol, UK
Re: Panzergruppe Tarraco scenery: the Panzodrom
Wow, I'm lost for words. Outstanding work 
Richard
Tamiya Tiger 1, Taigen FlakPanzer IV,Torro M16 half-track, Tamiya Panther,WSN/Torro T34,Taigen M41 Bulldog,H/l/Taigen Sherman M4A3,H/L T90, Haya M3 Grant, Metal Origins 234/2 Puma, Nashorn by Alwyn. I was only going to have one tank - honest!
Tamiya Tiger 1, Taigen FlakPanzer IV,Torro M16 half-track, Tamiya Panther,WSN/Torro T34,Taigen M41 Bulldog,H/l/Taigen Sherman M4A3,H/L T90, Haya M3 Grant, Metal Origins 234/2 Puma, Nashorn by Alwyn. I was only going to have one tank - honest!
Re: Panzergruppe Tarraco scenery: the Panzodrom
HOLY CR@P!!!!!!!!!!!!!!!!!!  ...Where do you find the time????
  ........Somebody has to call Disney or Universal ...Colombia!!...From bridge to AA guns...that's some Outstanding dedication and work
ALPHA
ALPHA
Re: Panzergruppe Tarraco scenery: the Panzodrom
thank you very much guys! I truly appreciate your kind words
ALPHA... lol! i must say that i seek time around the clock... but bear in mind that this FlaK38 had took three months to be completed from first pic to the last.
again, thanks guys!
best regards
ALPHA... lol! i must say that i seek time around the clock... but bear in mind that this FlaK38 had took three months to be completed from first pic to the last.
again, thanks guys!
best regards
Jussek
https://www.facebook.com/pages/Club-RC-Reus-Secci%C3%B3-de-Modelisme-Militar-Radiocontrolat-PzGr-Tarraco/639220812799552
https://www.facebook.com/pages/Club-RC-Reus-Secci%C3%B3-de-Modelisme-Militar-Radiocontrolat-PzGr-Tarraco/639220812799552
Re: Panzergruppe Tarraco scenery: the Panzodrom
I am now wondering just what kind of clock you have  ...It'd be a blue moon in August if I would be able to even find an hour to break ground ...What you and your buddies have accomplished is truly Spectacular (for lack of a better term )
ALPHA
ALPHA
