Thanks guys...
Who's Jarndice?
DAK Pz IV Ausf G Build
Re: DAK Pz IV Ausf G Build
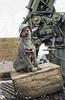
A little more work done on the upper hull.
Armor reinforcement: 2-mm sheet styrene cut and installed on the front glacis.
Hatches installed: Got the transmission and driver’s and radio operator’s hatches installed. Still need to add the small platform underneath the transmission hatches to keep them from falling through. Right now, they’re held in place with masking tape. I ground off the signal hatches from the driver’s and radio operator’s hatches since those were not present on most of the Gs.
Splash guard: Installed a small splash guard in front of the existing one using 2-mm triangular styrene. It’s sanded down to give a steep front slope and a more gradual rear slope. Then, I backfilled the space behind the them with contour putty and sanded it smooth.
Hull bolts: HL molded in several of the recessed hull bolts around the driver’s and radio operator’s hatches. But, they don’t look very good. So, I drilled them out and installed some real micro screws that just arrived. I used a #55 drill bit in a pin vise to drill them out carefully. Then a dab of CA glue holds the 000-120 brass slotted screws in place.
Wooden parts: I used some 4-mm x 4-mm strip to build these. The jack block uses (8) 4 x 4 x 19-mm strips that are glued together to form an 8 x 19-mm jack block. According to the Trojca books, the antenna trough appears to have been two troughs combined to form one. The bottom trough has a rounded trough. The top one is squared. The stain was applied using a stain pen.
Armor reinforcement: 2-mm sheet styrene cut and installed on the front glacis.
Hatches installed: Got the transmission and driver’s and radio operator’s hatches installed. Still need to add the small platform underneath the transmission hatches to keep them from falling through. Right now, they’re held in place with masking tape. I ground off the signal hatches from the driver’s and radio operator’s hatches since those were not present on most of the Gs.
Splash guard: Installed a small splash guard in front of the existing one using 2-mm triangular styrene. It’s sanded down to give a steep front slope and a more gradual rear slope. Then, I backfilled the space behind the them with contour putty and sanded it smooth.
Wooden parts: I used some 4-mm x 4-mm strip to build these. The jack block uses (8) 4 x 4 x 19-mm strips that are glued together to form an 8 x 19-mm jack block. According to the Trojca books, the antenna trough appears to have been two troughs combined to form one. The bottom trough has a rounded trough. The top one is squared. The stain was applied using a stain pen.
Re: DAK Pz IV Ausf G Build
More upper hull work...
Front hull bolts: HL also molded the hull bolts near the transmission hatches, but made them poorly done rounded protruding bolts. Looking at several of the walk-arounds on the internet, it seems that there was a tendency to use what was available. Most of the time they seemed to be flush. Others use rounded, slotted bolts or hex-head bolts. I’ve decided to go with one I saw and liked that used flat, flush, slotted bolts around the plate and hex bolts on the plate. I used brass 1-mm hex head bolts (head is 1.4-mm) and counter-sunk 000-120 flat head brass screws.
Lowered the rear deck: I did this by cutting the hull down about 3-mm in the rear and then tapering it to the point where the fan grills meet the hull. The gaps were filled with Milliput and sanded down.
Grab handle: The Gs don’t seem to have the step ladder on the portside fender like previous versions. But, I’ve seen some photos where there was a grab handle in its place. I used some 1.4-mm brass wire to fabricate one. It stands about 3-mm off the deck and is about 10-mm wide. Before epoxying it into place, I sanded the surface to rough it up. I did this because I’ve noticed some of the paint chipping off my brass parts on my PzIII. Perhaps this will help the primer stick better when it’s time to paint.
Engine access hatches: These were also installed. If you plan to do this, you’ll lose both of the rear screw posts for attaching the lower and upper hull. You also lose one of the posts for the rotation motor and one for the 8-pin plug. The rotation motor will be fine on 2 posts (originally there are three). The 8-pin plug can be moved to the front between the driver’s and radio operator’s positions.
Hull bolts: I replaced the recessed hull bolts here the same way as the ones near the driver’s and radio operator’s hatches.
Splash guard: HL’s molded portside rear guard was in the wrong spot. So, I ground it off and fabricated a new one using a 5-mm wide strip of 3-mm sheet styrene. Making a triangle from a rectangle was a fun challenge.
Rivets and panel markings: I deepened the holes or replaced as necessary the rivet holes. The panel markings were made using a metal ruler and Xacto knife followed by an oval micro file. Not a recommended process. I finally got the Tamiya scriber tool and touched up the markings. This would have been the tool to start with.
Rear hull plate: Because the rear deck was lowered, the rear plate has to be trimmed from the top. That means respotting all of the bolts, rivets and the tow cable brackets. The measurements were marked from the bottom of the plate with pencil to ensure that horizontal and vertical parallel lines were maintained. Then, holes were drilled to mark their future locations. (Waiting for hex styrene rods)
Front hull bolts: HL also molded the hull bolts near the transmission hatches, but made them poorly done rounded protruding bolts. Looking at several of the walk-arounds on the internet, it seems that there was a tendency to use what was available. Most of the time they seemed to be flush. Others use rounded, slotted bolts or hex-head bolts. I’ve decided to go with one I saw and liked that used flat, flush, slotted bolts around the plate and hex bolts on the plate. I used brass 1-mm hex head bolts (head is 1.4-mm) and counter-sunk 000-120 flat head brass screws.
Grab handle: The Gs don’t seem to have the step ladder on the portside fender like previous versions. But, I’ve seen some photos where there was a grab handle in its place. I used some 1.4-mm brass wire to fabricate one. It stands about 3-mm off the deck and is about 10-mm wide. Before epoxying it into place, I sanded the surface to rough it up. I did this because I’ve noticed some of the paint chipping off my brass parts on my PzIII. Perhaps this will help the primer stick better when it’s time to paint.
Hull bolts: I replaced the recessed hull bolts here the same way as the ones near the driver’s and radio operator’s hatches.
Splash guard: HL’s molded portside rear guard was in the wrong spot. So, I ground it off and fabricated a new one using a 5-mm wide strip of 3-mm sheet styrene. Making a triangle from a rectangle was a fun challenge.
Rivets and panel markings: I deepened the holes or replaced as necessary the rivet holes. The panel markings were made using a metal ruler and Xacto knife followed by an oval micro file. Not a recommended process. I finally got the Tamiya scriber tool and touched up the markings. This would have been the tool to start with.
-
PainlessWolf

- Colonel
- Posts: 7868
- Joined: Sun Feb 26, 2012 9:09 pm
- Location: Southern Colorado Rocky Mountains
Re: DAK Pz IV Ausf G Build
Philipat,
Jarndice is a friend of mine on here who loves Pz IVs. If he hasn't spotted this build yet, he soon will. ;o) Once again, your eye for detail and the work needed to pull it off is extraordinary! Following along.
regards,
Painless
Jarndice is a friend of mine on here who loves Pz IVs. If he hasn't spotted this build yet, he soon will. ;o) Once again, your eye for detail and the work needed to pull it off is extraordinary! Following along.
regards,
Painless
...Money!? What's that!?...
-
HERMAN BIX

- Major-General
- Posts: 11885
- Joined: Sun Jan 12, 2014 12:15 am
- Location: Gold Coast,Australia
Re: DAK Pz IV Ausf G Build
Sure is a nice change to have a different machine under the spotlight. Watching along on this for sure 
HL JAGDPANTHER,HL TIGER 1,HL PzIII MUNITIONSCHLEPPER, HL KT OCTOPUS,HL PANTHER ZU-FUSS,HL STuG III,HL T34/85 BEDSPRING,
HL PZIV MALTA,MATORRO JAGDTIGER,HL F05 TIGER,TAMIYA KT,HL PANTHERDOZER,HL EARLY PANTHER G,TAIGEN/RAMINATOR T34/76,
HL AN-BRI-RAM SU-85
HL PZIV MALTA,MATORRO JAGDTIGER,HL F05 TIGER,TAMIYA KT,HL PANTHERDOZER,HL EARLY PANTHER G,TAIGEN/RAMINATOR T34/76,
HL AN-BRI-RAM SU-85
Re: DAK Pz IV Ausf G Build
Sounds good...PainlessWolf wrote:Philipat,
Jarndice is a friend of mine on here who loves Pz IVs. If he hasn't spotted this build yet, he soon will. ;o) Once again, your eye for detail and the work needed to pull it off is extraordinary! Following along.
regards,
Painless
Glad to have everyone along. It's a fun build.
-
HERMAN BIX
- Major-General
- Posts: 11885
- Joined: Sun Jan 12, 2014 12:15 am
- Location: Gold Coast,Australia
Re: DAK Pz IV Ausf G Build
Mr Jarndice is a mythical entity that comes to life at certain times, under only the right conditions.................!PainlessWolf wrote:Philipat,
Jarndice is a friend of mine on here who loves Pz IVs. If he hasn't spotted this build yet, he soon will. ;o) Once again, your eye for detail and the work needed to pull it off is extraordinary! Following along.
regards,
Painless
HL JAGDPANTHER,HL TIGER 1,HL PzIII MUNITIONSCHLEPPER, HL KT OCTOPUS,HL PANTHER ZU-FUSS,HL STuG III,HL T34/85 BEDSPRING,
HL PZIV MALTA,MATORRO JAGDTIGER,HL F05 TIGER,TAMIYA KT,HL PANTHERDOZER,HL EARLY PANTHER G,TAIGEN/RAMINATOR T34/76,
HL AN-BRI-RAM SU-85
HL PZIV MALTA,MATORRO JAGDTIGER,HL F05 TIGER,TAMIYA KT,HL PANTHERDOZER,HL EARLY PANTHER G,TAIGEN/RAMINATOR T34/76,
HL AN-BRI-RAM SU-85
Re: DAK Pz IV Ausf G Build
Got some more work done on the upper hull.
Hatches: all of them have a support shelf installed using styrene sheet and a 2x1-mm disc rare earth magnet for each hatch. I cut a small piece of steel from frozen juice can lids and glued it to each hatch right where the magnet is. The magnet is strong enough to hold the hatch closed, but not make it impossible to open it.
Hatch bumpers: the driver’s and radio operator’s hatches both have small bumpers on the centered on the splash guards in front of them.
Vent Cover Tabs: The rear air vents had thin sheet metal covers that could be lifted to keep dust and things out. I’m not sure that I’ll model those. But, I did replicate the retention tabs.
Jack Block: I used some .8-mm sheet styrene cut into 2-mm strips and wrapped it around the block. After gluing it down, I installed miniature rivets. I also built the shelf that it will sit on. I’ll glue this in place when I get my 12-mm diameter styrene tube, which will be used to make the transmission vent cover. Until then I want to leave this off so that I measure and glue everything just once.
Hatches: all of them have a support shelf installed using styrene sheet and a 2x1-mm disc rare earth magnet for each hatch. I cut a small piece of steel from frozen juice can lids and glued it to each hatch right where the magnet is. The magnet is strong enough to hold the hatch closed, but not make it impossible to open it.
Jack Block: I used some .8-mm sheet styrene cut into 2-mm strips and wrapped it around the block. After gluing it down, I installed miniature rivets. I also built the shelf that it will sit on. I’ll glue this in place when I get my 12-mm diameter styrene tube, which will be used to make the transmission vent cover. Until then I want to leave this off so that I measure and glue everything just once.
Re: DAK Pz IV Ausf G Build
Some more work on the antenna, too.
Antenna base: I got this part from http://www.modellino.com. It’s a good part, but assumes that you’ll just use the standard HL antenna and stick it on the base. That would create an unsightly flare. So, I bored it out carefully with a micro drill and will eventually glue into it the HL antenna. Then, I’ll use black heat shrink to stiffen and blacken it.
Antenna Brackets: I built the three support brackets for the antenna trough using brass strip. Some styrene strip replicates the metal strips that ran vertically on the hull. I also made the strap with a small buckle for holding the shovel handle. I needed a couple of small chunks to be spacers to get the brackets to the right distance from the hull to work with the antenna base. The rearmost bracket is the trickiest to make. This bracket “bolts” to the fan housing and the underside of the main bracket.
-
Jake79
- Warrant Officer 2nd Class
- Posts: 1062
- Joined: Mon Aug 11, 2014 9:10 pm
- Location: Essex,Colchester, UK
Re: DAK Pz IV Ausf G Build
Great detail, I'm enjoying this...
Jake
Jake
Tamiya: 2 King Tigers
H/L,Taigen :Initial Tiger 1, Panzer III, Kv 2, Panther G, Bulldog, Leo 2A6
H/L,Taigen :Initial Tiger 1, Panzer III, Kv 2, Panther G, Bulldog, Leo 2A6
