Converting HL Panther "G" to a Late "A"
Re: Converting HL Panther "G" to a Late "A"
Good job Dean, I'm very impressed. But how will you prevent, that your side skirts not fall down during use? That would be a great pity. Do you have already an idea? 
Greeting Hotte
IG-Panzerjäger Berlin
HL Tiger I late (ElMod)
Torro Kingtiger (ElMod)
Tamiya Tiger I early (ElMod)
Tamiya Panther G (ElMod)
The thinking is allowed to all people, but many are spared. (Curt Goetz 1888-1960)
IG-Panzerjäger Berlin
HL Tiger I late (ElMod)
Torro Kingtiger (ElMod)
Tamiya Tiger I early (ElMod)
Tamiya Panther G (ElMod)
The thinking is allowed to all people, but many are spared. (Curt Goetz 1888-1960)
-
HERMAN BIX

- Major-General
- Posts: 11885
- Joined: Sun Jan 12, 2014 12:15 am
- Location: Gold Coast,Australia
Re: Converting HL Panther "G" to a Late "A"
Nothing worse than your skirt falling down eh mate 

That would have to be one of the most useful series of pics to date. The basics on getting the plates in the correct position, and height with mounts that are not to much over complcated is a bloody bonus mate
I have some brass here from K & S engineering , Chicago and now I have the dimensions & methodology
HL JAGDPANTHER,HL TIGER 1,HL PzIII MUNITIONSCHLEPPER, HL KT OCTOPUS,HL PANTHER ZU-FUSS,HL STuG III,HL T34/85 BEDSPRING,
HL PZIV MALTA,MATORRO JAGDTIGER,HL F05 TIGER,TAMIYA KT,HL PANTHERDOZER,HL EARLY PANTHER G,TAIGEN/RAMINATOR T34/76,
HL AN-BRI-RAM SU-85
HL PZIV MALTA,MATORRO JAGDTIGER,HL F05 TIGER,TAMIYA KT,HL PANTHERDOZER,HL EARLY PANTHER G,TAIGEN/RAMINATOR T34/76,
HL AN-BRI-RAM SU-85
-
dgsselkirk

- Warrant Officer 1st Class
- Posts: 1510
- Joined: Tue Oct 16, 2012 1:57 am
- Location: Kitchener, Ontario, Canada
- Contact:
Re: Converting HL Panther "G" to a Late "A"
If I impress you that's good!hotte8487 wrote:Good job Dean, I'm very impressed. But how will you prevent, that your side skirts not fall down during use? That would be a great pity. Do you have already an idea?
Once we have gone to paint and then re-mounted everything I am going to squeeze the U brackets shut a little more so the plates are snug but not too snug that they can't come off with a good jolt. I actually hope that once in a while in the middle of a battle one or 2 do pop off. I will have to test it as I go along in the spring.
Enough playing with brass So now I want to address the HL road wheels ridge issue. I see some different methods tried by lots of people usually involving putty which I wanted to try and avoid so I choose styrene itty bitty strips and some knife work. So first here is the pic showing the ridges that everyone talks about.
- Panther A 212.jpg (65.33 KiB) Viewed 4085 times
- Panther A 213.jpg (49.11 KiB) Viewed 4085 times
- Panther A 214.jpg (57.92 KiB) Viewed 4085 times
- Panther A 215.jpg (47.87 KiB) Viewed 4085 times
- Panther A 216.jpg (44.77 KiB) Viewed 4085 times
- Panther A 217.jpg (54.73 KiB) Viewed 4085 times
- Panther A 218.jpg (62.15 KiB) Viewed 4085 times
"There are things in Russia which are not as they seem..."
Georgy Konstantinovich Zhukov
Georgy Konstantinovich Zhukov
Re: Converting HL Panther "G" to a Late "A"
UHHHHHHHHHHHHHHHHH....Wouldn't running a bolt through the center and spinning the wheels on a drill been faster??????????????dgsselkirk wrote:If I impress you that's good!hotte8487 wrote:Good job Dean, I'm very impressed. But how will you prevent, that your side skirts not fall down during use? That would be a great pity. Do you have already an idea?
Once we have gone to paint and then re-mounted everything I am going to squeeze the U brackets shut a little more so the plates are snug but not too snug that they can't come off with a good jolt. I actually hope that once in a while in the middle of a battle one or 2 do pop off. I will have to test it as I go along in the spring.
Enough playing with brass So now I want to address the HL road wheels ridge issue. I see some different methods tried by lots of people usually involving putty which I wanted to try and avoid so I choose styrene itty bitty strips and some knife work. So first here is the pic showing the ridges that everyone talks about. Take a new xacto knife blade and snap the the tip off. I use this to scrape the paint off so we are gluing directly to plastic. I am using .020 x .030 strips of styrene Sorry these are a little blurry. So using Tamiya extra thin glue I dab a little on the wheel and dab some on the beginning of the strip and wait 30 seconds till it gets a bit tacky and then using the curvd tweezers I start putting it into the groove It takes 2 strips with this method so started the next one Let these dry OVERNIGHT!!! if you start on them any sooner the styrene will still be soft and it will mak a mess. Then using the knife with the broke off tip start scraping away any ridge that is left and rounding the new white styrene into the wheel. And finally a little sanding and gentle filing making sure not to hit the bolt heads and you have a more realistic road wheel. I will be using Mr. Surfacer to give it the proper cast surface look it should have and this will also blend everything in together to make it seamless...
ALPHA
-
dgsselkirk
- Warrant Officer 1st Class
- Posts: 1510
- Joined: Tue Oct 16, 2012 1:57 am
- Location: Kitchener, Ontario, Canada
- Contact:
Re: Converting HL Panther "G" to a Late "A"
Funny you should mention that Alpha, I thought about doing that and actually experimented on an extra wheel but just removing the ridge made the angle too steep going in towards the center of the wheel if I explained that right! It just looked too concave...
"There are things in Russia which are not as they seem..."
Georgy Konstantinovich Zhukov
Georgy Konstantinovich Zhukov
Re: Converting HL Panther "G" to a Late "A"
Doing it sober helpsdgsselkirk wrote:Funny you should mention that Alpha, I thought about doing that and actually experimented on an extra wheel but just removing the ridge made the angle too steep going in towards the center of the wheel if I explained that right! It just looked too concave...
Seriously though dgsellkirk...plastic powder + crazy glue in that gap...spun in a drill...with a dremel on slow with a round bit is pretty fast
ALPHA
Re: Converting HL Panther "G" to a Late "A"
Me too Dean, I'm waiting also for the spring to check my Tiger 1 and may be sort out any problems which do not occur in my basement.dgsselkirk wrote:If I impress you that's good!hotte8487 wrote:Good job Dean, I'm very impressed. But how will you prevent, that your side skirts not fall down during use? That would be a great pity. Do you have already an idea?
Once we have gone to paint and then re-mounted everything I am going to squeeze the U brackets shut a little more so the plates are snug but not too snug that they can't come off with a good jolt. I actually hope that once in a while in the middle of a battle one or 2 do pop off. I will have to test it as I go along in the spring.
Greeting Hotte
IG-Panzerjäger Berlin
HL Tiger I late (ElMod)
Torro Kingtiger (ElMod)
Tamiya Tiger I early (ElMod)
Tamiya Panther G (ElMod)
The thinking is allowed to all people, but many are spared. (Curt Goetz 1888-1960)
IG-Panzerjäger Berlin
HL Tiger I late (ElMod)
Torro Kingtiger (ElMod)
Tamiya Tiger I early (ElMod)
Tamiya Panther G (ElMod)
The thinking is allowed to all people, but many are spared. (Curt Goetz 1888-1960)
Re: Converting HL Panther "G" to a Late "A"
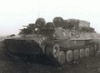
And exactly this is the problem, to see at your second picture EF; your skirt part hangs down only at one side and so you could drive over it and if you have bad luck, it will be damaged. And that would be pity.Eastern Front wrote:Nothing wrong with having the schurzen come off, here is a photo of mine doing just that! I hit something (I think the edge of a tree during combat, and the plate came off the mounts, it then was shed a few seconds later. After battle, I went out on the field and picked up the pieces that were shed.. Don't get me wrong, they do not come off easy, but they are not hard either.....HERMAN BIX wrote:Nothing worse than your skirt falling down eh mate
That would have to be one of the most useful series of pics to date. The basics on getting the plates in the correct position, and height with mounts that are not to much over complcated is a bloody bonus mate
I have some brass here from K & S engineering , Chicago and now I have the dimensions & methodology
Greeting Hotte
IG-Panzerjäger Berlin
HL Tiger I late (ElMod)
Torro Kingtiger (ElMod)
Tamiya Tiger I early (ElMod)
Tamiya Panther G (ElMod)
The thinking is allowed to all people, but many are spared. (Curt Goetz 1888-1960)
IG-Panzerjäger Berlin
HL Tiger I late (ElMod)
Torro Kingtiger (ElMod)
Tamiya Tiger I early (ElMod)
Tamiya Panther G (ElMod)
The thinking is allowed to all people, but many are spared. (Curt Goetz 1888-1960)
-
dgsselkirk
- Warrant Officer 1st Class
- Posts: 1510
- Joined: Tue Oct 16, 2012 1:57 am
- Location: Kitchener, Ontario, Canada
- Contact:
Re: Converting HL Panther "G" to a Late "A"
Well guys, had to take a week break to get my tanks ready and organize our club get together but back at it now. It was time to tackle the zim. I really love working with this stuff. I know the kits are a bit expensive but having done all kinds of putty and burn zim, this is just soooo much easier!
It took some fitting and cutting and re-use of small pieces since this kit is made for a Tamiya G so there are some things that had to be adjusted of course.
First I had to replace the back tow pull points
So here are the pics of the zim pretty well finished up except for the lower one side.
Notice how the zim "bends" over the edges of the sides as per the real thing. This is done using a heat gun CAREFULLY just warm it to the point it flexes and then push it down with fingers. Yes, it;s a little warm but the results are much better than if you use a tool. You can just "feel" when it bends down right.
It took some fitting and cutting and re-use of small pieces since this kit is made for a Tamiya G so there are some things that had to be adjusted of course.
First I had to replace the back tow pull points
- Panther A 219.jpg (41 KiB) Viewed 5148 times
- Panther A 220.jpg (70.29 KiB) Viewed 5148 times
- Panther A 221.jpg (60.57 KiB) Viewed 5148 times
- Panther A 222.jpg (45.62 KiB) Viewed 5148 times
- Panther A 223.jpg (47.37 KiB) Viewed 5148 times
- Panther A 224.jpg (54.94 KiB) Viewed 5148 times
- Panther A 225.jpg (52.85 KiB) Viewed 5148 times
- Panther A 226.jpg (62.17 KiB) Viewed 5148 times
"There are things in Russia which are not as they seem..."
Georgy Konstantinovich Zhukov
Georgy Konstantinovich Zhukov
Re: Converting HL Panther "G" to a Late "A"
8 pages deep....and we're only up to Zim application?????????????  ................Just kidding dgsellkirk....We all know you had your hands full planning that Cool Club ShinDig
Clean ..Seamless application by the way .......she's really coming along
ALPHA
Clean ..Seamless application by the way
ALPHA
