Good Afternoon,
Thanks, my friends. Once I add the tow cable and stowage and a little depth to the paint with a pin wash and weathering, I will do a Show-Off thread. I have the original upper and turret mostly intact and it is interesting to see how much can be done to upgrade these iconic tanks. I'll make sure to do a 'Then' and 'Now' picture.
warm regards,
Painless
Heng Long Pershing Rebuild
-
PainlessWolf

- Colonel
- Posts: 7864
- Joined: Sun Feb 26, 2012 9:09 pm
- Location: Southern Colorado Rocky Mountains
Re: Heng Long Pershing Rebuild
...Money!? What's that!?...
-
PainlessWolf
- Colonel
- Posts: 7864
- Joined: Sun Feb 26, 2012 9:09 pm
- Location: Southern Colorado Rocky Mountains
Re: Heng Long Pershing Rebuild
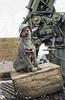
Tonight saw the tow cable wound and assembled and painted. I did a little more detail painting on the rear plate pieces and the medical kit and turret antennas. More to do but the eyes decided to call it a night. Getting close to stowage and weathering. Pictures:
- Attachments
-
- Another angle on the black plate.
-
- Back plate is complete except for detailing of the handset and weathering
- Back plate is complete except for detailing of the handset and weathering.JPG (94.27 KiB) Viewed 4103 times
-
- Ceramic pieces of the radio antennas done in Burnt Sienna gloss.
- Ceramic pieces of the radio antennas done in Burnt Sienna gloss..JPG (98.73 KiB) Viewed 4103 times
-
- First Aid kit
- First Aid kit.JPG (84.66 KiB) Viewed 4103 times
-
- Painted flat black and subtly rusted with a dry brush.
-
- Tow cable twisted out of 14 gauge copper wire and cut to length
...Money!? What's that!?...
-
HERMAN BIX

- Major-General
- Posts: 11879
- Joined: Sun Jan 12, 2014 12:15 am
- Location: Gold Coast,Australia
Re: Heng Long Pershing Rebuild
not sure whats more enticing mate ?...................the bloody outstanding tank, or the 'FREE BEER' sign hanging on the wall 
Best you watch out sending invites out like that I can give you the tip

Best you watch out sending invites out like that I can give you the tip
HL JAGDPANTHER,HL TIGER 1,HL PzIII MUNITIONSCHLEPPER, HL KT OCTOPUS,HL PANTHER ZU-FUSS,HL STuG III,HL T34/85 BEDSPRING,
HL PZIV MALTA,MATORRO JAGDTIGER,HL F05 TIGER,TAMIYA KT,HL PANTHERDOZER,HL EARLY PANTHER G,TAIGEN/RAMINATOR T34/76,
HL AN-BRI-RAM SU-85
HL PZIV MALTA,MATORRO JAGDTIGER,HL F05 TIGER,TAMIYA KT,HL PANTHERDOZER,HL EARLY PANTHER G,TAIGEN/RAMINATOR T34/76,
HL AN-BRI-RAM SU-85
-
PainlessWolf
- Colonel
- Posts: 7864
- Joined: Sun Feb 26, 2012 9:09 pm
- Location: Southern Colorado Rocky Mountains
Re: Heng Long Pershing Rebuild
*chuckles* Good Morning, Herman,
You would have to read the bottom of the sign. ;o) It's never tomorrow in my kitchen. I'm glad you're liking the work. This one ( like all of the others it seems ) turned into a bigger project than I at first anticipated. You look at the work and say to yourself, " Hey, it would be easy to add\change\improve this feature!" and suddenly, it's two months later. ;o) Damn Time Machines, tanks are....
regards,
Painless
...Money!? What's that!?...
-
Jake79
- Warrant Officer 2nd Class
- Posts: 1062
- Joined: Mon Aug 11, 2014 9:10 pm
- Location: Essex,Colchester, UK
Re: Heng Long Pershing Rebuild
Hi Painless
The Pershing is looking fantastic Painless, all that hard work is really paying off, it's been a very enjoyable build to follow. I've learnt a few things as well..
Looking forward to the next one...
Jake
The Pershing is looking fantastic Painless, all that hard work is really paying off, it's been a very enjoyable build to follow. I've learnt a few things as well..
Looking forward to the next one...
Jake
Tamiya: 2 King Tigers
H/L,Taigen :Initial Tiger 1, Panzer III, Kv 2, Panther G, Bulldog, Leo 2A6
H/L,Taigen :Initial Tiger 1, Panzer III, Kv 2, Panther G, Bulldog, Leo 2A6
-
PainlessWolf
- Colonel
- Posts: 7864
- Joined: Sun Feb 26, 2012 9:09 pm
- Location: Southern Colorado Rocky Mountains
Re: Heng Long Pershing Rebuild
Jake,
Thank you! I'm glad to have been of use. ;o) I think the next thing that I do will be to assemble the 1/35 Stug that Alpha sent along as research for a filler build next spring of a HL or Taigen Stug. Making one of those into an Ausf B model will be interesting.
regards,
Painless
Thank you! I'm glad to have been of use. ;o) I think the next thing that I do will be to assemble the 1/35 Stug that Alpha sent along as research for a filler build next spring of a HL or Taigen Stug. Making one of those into an Ausf B model will be interesting.
regards,
Painless
...Money!? What's that!?...
-
PainlessWolf
- Colonel
- Posts: 7864
- Joined: Sun Feb 26, 2012 9:09 pm
- Location: Southern Colorado Rocky Mountains
Re: Heng Long Pershing Rebuild
Last night saw the detail painting completed with the periscope and vision blocks and tank odds and ends. I finished up the evening by going over various stowage ideas and gathering pieces together to touch up. I'm still on the fence about K ration crates. They are a staple of the Tamiya Pershing and nearly everyone seems to add them so I'll see. Pictures:
- Attachments
-
- Collected stowage pieces include original jerry cans and plastic and metal helmets. Alpha's bucket. Chain, .45, an original road wheel repainted along with a salvage shovel
-
- Another view of the persicope lens and vision blocks
-
- Commander's cupola persicope
-
- Handset covers applied
- Handset covers applied.JPG (95.65 KiB) Viewed 4055 times
-
- Another view of the exhaust with rust
-
- Rust applied to the exhaust
...Money!? What's that!?...
Re: Heng Long Pershing Rebuild
HMMMMMMMMMMMMM........... Not sure I'm liking the technique on the exhaust Painless.... kind of makes me think of a baboons rear end 
Sorry bout that
ALPHA
Sorry bout that
ALPHA
-
PainlessWolf
- Colonel
- Posts: 7864
- Joined: Sun Feb 26, 2012 9:09 pm
- Location: Southern Colorado Rocky Mountains
Re: Heng Long Pershing Rebuild
Good Morning, *chuckles*
It's the same as was on the original except that the piece was oil stained over time making it darker. I'll do a wash and add soot to kill the brightness of the rust. Here is a pic of the original paint job on the exhaust ports.
regards,
Painless
It's the same as was on the original except that the piece was oil stained over time making it darker. I'll do a wash and add soot to kill the brightness of the rust. Here is a pic of the original paint job on the exhaust ports.
regards,
Painless
- Attachments
-
...Money!? What's that!?...
Re: Heng Long Pershing Rebuild
OK..........do that again  ...................
ALPHA
ALPHA
