
Looking sweet nice video of what you have done be nice to see when all done and first test run on video
cheers Derek
1:16 Sherman convert to "Oddball's" tank
Re: 1:16 Sherman convert to "Oddball's" tank
Awesome, this is why I love tanks

Re: 1:16 Sherman convert to "Oddball's" tank
Thanks Chris 
Last edited by sparks on Fri Mar 04, 2011 9:52 pm, edited 1 time in total.
Hey man....I just ride 'em, I dunno what makes 'em work.
Woof woof woof !
Woof woof woof !
Re: 1:16 Sherman convert to "Oddball's" tank
RECOIL Mk 1
As mentioned, I've been thinking about the recoil action. I have already purchaced the Tamiya recoil motor and the Pershing MF and DMD units to do the job.
With Pershing in mind, I had a look inside mine again to see how the recoil motor was fitted, and it sits on a platform attached to the elevation action.
So I set about making my version of it. Started by making a platform from sheet brass and formed it to fit around the elevation pipe.


Drilled and tapped 4 M2 threads in the elevation pipe and fixed platform.

Fixed the recoil motor to the platform with 3 M2 nuts and bolts, using the holes I had drilled through the motor chasis.
Drilled and tapped a M2 thread in the cannon and fomed a bit of M2 stud (that I threaded myself) to link the cannon to the recoil motor.

Checked to see that I could still get the flash unit through the barrel (part of the reason for threading it and not hooking a wire through the hole) and all went well. Recoil action worked fine in all planes.
When I went to fit the underside of the turret......Doh !! Got so carried away that I forgot to off set the recoil motor to miss the elevation motor
So back th the old drawing board as they say. Only good thing is that I didn't get so carried away that I fixed everything with thread lock which is what I intend to do when everything fits properly.
Working at the weekend, so don't know how much will get done on Recoil Mk 2.
BFN
As mentioned, I've been thinking about the recoil action. I have already purchaced the Tamiya recoil motor and the Pershing MF and DMD units to do the job.
With Pershing in mind, I had a look inside mine again to see how the recoil motor was fitted, and it sits on a platform attached to the elevation action.
So I set about making my version of it. Started by making a platform from sheet brass and formed it to fit around the elevation pipe.
Drilled and tapped 4 M2 threads in the elevation pipe and fixed platform.
Fixed the recoil motor to the platform with 3 M2 nuts and bolts, using the holes I had drilled through the motor chasis.
Drilled and tapped a M2 thread in the cannon and fomed a bit of M2 stud (that I threaded myself) to link the cannon to the recoil motor.
Checked to see that I could still get the flash unit through the barrel (part of the reason for threading it and not hooking a wire through the hole) and all went well. Recoil action worked fine in all planes.
When I went to fit the underside of the turret......Doh !! Got so carried away that I forgot to off set the recoil motor to miss the elevation motor
So back th the old drawing board as they say. Only good thing is that I didn't get so carried away that I fixed everything with thread lock
Working at the weekend, so don't know how much will get done on Recoil Mk 2.
BFN
Hey man....I just ride 'em, I dunno what makes 'em work.
Woof woof woof !
Woof woof woof !
Re: 1:16 Sherman convert to "Oddball's" tank
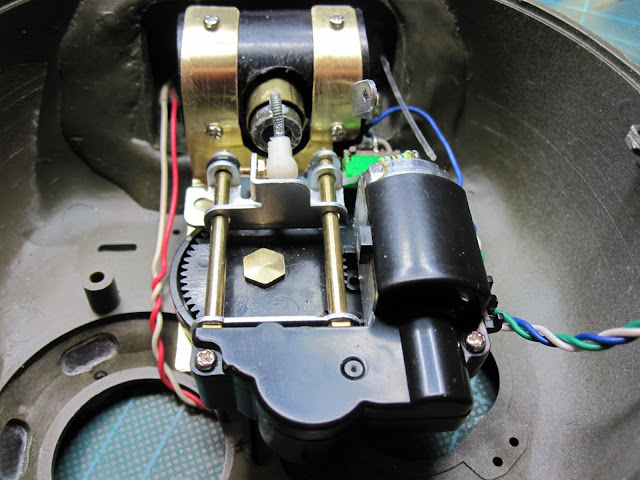
RECOIL Mk 2
Right, here we go again.
Adapted and extended the brass platform so that the recoil motor sits more to one side and further back.

This offset meant I had to make a new connecting rod from my studding, but allowed me to use a ball connector threaded into the barrel. Also cut the other side of the barrel out to make fitting the flash unit easier.

Looking at the close up, I can see room for improvement, I will add a spacing nut to the ball connector fitted to the recoil motor, that should give it a straighter pull.
Temporarily fitted the flash unit (this is one I purchased, its for the King Tiger, to get the length I needed for the 76mm cannon) I purposely left it sticking proud of the end of the barrel as I need to remove it again and I'm using the end piece to help pull it through.
Re-fitted the turret base ring ( no clashing of motors this time).

I also had to cut part of the centre bar away to make clearence for the recoil when the gun is at full elevation.
While I had it stripped down again, I fiddled with the elevation mechanism to give me more depression.
Only problem I found, is that I can't fully rotate the turret with the cannon at full elevation, but think I can live with that.
New video of recoil below.
BFN
Right, here we go again.
Adapted and extended the brass platform so that the recoil motor sits more to one side and further back.
This offset meant I had to make a new connecting rod from my studding, but allowed me to use a ball connector threaded into the barrel. Also cut the other side of the barrel out to make fitting the flash unit easier.
Looking at the close up, I can see room for improvement, I will add a spacing nut to the ball connector fitted to the recoil motor, that should give it a straighter pull.
Temporarily fitted the flash unit (this is one I purchased, its for the King Tiger, to get the length I needed for the 76mm cannon) I purposely left it sticking proud of the end of the barrel as I need to remove it again and I'm using the end piece to help pull it through.
Re-fitted the turret base ring ( no clashing of motors this time).
I also had to cut part of the centre bar away to make clearence for the recoil when the gun is at full elevation.
While I had it stripped down again, I fiddled with the elevation mechanism to give me more depression.
Only problem I found, is that I can't fully rotate the turret with the cannon at full elevation, but think I can live with that.
New video of recoil below.
BFN
Last edited by sparks on Wed Oct 12, 2011 10:27 pm, edited 1 time in total.
Hey man....I just ride 'em, I dunno what makes 'em work.
Woof woof woof !
Woof woof woof !
Re: 1:16 Sherman convert to "Oddball's" tank
Hi all,
I'm waiting on a small part at the moment, been chasing the supplier for weeks (none in the country or at the manufacturers apparently) its the machine gun LED housing, I need it to finish the working turret MG that I've fitted. Once I get that, I can finish off inside the turret and close it up. I don't want to put any detail parts on the turret while I still have to work on it.
That said, I decided to have a fiddle with the hatches.
Drilled out the "false" hinge rod on the commander hatch and fitted brass rod so the hatch is opperational. Also ground down the "implied" handle and fitted the metal replacement.

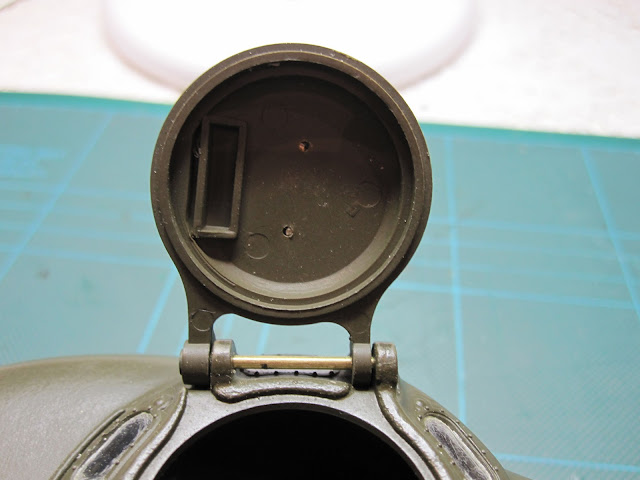

While I was at it, decided to drill out the plastic pin on the loaders hatch and replace it with brass rod for additional strength. Again, fitted the replacement metal handle.


Thats all for now,alledgedly, I should have the LED housing by the end of the week, but I won't hold my breath
I'm waiting on a small part at the moment, been chasing the supplier for weeks (none in the country or at the manufacturers apparently) its the machine gun LED housing, I need it to finish the working turret MG that I've fitted. Once I get that, I can finish off inside the turret and close it up. I don't want to put any detail parts on the turret while I still have to work on it.
That said, I decided to have a fiddle with the hatches.
Drilled out the "false" hinge rod on the commander hatch and fitted brass rod so the hatch is opperational. Also ground down the "implied" handle and fitted the metal replacement.
While I was at it, decided to drill out the plastic pin on the loaders hatch and replace it with brass rod for additional strength. Again, fitted the replacement metal handle.
Thats all for now,alledgedly, I should have the LED housing by the end of the week, but I won't hold my breath
Hey man....I just ride 'em, I dunno what makes 'em work.
Woof woof woof !
Woof woof woof !

Re: 1:16 Sherman convert to "Oddball's" tank
Woof! woof woof woof, woooooooof!
That was my other dog impersonation.
Looking forward to more. Cheer's.
That was my other dog impersonation.
Looking forward to more. Cheer's.
Re: 1:16 Sherman convert to "Oddball's" tank
Hi all,
Well, to my suprise, the LED housing turned up in the post on Saturday morning, was out at work, so couldn't do anything till today.
Started by fixing the extra MG LED and the fibre optic to the housing and fixed the assembly to the inside wall of the turret, covered it all with black double sided tape to prevent light leakage into the turret.

Next step was the control, bought the smallest servo I could find and a 3 position micro switch.
Shaped the servo arm and fixed the micro switch in position on the side of the servo, after soldering some wires to it.
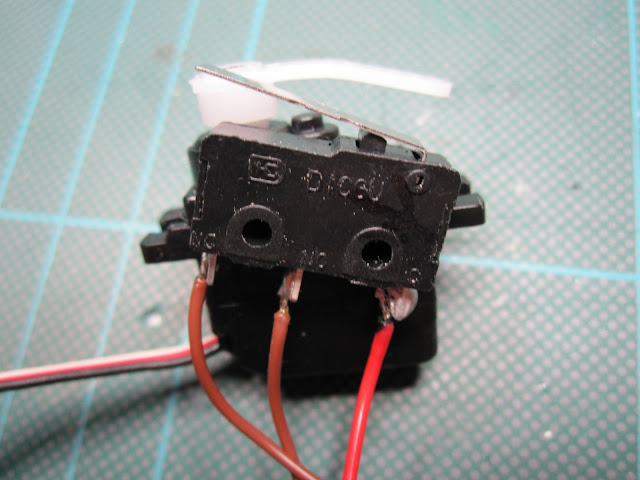

Then fixed the servo/switch assembly inside the hull close to the RX.

Cut the cable from the original MG LED and extended the orange core to the micro switch and connected to the common terminal. Then back from the micro switch to re-feed the hull MG. Took another cable from the other switched side of the micro switch to feed the orange core of the new turret MG. Connected all the white cores together. Now the opperation of the micro switch transferres power between the two MG's
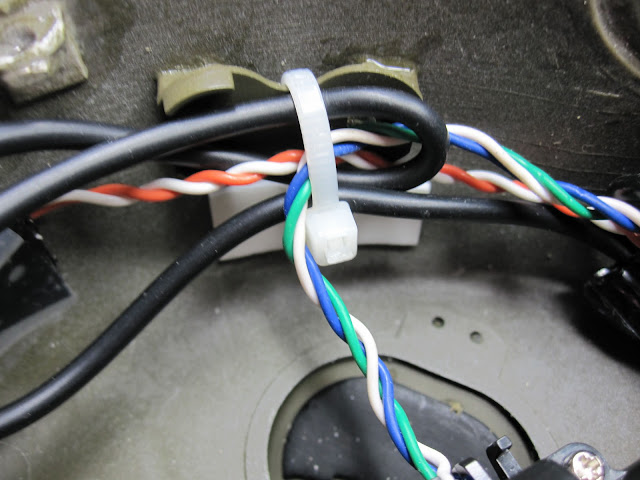
While I had the turret stripped down again , decided to make an improvement on the cable fixing, as I had to be sure they wouldn't obstruct the elevation mechanism, and the double sided tape supplied would probably come loose after a while.
Fixed some redundant plastic suspension parts to the inside of the turret to make cable tie anchoring points.

Then dressed and fixed the cables on the inside walls of the turret.
I have uploaded another video of the MG's working. I purposely dimmed the lights so the MG LED's would show up better.
BFN
Well, to my suprise, the LED housing turned up in the post on Saturday morning, was out at work, so couldn't do anything till today.
Started by fixing the extra MG LED and the fibre optic to the housing and fixed the assembly to the inside wall of the turret, covered it all with black double sided tape to prevent light leakage into the turret.
Next step was the control, bought the smallest servo I could find and a 3 position micro switch.
Shaped the servo arm and fixed the micro switch in position on the side of the servo, after soldering some wires to it.
Then fixed the servo/switch assembly inside the hull close to the RX.
Cut the cable from the original MG LED and extended the orange core to the micro switch and connected to the common terminal. Then back from the micro switch to re-feed the hull MG. Took another cable from the other switched side of the micro switch to feed the orange core of the new turret MG. Connected all the white cores together. Now the opperation of the micro switch transferres power between the two MG's
While I had the turret stripped down again
Fixed some redundant plastic suspension parts to the inside of the turret to make cable tie anchoring points.
Then dressed and fixed the cables on the inside walls of the turret.
I have uploaded another video of the MG's working. I purposely dimmed the lights so the MG LED's would show up better.
BFN
Hey man....I just ride 'em, I dunno what makes 'em work.
Woof woof woof !
Woof woof woof !
Re: 1:16 Sherman convert to "Oddball's" tank
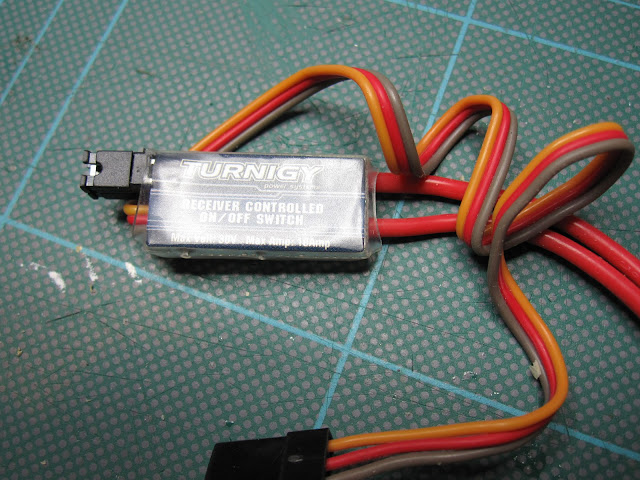
For some reason the lighting wasn't working properly, don't know if its a faulty MF unit (everything else works fine) or just the digital trim problem again. So I got a Turnigy RC Switcher and wired the lights so I can switch them on and off from the TX.
Hey man....I just ride 'em, I dunno what makes 'em work.
Woof woof woof !
Woof woof woof !
Re: 1:16 Sherman convert to "Oddball's" tank
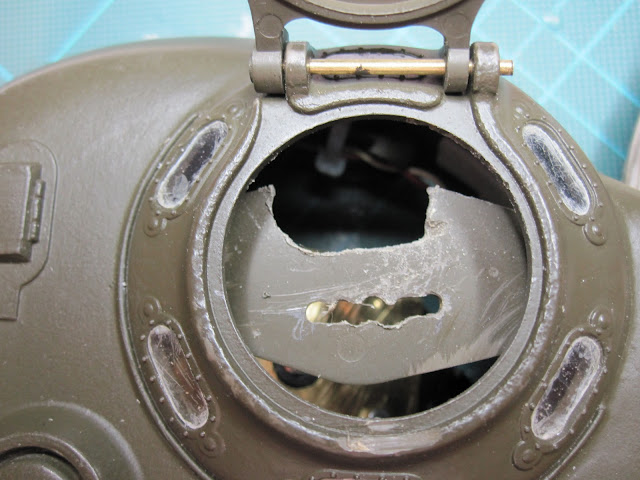
Because of the lack of space in the turret, (the recoil unit moves with the elevation and practicaly touches the underside of the commanders hatch), fitting the Battle System reciever was always going to be difficult. I had considered doing the "disguised" reciever as shown on this site, but two things put me off that, firstly, I'm not sure if that conforms to the Tamiya Battle regulations  , and most importantly, If I did it on this tank I would want to do it on all the others So I had to make the space.
I stripped down the reciever base to the bare essentials cutting the plastic sides to make it thinner, and had to cut a slice off the top of the socket so the commanders hatch could close.

I used kit part D25 witch I think is for supporting the commander, cut it down in length so it fitted flush to the roof of the turret and welded it into place below the commanders copula, after cutting a space for the small plug and a slot to take the row of solder spots, both on the underside of the reciever base.
Threaded the cable loom through and fixed the reciever base to D25.

Now I can use the battle system the same as on my other tanks.

And still shut the commander hatch when not using the Battle Sytem

BFN
I stripped down the reciever base to the bare essentials cutting the plastic sides to make it thinner, and had to cut a slice off the top of the socket so the commanders hatch could close.
I used kit part D25 witch I think is for supporting the commander, cut it down in length so it fitted flush to the roof of the turret and welded it into place below the commanders copula, after cutting a space for the small plug and a slot to take the row of solder spots, both on the underside of the reciever base.
Threaded the cable loom through and fixed the reciever base to D25.
Now I can use the battle system the same as on my other tanks.
And still shut the commander hatch when not using the Battle Sytem
BFN
Hey man....I just ride 'em, I dunno what makes 'em work.
Woof woof woof !
Woof woof woof !
