43R&R,
Good afternoon. It's really coming along! About the main gun, does it have elevation? Wise on the reinforcement.
regards,
Painless
Cromwell Mk 4 1:16 scratch build Ludwig kit
-
PainlessWolf

- Colonel
- Posts: 7858
- Joined: Sun Feb 26, 2012 9:09 pm
- Location: Southern Colorado Rocky Mountains
Re: Cromwell Mk 4 1:16 scratch build Ludwig kit
...Money!? What's that!?...
-
43rdRecceReg

- Major
- Posts: 6295
- Joined: Fri Jul 31, 2015 11:38 am
- Location: North West Highlands, Scotland
Re: Cromwell Mk 4 1:16 scratch build Ludwig kit
Evening, PainlessPainlessWolf wrote:43R&R,
Good afternoon. It's really coming along! About the main gun, does it have elevation? Wise on the reinforcement.
regards,
Painless
Yes, the Gun will have elevation, turret rotation, and maybe recoil too. I have the styrene brackets- with the kit- for allowing the mantlet assembly to elevate, but I'm not bonding them into the turret for the moment before I decide where to go next. Macman did a Cromwell build back in 2015 and had issues fitting an elevation servo mechanism. From that I take a cautionary note. But on that build, ion fact, it's no understatement to say that he did an enviable job of work with the kit. Pity we've not heard from him lately, and of where he went with the build. (Paint, electronics and kitting out stages.. the launch, that is.. with or without Champers.
"Get your facts first, and then you can distort them as much as you please"- Mark Twain.

Re: Cromwell Mk 4 1:16 scratch build Ludwig kit
Mine has the asiatam recoil/elevation modded to servo recoil. The elevations on the slow side but it works well
-
43rdRecceReg
- Major
- Posts: 6295
- Joined: Fri Jul 31, 2015 11:38 am
- Location: North West Highlands, Scotland
Re: Cromwell Mk 4 1:16 scratch build Ludwig kit
Well, thanks for that Tom.The idea of an all-in-one unit is very appealing. I've been looking at the DKLM elevation/recoil offering and it looks promising. Thing is, I'm not sure how easy it will be to fit it in the Cromwell Turret. The Ludwig Mantlet will have to go if I choose that option, whereas 'Macman' managed to use Chris' mantlet with what looks like a Taigen recoil setup in his 2015 build. He wasn't specific about his electronic setup, unfortunately.tomhugill wrote:Mine has the asiatam recoil/elevation modded to servo recoil. The elevations on the slow side but it works well
Lately, I've been put off Asiatam products by the poorly made Pz IV metal hull, and some gearboxes that look like Taigen knockoffs.
"Get your facts first, and then you can distort them as much as you please"- Mark Twain.
-
43rdRecceReg
- Major
- Posts: 6295
- Joined: Fri Jul 31, 2015 11:38 am
- Location: North West Highlands, Scotland
Re: Cromwell Mk 4 1:16 scratch build Ludwig kit
Like a bad penny..  Curving these styrene sheets was an unexpected challenge. I tried taping the panels to a wooden rolling pin, and gave them a light bast with a heat gun; but after several crinkly failures. I tried a hair dryer. That wasn't hot enough. Eventually, I found that tying the panels down, under tension, with brown parcel tape worked very well
  A spot of filling, trimming, sanding and painting needed. Otherwise, I'm happy with this.
Time to fit the rear mudguards, and start the 'Normany cowling':
Putting a curve in styrene is really tricky. In retrospect, two thinner sheets bonded together in a layer would have been easier; but I used the single sheet supplied with the kit..  I tried g-cramps to created the curve under tension, but with the clamps tying off, I would have needed as many arms as the Indian Goddess Kale, to keep the styrene in place.
Parcel tape worked as a last gasp solution, though.
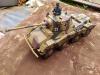
Well, here's the extent of my progress with the basic kit (plus add ons). This is just a mock up as the hatches, and other bits are not properly attached yet. There's also a lot of filling, trimming and sanding to do. The ride height of the suspension is the foremost niggle. I based the spring position of Christian's somewhat sparse illustrations. In the end the support pin for the return spring is clearly in the wrong position for my Cromwell. That is probably because the fitting is more appropriate the Comet (which shares many of the same bits), with its return rollers. So, I'll have to drop the suspension somehow. It looks like it's wearing high heels/ platform soles at the minute
 For anyone contemplating buying and building a kit, I'd say DO, as it's very immersive..(but you could also easily drown in it
  ). It promises- and can deliver- a great looking representative of British WW2 armour. BUT.. it takes lots of work, lots of extra tools, and loads of nail biting
- Closing the front mudguard
- Getting a curve in the panel
Time to fit the rear mudguards, and start the 'Normany cowling':
- Mudguards in place and Supports for cowling
- Tricky curve formed with parcel tape
Parcel tape worked as a last gasp solution, though.
Well, here's the extent of my progress with the basic kit (plus add ons). This is just a mock up as the hatches, and other bits are not properly attached yet. There's also a lot of filling, trimming and sanding to do. The ride height of the suspension is the foremost niggle. I based the spring position of Christian's somewhat sparse illustrations. In the end the support pin for the return spring is clearly in the wrong position for my Cromwell. That is probably because the fitting is more appropriate the Comet (which shares many of the same bits), with its return rollers. So, I'll have to drop the suspension somehow. It looks like it's wearing high heels/ platform soles at the minute
- Progress update
- Attachments
-
- Another angle
-
- Cowling brackets and plate
"Get your facts first, and then you can distort them as much as you please"- Mark Twain.
-
silversurfer1947
- Lieutenant
- Posts: 3337
- Joined: Tue Oct 27, 2015 9:54 pm
- Location: Bristol, UK
Re: Cromwell Mk 4 1:16 scratch build Ludwig kit
I had a look for Tennax 7R and found it impossible to obtain in the UK, except once source which wanted a ridiculous price. I think the active chemical is the same s things like PlasticWeld.
Richard
Tamiya Tiger 1, Taigen FlakPanzer IV,Torro M16 half-track, Tamiya Panther,WSN/Torro T34,Taigen M41 Bulldog,H/l/Taigen Sherman M4A3,H/L T90, Haya M3 Grant, Metal Origins 234/2 Puma, Nashorn by Alwyn. I was only going to have one tank - honest!
Tamiya Tiger 1, Taigen FlakPanzer IV,Torro M16 half-track, Tamiya Panther,WSN/Torro T34,Taigen M41 Bulldog,H/l/Taigen Sherman M4A3,H/L T90, Haya M3 Grant, Metal Origins 234/2 Puma, Nashorn by Alwyn. I was only going to have one tank - honest!
-
43rdRecceReg
- Major
- Posts: 6295
- Joined: Fri Jul 31, 2015 11:38 am
- Location: North West Highlands, Scotland
Re: Cromwell Mk 4 1:16 scratch build Ludwig kit
Yes, I tried heat. Firstly with a heat gun, and that produced crinkly edges no matter how hard I tried. Then I tried a hairdryer, but that wasn't hot enough. I even considered trying hot waterEastern Front wrote:Coming along real fine!
The styrene will be easier to bend with heat, have you tried that?
Also, for styrene I use Tennax 7R if you can still find it! other wise plastruct has some fine cement.. I have 10 bottles of the Tenax, its almost an instant bond, it actually welds them together..
Cheers!
shaping styrene, and he made it look effortless. Clearly, it's an acquired skill...one I haven't mastered so far. Luckily, I make copies of the panels to be curved as a precaution
"Get your facts first, and then you can distort them as much as you please"- Mark Twain.
-
43rdRecceReg
- Major
- Posts: 6295
- Joined: Fri Jul 31, 2015 11:38 am
- Location: North West Highlands, Scotland
Re: Cromwell Mk 4 1:16 scratch build Ludwig kit
Tennax sounds good, but I've become used to having a little extra time to position components correctly by using Revell Contacta Pro. I've made a gaffe here and there, and had time to correct it.silversurfer1947 wrote:I had a look for Tennax 7R and found it impossible to obtain in the UK, except once source which wanted a ridiculous price. I think the active chemical is the same s things like PlasticWeld.
"Get your facts first, and then you can distort them as much as you please"- Mark Twain.
-
43rdRecceReg
- Major
- Posts: 6295
- Joined: Fri Jul 31, 2015 11:38 am
- Location: North West Highlands, Scotland
Re: Cromwell Mk 4 1:16 scratch build Ludwig kit
A little update. The suspension is a major niggle, but have now found room for the gearboxes. I have had to reposition the suspension arms yet again. More on that later. Meantime, I'm making my own bolt heads (I have to pinch myself sometimes.. ). This hobby is lunacy on steroids!
I've also begun shaping the mudguards with Milliput; but it will be a while until I get the right profile- one based on pics I took of the Bovington Cromwell. It's brilliant stuff, but requires skill to apply it. That's one I'm working on. I want a balance between that 'lived in' look of the old campaigner, and the pristine feel of a brand new model tank. That's a hard compromise to make in some ways.
The Cromwell has little bevels on the leading edge of the Driver's hatch front armoured panel. That's a detail missing from Chris' model, but it's present in Macman's version. I've also added a little extra panel to the front mudguard support strut, along with homemade bolt heads! Again, that's a detail from the Bovvy tank, which is absent in the Kit.
These are 2mm styrene, but I also have 1mm on order. It will take time fitting them all.
Having filed them away, and fitted the Pz 111 headlights, we have this little update. As you can see, there's quite a bit of filling and sanding to do. I also have the new sprockets and motors to fit...  These are the Ludwig special scale sprockets for the Cromwell. They're well worth the investment, I think you'll agree. But I really won't want to paint them
  ...would you ? I might just leave them as armoured 'bling'
Before I do, there's a whole lot of screwing to do, if you'll pardon the expression..just look at all those wee 2mm bolts. God, I can hardly see them
I've also begun shaping the mudguards with Milliput; but it will be a while until I get the right profile- one based on pics I took of the Bovington Cromwell. It's brilliant stuff, but requires skill to apply it. That's one I'm working on. I want a balance between that 'lived in' look of the old campaigner, and the pristine feel of a brand new model tank. That's a hard compromise to make in some ways.
The Cromwell has little bevels on the leading edge of the Driver's hatch front armoured panel. That's a detail missing from Chris' model, but it's present in Macman's version. I've also added a little extra panel to the front mudguard support strut, along with homemade bolt heads! Again, that's a detail from the Bovvy tank, which is absent in the Kit.
- Homemade bolt heads
- Position of bevels..
- Bevels now in front plate, and headlights fitted
Before I do, there's a whole lot of screwing to do, if you'll pardon the expression..just look at all those wee 2mm bolts. God, I can hardly see them
- A whole lot of screwing going on!
Last edited by 43rdRecceReg on Mon Mar 20, 2017 8:01 pm, edited 1 time in total.
"Get your facts first, and then you can distort them as much as you please"- Mark Twain.
-
c.rainford73

- Major
- Posts: 6104
- Joined: Thu Aug 25, 2016 7:34 pm
- Location: Connecticut USA
Re: Cromwell Mk 4 1:16 scratch build Ludwig kit
Really impressed with your progress and the new bling wheels! I'd be hard pressed to paint them too
Tanks alot.... 
