Tamiya 1/35 1971 Centurion MkIII SM motorized to DM DSM2 RRC

Post all your Smaller Scale RC Tanks, Half Tracks and Vehicles, including build threads here. From below 1/18 to way down as far as you can go, H.O. 1/87th scale or less. Even your Smaller Scale figures are welcome here.
User avatar
modler
Sergeant
Posts: 503
Joined: Sat Feb 02, 2019 2:33 pm
Location: North Ridgeville Ohio USA

Tamiya 1/35 1971 Centurion MkIII SM motorized to DM DSM2 RRC

Post by modler »

Well, I FINALLY DID IT :O I installed a HOBBY GRADE DSM2 radio control system in one of my favorite Tamiya models.

This Tamiya Centurion MkIII Tank came as a single motor (SM) motorized (Re-260) model and featured a unique integrated forward\reverse on\off switch motor control. I remember as a young teenagaer pining for this Tamiya model in 1971, but it was just out of my reach at $15 at the local Hobby shop. MOTOR ON\OFF SWITCH CONTROL is all that was available at that time for a scale model tank of any kind and this one had something extra...ON\OFF REVERSE! :crazy: 8) IN 1971.


I would have been overjoyed to own this model back then. Come to think of it, I am pretty happy to own one now ;)


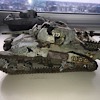
On\Off switch, explained between the two versions of motorized Tamiya models.

I initially built this Tank as a motorized single motor On\Off-FORWARD\REVERSE switch controlled model as it comes from Japan and finally after all these years was able to own and operate a Tamiya motorized Centurion MkIII :D Fortunately for me, I have the ability and resources to upgrade this model to Dual motor Radio Remote Control with a factory integrated F\R On\Off switch. The Tamiya SM motorized models are the only ones that have the factory on\off switch so when you upgrade one of these, it will have a factory on\off switch. The Dual Motor remote control versions have an external switch on the wired controller that in effect is the on\off switch and has two on\off forward switches that also include reverse on\off so the tank does not get an internal switch in next level up, "Motorized Remote Control".

Note, The Centurion MkIII "motorized" version actually gets the BEST switch of all that was available in these series of models, What is that you say? The MkIII is the only one that I have seen that has a single integrated FORWARD\REVERSE ON\OFF switch. The switch is on the bottom side of the hull near the center of the right track. This option would make you the envy of all the model guys in the hood back in 1971 lol. Seriously!


Single motor (SM) On\Off switch control, that may sound pretty humble and it is these days, and it is... however, as a SM motorized version, it has the correct drive sprockets that are required for upgrade to full Dual Motor Radio Remote Control (DM RRC) and it has a integrated Forward\Reverse switch that can be wired as a double throw on\off switch :O willikers! :O

First step in this upgrade is to add a dual motor (DM) gearbox.
Ok, once the thrill is gone of running the motorized MkIII as a Forward\Reverse on\off switch controlled model, (keeping all the original motor\gearbox for posterity) A dual gearbox needs to be found....

I will continue this thread ASAP...

continued....Dual motor gearbox. The 60',70's vintage Tamiya models had all metal dual gearbox that came in a few variations. These are much sought after today as they are very robust and last for decades! They have a very special sound (especially after upgrading the pinion gear to 8 tooth BRASS) when in operation that has a metallic ring that is quite nice. Anyway, these days the only way to get one is to buy a vintage Tamiya kit. I have never seen one for sale outside of a kit but I keep looking as I have seen a few built Dual motor gearbox models for sale but they cost as much as a vintage kit and I would rather have the NOS kit. I have several right now I borrowed a dual motor gearbox from one of these NOS kits to upgrade this MkIII. It is hard to find the Centurion MkIII as a motorized Remote Control NOS kit (DM wired remote comes with the vintage kit), I will post a picture of the wired remote that comes in those kits.

Note. these 1/35 all metal dual motor gearboxes (60's-70's vintage) come with round Mabuchi RE-140RA motors...well mostly. I know of one exception...that I know of anyway is the Tamiya 1970 Sherman M4 which comes with a set of 130-RE motors.

The following step is optional if using 2.4ghz radio gear....
The first step in preparing this dual motor gearbox for use with Radio Remote control is to add 4 noise cancelling capacitors (104 OR .1UF) (not required for DSM radio gear or any 2.4ghz gear). I add them regardless as I tend switch around gear and is a bother to add them later..This has to be done a certain way to avoid shorts circuits due to the metal construction. 2 caps per motor. One for each motor input terminated to to metal outer motor shell.I guess I am going to have to take some pictures of this to save a thousand words lol.

The stock Remote Control system is wired switch type with no electronics and does not require electrical noise decoupling is the reason the caps are not there in the vintage kits.

After the noise decoupling capacitors are added, the motors will need connectors to connect to the speed control(s) or ESC. Since this is 1/35 scale and the current requirements are less than 2 amps max nominal, I use micro JST. They are readily available and are now the standard for low power electronics and such. I get mine from ebay. Anyway, I wire each motor with a female micro JST connecting red to motor + and black to motor - on each motor or if not marked then wire them opposite of each other with respect to polarity. this will allow easy motor direction reversal by swapping the motor connectors to compensate for front\rear sprocket drive.

Are you still with me? It seems a little complicated but it not really after you do one. any questions let me know. anyway, onward lol :D
Attachments
Here are some examples of  what Tamiya calls "motorized" The consist of a single motor (SM) with metal gearbox that drives both tracks with a RE-260 Mabuchi motor. The one in the center is the original one for this motorized kit Centurion MkII
Here are some examples of what Tamiya calls "motorized" The consist of a single motor (SM) with metal gearbox that drives both tracks with a RE-260 Mabuchi motor. The one in the center is the original one for this motorized kit Centurion MkII
The DSM electronics with dual speed controls have been condensed as much as possible to fir in this 1/35 scale hull.
IMG_4402.JPG (87.34 KiB) Viewed 2148 times
there is that high tech forward\reverse on\off switch...ah, 1971
IMG_4406.JPG (87.54 KiB) Viewed 2157 times
This one is my favorite. I have lots of radio gear and have decided to do a 1/35 DSM setup. That will make it easy to add turret, gun, sound, or even a I\R battle version.
IMG_4405.JPG (99.61 KiB) Viewed 2157 times
Last edited by modler on Sun Feb 23, 2020 3:29 pm, edited 5 times in total.
User avatar
modler
Sergeant
Posts: 503
Joined: Sat Feb 02, 2019 2:33 pm
Location: North Ridgeville Ohio USA

Re: Tamiya 1/35 Centurion MkIII SM motorized to DM DSM2 RRC

Post by modler »

decided to make a camera ramp run video with the MkIII.


https://youtu.be/jlJTVLwWAEI

I will do a parallel motor drive DSM2 tank next just to compare serial\parallel motor wiring. The downside of serial motor wing is no parrotte track action. It is not actual used much in real tanks but it is "cute" to have the option. :D
Attachments
This Tank easily climbs the 32° ramp with the camera payload.
IMG_4421.JPG (92.24 KiB) Viewed 2126 times
Runcam2 on the MkIII
IMG_4422.JPG (79.31 KiB) Viewed 2126 times
User avatar
modler
Sergeant
Posts: 503
Joined: Sat Feb 02, 2019 2:33 pm
Location: North Ridgeville Ohio USA

Re: Tamiya 1/35 Centurion MkIII SM motorized to DM DSM2 RRC

Post by modler »

Ok after upgrading the MKIII TO DSM2 radio setup, I noticed there are some non linear steering issues with the serial wired motor\DTL mod. When you add digital proportional speed with the HB system, some non linear quirks between L\R steering start to become noticable. It will take more work\testing to get the serial wired motors to adequately perform (steering wise) with proportional speed ESC.

So I scrapped the serial wiring in this tank and went to parallel wired motors (as is the standard) in the Centurion MkIII and reprogrammed my Dx-6i and after a good deal of fooling around with the settings got my Tank to run very good. The low impedance 3v motors are not ideal for anything other than straight up battery operation as intended by the factory but found that a single lipo with everything running off the lipo by bypassing the ESC BEC and running everything off the lipo (3.7V). Any voltage higher than that causes the ESC's to be unstable at low speeds. A set of 6v motors would cure this situation but for now, I will run it off a 1000mah 1s 20c lipo which seems to works very well.

It is hard to find a matching set of 6V RE-140 (round) motors but I will find some on ebay when I time to do the search. For the time being, this 1s setup works good and the tank tracks have much improved linear Hi\Low L\R steering function and can do a sweet L\R pirouette :O

The MkIII is more maneuverable and can be whipped around quite nicely and has good MAX speed and is faster than the factory setup by far despite its limited working voltage of 3.7V .

Anyone attempting this upgrade will probably be discouraged if using the factory motors with Hobby grade ESC's as they don't like to work with 3V motors unless you drop the source voltage down to 3.7V-4.2V. Then you have to bypass both ESC BEC's and wire new connector for RX to run directly off the 1s lipo.
Note..3 cells Ni-Mh did not work well either as the source voltage under load drops below the 3.3 ESC working voltage threshold in a very short time so its 1S Lipo or nothing with the stock motors with parallel wired motors using the HG ESC setup.

Most of the Toy grade receivers I use in these projects work down to 1.8V! The Hobby grade setup has a work nominal working voltage of 3.2-4.2 V. That is only a 1v working voltage range so that is why I used a large 1kmah lipo for decent run time.

I will soon do a video showing the enhanced maneuverability of the MkIII asap.

The mission to upgrade This motorized single motor F\R switch motor control Tank to dual parallel wired motor, Hobby Grade, DSM2 Radio Remote Control is a success :D
Attachments
The Re-260 Single motor, metal gearbox for the Centurion MkIII is the middle of the picture. That is the stock gearbox option in this motorized version. I can see no information on the box about the unique F\R integral switch that comes with this option on this particular model..
Centurion MkIII to DSM2 with stock parallel wired motors is a go!
User avatar
c.rainford73
Major
Posts: 6104
Joined: Thu Aug 25, 2016 7:34 pm
Location: Connecticut USA

Re: Tamiya 1/35 1971 Centurion MkIII SM motorized to DM DSM2

Post by c.rainford73 »

This is all very interesting engineering. Can you please post a pic of the esc and all the components you used and how to wire them up? :wave:
Tanks alot.... :wave:
User avatar
modler
Sergeant
Posts: 503
Joined: Sat Feb 02, 2019 2:33 pm
Location: North Ridgeville Ohio USA

Re: Tamiya 1/35 1971 Centurion MkIII SM motorized to DM DSM2

Post by modler »

c.rainford73 wrote:This is all very interesting engineering. Can you please post a pic of the esc and all the components you used and how to wire them up? :wave:
Greetings rainford73, It will take some time to do as you request but the answer is yes. I will do it in steps due to time constraints.
There are a couple of ways to do the more advanced control stick mixing required for "single stick throttle" as done in this MkIII model.
There is also mode 1, mode 2 options which need to be considered....

Different throttle stick controls are outlined below..

1. "Dual stick manual differential throttle" is the most common and "old school" type of Tank Track control. Left stick controls the right track, Right stick controls the left track. Main advantage, easy and intuitive control method that my wife (who had never operated a motorized model of any kind) was able to master with little effort, to control a I\R battle tank quite effectively in a short time. I have ~4 sets of I\R battle Tanks that use this control method and in a few minutes I was defeated in the I\R battle zone by a novice Tank commander (the wife). This is the standard control system used in most toy grade Tanks and in some Hobby Grade models. I personally do not like this system as it takes both hands at all times on the Transmitter sticks. This would be a good starting point in a DSM upgrade as it requires no mixing and is strait forward left\right logic to implement.

to be continued..
Attachments
Here is my hoard of I\R battle Tanks. They all use Dual stick throttle control.
User avatar
modler
Sergeant
Posts: 503
Joined: Sat Feb 02, 2019 2:33 pm
Location: North Ridgeville Ohio USA

Re: Tamiya 1/35 1971 Centurion MkIII SM motorized to DM DSM2

Post by modler »

continued..
I am setting up a new DSM2 kit for another DSM2 upgrade. I will start with making a few mods to the twin ESC's required for this upgrade.
I do not like the wiring and switch on this ESC and I am changing them out using micro JST connectors and eliminating the on\off switch.
This is an optional step and requires soldering skills and basic tools used in soldering. I have to say that this is not all that easy to do your own DSMX RRC Tank upgrade but if you want to do it I will attempt to outline it here.

These are available on ebay. Many venders sell them. I show the part number in the first picture.
Attachments
wires are then tinned
IMG_4521.JPG (64.65 KiB) Viewed 2005 times
wires stripped with a BIC
IMG_4520.JPG (83.71 KiB) Viewed 2005 times
I will be using this RX connector as it is a small gauge wire and the right length.
IMG_4519.JPG (70.91 KiB) Viewed 2005 times
The circuit board has markings on it showing the polarity. the white wire should be labeled S for signal.
IMG_4518.JPG (97.24 KiB) Viewed 2005 times
first going to change out this connector as I don't like it and it is too long.
IMG_4516.JPG (89.6 KiB) Viewed 2005 times
You can see the damage in this picture. I  accidentally popped that black cap off the coil circuit of the BEC. Fortunately, the coil itself was not  damaged. Be Careful when removing that plastic cover! You can see I made my second cut on the opposite side of those round part.
You can see the damage in this picture. I accidentally popped that black cap off the coil circuit of the BEC. Fortunately, the coil itself was not damaged. Be Careful when removing that plastic cover! You can see I made my second cut on the opposite side of those round part.
The outer plastic cover needs to be removed. Be very careful here as it is easy to damage the circuit board as I did because I was in a hurry as this takes a lot of time to do something like this let alone share it on the internet.
IMG_4514.JPG (77.38 KiB) Viewed 2005 times
the ESC on top is what we want with Micro JST connectors.
IMG_4513.JPG (80.65 KiB) Viewed 2005 times
We will be changing out the connectors on this ESC.
IMG_4512.JPG (85.05 KiB) Viewed 2005 times
Here is the bidirectional electronic speed control (ESC) used in this project. This one has no brake and a 5v BEC. about 10 amps limit per ESC and we will be using two.
IMG_4509.JPG (93.07 KiB) Viewed 2005 times
User avatar
modler
Sergeant
Posts: 503
Joined: Sat Feb 02, 2019 2:33 pm
Location: North Ridgeville Ohio USA

Re: Tamiya 1/35 1971 Centurion MkIII SM motorized to DM DSM2

Post by modler »

continued..

I had to start a new reply as you can only post 10 pictures per reply.

Here is how to tell if a wire is high Q or crap. If you can twist a pair of wires and it holds its shape, or wires can keep a form like in the picture below showing the formed 3 wire connection to the ESC board, that is a good wire to use in RC work otherwise they tend to break right at the solder junction. I move things around and do not like it when the cheap wires break through handling :-<
Attachments
That is the optional mixer that allows single stick forward\reverse throttle with paroette action and proportional steering on the right stick (mode 2)
IMG_4543.JPG (77.53 KiB) Viewed 1988 times
Oh wait, what is this new thingy?
IMG_4542.JPG (86.56 KiB) Viewed 1988 times
Here is the minimal requirements for a DSM2 RRC upgrade providing you have a programmable Transmitter . Mixing can be done using &quot;elevon&quot; settings coupled with throttle mixing. I will go into that as well.
Here is the minimal requirements for a DSM2 RRC upgrade providing you have a programmable Transmitter . Mixing can be done using "elevon" settings coupled with throttle mixing. I will go into that as well.
IMG_4541.JPG (84.83 KiB) Viewed 1988 times
Now do it again cause we need two.
IMG_4539.JPG (76.25 KiB) Viewed 1988 times
small wire gauge high Q RX connector, Micro JST Male\Female added, power switch eliminated.
IMG_4538.JPG (85.35 KiB) Viewed 1988 times
they have been removed.
IMG_4537.JPG (72 KiB) Viewed 1988 times
now replace those clunky regular size JST connectors. Notice how that twisted pair micro JST holds the twist. that is decent wire that resists breakage.
IMG_4536.JPG (74.75 KiB) Viewed 1988 times
jumper bypass added from scrap LED lead.
IMG_4528.JPG (82.53 KiB) Viewed 1988 times
next eliminate that power switch as it is usless in this application and just takes up valuable room in the model.
IMG_4525.JPG (87.88 KiB) Viewed 1988 times
smaller gauge wire RX connector added. I hate those big fat generic aluminum core wires!
Last edited by modler on Wed Feb 26, 2020 3:29 pm, edited 3 times in total.
User avatar
C.Ellis
Private
Posts: 77
Joined: Sun Dec 11, 2016 5:59 am
Location: Newcastle NSW Australia

Re: Tamiya 1/35 1971 Centurion MkIII SM motorized to DM DSM2

Post by C.Ellis »

This is really informative and well structured guide. Thanks for taking the time and effort to show us your methods. :thumbup: got me thinking that maybe I should give it a go.
User avatar
jimbo_wa
Corporal
Posts: 380
Joined: Fri Dec 21, 2018 3:55 pm
Location: Cambridge, UK

Re: Tamiya 1/35 1971 Centurion MkIII SM motorized to DM DSM2

Post by jimbo_wa »

Not sure if you've seen these: https://www.aliexpress.com/item/3300831 ... 4c4drXNe7V?

I'm waiting on set of 4x to be sent out and will let you know what they're like - space matters in these builds! 8|

I'm hoping that they will work OK on 1S as well...

I also have one of these https://www.aliexpress.com/item/3297547 ... 4c4drXNe7V for another build, but it's much more expensive and I'm still waiting for motors to arrive.
User avatar
modler
Sergeant
Posts: 503
Joined: Sat Feb 02, 2019 2:33 pm
Location: North Ridgeville Ohio USA

Re: Tamiya 1/35 1971 Centurion MkIII SM motorized to DM DSM2

Post by modler »

C.Ellis wrote:This is really informative and well structured guide. Thanks for taking the time and effort to show us your methods. :thumbup: got me thinking that maybe I should give it a go.
C.Ellis, happy to share with my fellow Tankers. Feedback from my fellow enthusiasts helps me with the direction here. I am glad to see I am not the only person with this disease I mean interest in Radio Remote Control Tanks :)
Last edited by modler on Wed Feb 26, 2020 3:59 pm, edited 1 time in total.
Post Reply

Return to “Smaller Scale Military.”