Michael's Comet Repaint...

Here is where you can show off your finished tanks and military vehicles, post pics and info on your arsenal!
Forum rules
If you're planning on posting a log of your build please use the relevant build sections.
User avatar
43rdRecceReg
Major
Posts: 6294
Joined: Fri Jul 31, 2015 11:38 am
Location: North West Highlands, Scotland

Re: Michael's Comet Repaint...

Post by 43rdRecceReg »

MichaelC wrote:
Vanguard wrote:Wow awesome job guys, have you built this from scratch, if not who makes the model I want one hehe you dont see enough British tanks.
Upper is from Ludwig:

http://www.ludwigs-hobby-seite.de/Comet.html

He sells the bottom too, but I wanted a more robust RC platform, so I mated it to a T34 lower from Heng Long, and fitted it with Leo metal road wheels, PzIV metal tracks, rollers and sprockets and ZTZ idlers. Clark electronics.

Basically best of both worlds. A custom upper with a Heng Long RC bottom and Clark electronics.
When you compare Michael's Comet with this model in a german military museum, you begin to realise not only what an eye for detail he has, but also how donor parts from an array of other tanks can be combined, and transplanted, to make a pretty faultless study of a real tank.. :clap: :clap:
The Study..
The Study..
Michael's Comet.jpg (78.85 KiB) Viewed 2392 times
and an original:
Attachments
Comet_tank_1.jpg
"Get your facts first, and then you can distort them as much as you please"- Mark Twain.
User avatar
Raminator
Warrant Officer 2nd Class
Posts: 1267
Joined: Tue Aug 11, 2015 9:57 am
Location: Newcastle, Australia

Re: Michael's Comet Repaint...

Post by Raminator »

dgsselkirk wrote:I'll see what I can do about some close ups. Anything in particular Raminator?
I'm interested in how you did the dusting and dirt, paint chips and the pen lines. Any photos of those or even a little bit of explanation would go a long way. Thanks!
MichaelC wrote:
Vanguard wrote:Wow awesome job guys, have you built this from scratch, if not who makes the model I want one hehe you dont see enough British tanks.
Upper is from Ludwig:

http://www.ludwigs-hobby-seite.de/Comet.html

He sells the bottom too, but I wanted a more robust RC platform, so I mated it to a T34 lower from Heng Long, and fitted it with Leo metal road wheels, PzIV metal tracks, rollers and sprockets and ZTZ idlers. Clark electronics.

Basically best of both worlds. A custom upper with a Heng Long RC bottom and Clark electronics.
Interesting stuff, I had a look at your previous thread to check it out. I'm probably getting ahead of myself, but I'd really like to do one of Chris Ludwig's Cromwells one day. How much did you have to butcher the T-34 hull to get it Comet-shaped? It's impressive how similar the running gear is, but I guess sharing the same Christie suspension would force some similarities.
User avatar
dgsselkirk
Warrant Officer 2nd Class
Posts: 1484
Joined: Tue Oct 16, 2012 1:57 am
Location: Kitchener, Ontario, Canada
Contact:

Re: Michael's Comet Repaint...

Post by dgsselkirk »

If I told you how I do it, I'd have to kill you... :-)

I AM NO EXPERT BY ANY MEANS! There are a lot better than me but I consider myself a guy with a little better than average skills.

My way is relatively easy. 95% airbrushing. Primer, paint, I then line every edge, corner, and places where there would be outlines with .25mm drafters marker/pen. I then do some shading by taking the original colour and darkening it a lot and cut it 5% to 10% paint to thinner and air brush very lightly along seams, corners, places where shadows would be. For the flat open areas do the reverse. Lighten the original colour and do the same thing. Do both lightly and let it dry. Look at it and do it again if it needs more.

Once you are happy with the shading then spray clear acrylic floor polish over all the model. It is at this stage you apply decals and do either a black or dark brown pin wash. I just use dollar store paints for these browns ivory blacks etc. and cut them down at least 80% water. This blends into the the black lines you did at the beginning. The floor polish allows the pin wash to have capillary action and run around things like hatches, bolt heads, weld lines, etc.. This is also when you can use an HB pencil to do edges to give metal appearance.

For chipping tedious, time consuming put on some Pink Floyd pour a tall cold one to keep your sanity On the 
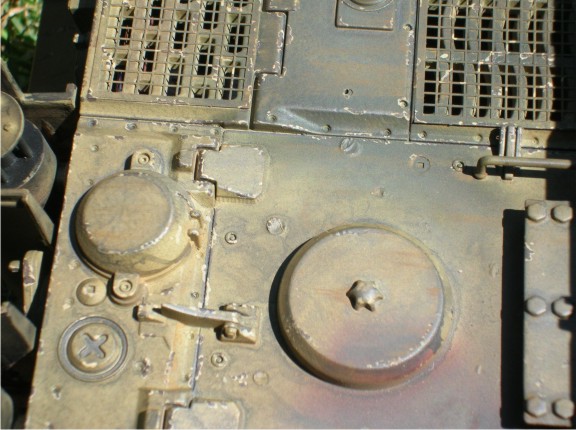
Comet I used buff and a 000 brush and do the edges of hatches, edges of grill, scratches etc.. and touch, touch, little stroke, touch, touch, a little here, a little there, and before you know it 4 or 5 hours have passed. Now you go back and in the Comets case I used an almost black green and do the centers of the buff chips you just painted and kiss another 4 or 5 hours goodbye! LOL!

For streaking and this one kills me! There are companies out there that sell these rust washes, engine grime, streaking formulas, etc.. and all they really are are oil paints thinned down which you can buy for a fraction of the price! Go to a artists store and find the cheapest oil paints you can find. Things like burnt umber, raw umber, and other colours that interest you. Take them home thin them down to a little thicker than water consistency with colour in them. Use a small brush and also from the artist store buy a large round 1" bristle brush. Practice on some painted styrene by putting a couple of little dots on an edge leave it for 20 or 30 seconds and then take your bristle brush and pull it straight down and viola! Streaks! Here is an example on a ZTZ99A
M 10.JPG
M 10.JPG (84.09 KiB) Viewed 2331 times
Now for dusting! It is at this stage I switch from Tamiya acrylics to clear flat lacquer.The reason I do this is I build tanks that fight and take some abuse so the Lacquer is much tougher than clear acrylics but you can use regular acrylic clears of course. If you have trouble finding it look at railway model shops they usually have it. Cut it 50/50 with thinner and add a TOUCH of things like dark earth, mud, whatever colour you want for making the lower hull dirty. Again light thin coats till you get it the way you like it. Start at the bottom and then less as you go higher. Last I will open my airbrush up and spray from about 2 feet away in bursts all over the tank. Next mic the clear lacquer with something lighter like buff or sand and do the higher areas. and you can again do the open flat areas with this mix too. Do any touch ups with a pencil pin wash etc.. and it should be good to go... :-)

If I forgot anything sorry! Of course doing camo tanks is a little different... :-)
Sturmtiger 17.JPG
Sturmtiger 17.JPG (75.24 KiB) Viewed 2331 times
"There are things in Russia which are not as they seem..."
Georgy Konstantinovich Zhukov
User avatar
Raminator
Warrant Officer 2nd Class
Posts: 1267
Joined: Tue Aug 11, 2015 9:57 am
Location: Newcastle, Australia

Re: Michael's Comet Repaint...

Post by Raminator »

Thanks for the detailed explanation, I appreciate it. Lots to take in, but the way you've broken it down gives me a bit of hope that I'll be able to follow your steps it when the time comes. Apologies for the thread derail, but thank you again!
User avatar
dgsselkirk
Warrant Officer 2nd Class
Posts: 1484
Joined: Tue Oct 16, 2012 1:57 am
Location: Kitchener, Ontario, Canada
Contact:

Re: Michael's Comet Repaint...

Post by dgsselkirk »

No problem, hope it helps. The great part about painting and detailing is if you really mess it up just repaint it or re-touch it! It takes practice but if you do everything patiently it usually turns out pretty good....
"There are things in Russia which are not as they seem..."
Georgy Konstantinovich Zhukov
User avatar
MichaelC
2nd Lieutenant
Posts: 2448
Joined: Tue Oct 16, 2012 4:03 pm
Location: Toronto, Canada

Re: Michael's Comet Repaint...

Post by MichaelC »

[quote="Raminator] How much did you have to butcher the T-34 hull to get it Comet-shaped? It's impressive how similar the running gear is, but I guess sharing the same Christie suspension would force some similarities.[/quote]

Not too bad. Removed the front edge of the T34 lower chassis, replaced the stock gearbox to a low profile one since the Comet/Cromwell has a relatively flat rear top plate. If you use the metal T34 swing arms it is a simple swap and they fit the Leo metal road wheels perfectly. The other major change is to install the return rollers, which should line up with the idlers at the front.
Post Reply

Return to “Show Off”