Hello friends,
The project is not stopped, but I am late in translating the progress from the Spanish forum. Besides, the acquisition of my 3D printer and other projects have kept me busy

Lately I've been working on the rear part of the tank: the different access hatches to the engine and the stowage bins. As there are no original plans for this part, I have been mainly based and inspired by the panther/jagdpanther.
First of all, the layout I am looking for, designed in 3d:
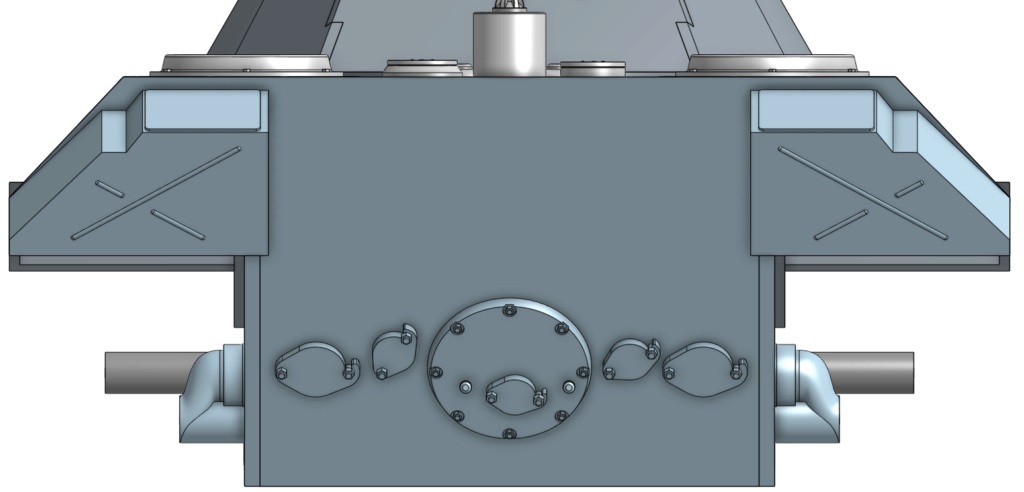
- rear110.jpg (61.52 KiB) Viewed 1594 times
With the corresponding measurements, I built the engine access hatch. To do this, I cut two 1 mm styrene discs and make the 8 octagonal holes, being very careful not to damage the edges. I glue them and bevel the edge. Then I place the 1.8 mm Meng screw heads (from the A large set) in each hole. With a 2.5 mm rod I make the black protrusions, using an electric screwdriver as a lathe to get the recess. Finally, I cut out the smaller hatch that goes on top and use 2.1 mm screw heads to finish it:
The next step is the two hatches on each side. I print a drawing and cut it in 0.4 mm styrene as a template, both the big and the small one. Now all that's left is to cut it out in 2 mm sheet and complete it with the screws. The template in use:
Makin copies:
Already glued in place:
As for the stowage bins, they are smaller than the original panther ones, but I designed them being as faithful as possible. I 3d printed the basic shape and with 0.4 mm styrene and patience I make the X flanges and try to simulate hinges and latches:
General appearance: