
Hi Dennis. It takes courage to build a Churchill like you do, it is a complex tank and what's available on the market is custom, limited and expensive. You are well under way with a solid tank with a lot of metal. Compared even to German designs, the Churchill uses a lot of material due to its side panniers design, 44 road wheels, complicated suspension, thick armor, heavy tracks... It really makes a heavy RC tank. When i opened these planetary gearbox ratio reducers like you are using, i was surprised by the tiny size of the gears inside. I hope these will not cause you issues later due to the weight of the tank. I used these on a M-113 but i feel they are a risk factor on anything heavier. I recommend some testing to see if the tank will move like you hope it will be. Good luck.TheCrow3333 wrote:I´m building an Churchill aswell. I chosed an MK VII. I designed the Model myself and Ludwig only cut the alloysheets for me.
I haven't come as far as you have with your model, but I thing I´m on a good way
RC 1/16 Churchill Mk III - Dieppe Raid 1942 - Build
Re: RC 1/16 Churchill Mk III - Dieppe Raid 1942 - Build
-
TheCrow3333
- Recruit
- Posts: 3
- Joined: Thu Apr 15, 2021 3:19 pm
Re: RC 1/16 Churchill Mk III - Dieppe Raid 1942 - Build
I think any scratch build is a challenge. The Churchill as such has much clear structures, which makes it a bit easier to build here. There are many repetitive jobs like the suspension and the runningwheels.
But since I have already built many other scratch-tanks (Tortoise, Matilda, T29, Neubaufahrzeug, etc.), a lot can be built quickly.
The gears in the ratio (50: 1) are almost indestructible. I also use them in tanks that weigh over 13 kg. Due to the high torque, the tanks all have a nice driving pattern and can also be driven very slowly and precisely. We have never had a breakdown in any of the years. You don't really need to be afraid. Size doesn't always matter If you really want to get more out of it, you can swap the motors for crawler motors.
But now I don't want to distract you further into your contribution. I'm already looking forward to the next advance. I myself have to wait for my springs. I ordered several for the chassis. Its a bit tricky to get the right strength foir them.
best regads.
Dennis
But since I have already built many other scratch-tanks (Tortoise, Matilda, T29, Neubaufahrzeug, etc.), a lot can be built quickly.
The gears in the ratio (50: 1) are almost indestructible. I also use them in tanks that weigh over 13 kg. Due to the high torque, the tanks all have a nice driving pattern and can also be driven very slowly and precisely. We have never had a breakdown in any of the years. You don't really need to be afraid. Size doesn't always matter
But now I don't want to distract you further into your contribution. I'm already looking forward to the next advance. I myself have to wait for my springs. I ordered several for the chassis. Its a bit tricky to get the right strength foir them.
best regads.
Dennis
-
Herr Dr. Professor

- Lieutenant
- Posts: 3635
- Joined: Mon Apr 22, 2019 10:48 pm
- Location: Southern Wisconsin USA
Re: RC 1/16 Churchill Mk III - Dieppe Raid 1942 - Build
Hello Dennis "Crow."  It seems that you have some interesting skill and experience. Might you, please, give us a post in the "Introduce Yourself " section (viewforum.php?f=42)? We would be interested in what modeling and RC experience you have. After you do the introduction, you'll likely find welcomes galore and probably start a bit of good-natured fun, too.
Re: RC 1/16 Churchill Mk III - Dieppe Raid 1942 - Build
Hi, the following posts are for the bow plate with machine gun mount and driver's hatch.
View of the AFV Club Churchill Mk III bow machine gun and the strange driver's hatch that was later modified into the circular one that we know.
The mount for the Besa machine gun has pivots for elevation and horizontal movement. I think the American ball design is better and certainly less complicated for the modeller to repro...
The machine gun mount has an add-on armored plate.
First thing is to create the bow armor plate. Based on calculations, i decided to make it 5.5mm thick. Two layers of 2mm plus one layer of 1.5mm plasticard will be glued together.
Position and shape for the machine gun mount are planned.
The plate is dry fitted to the hull, adjustments to match the hull sides and angle of the glacis are required with lots of finetuning.
Close up of the machine gun mount to repro.
Parts are created for the mantlet of the machine gun. The Shapeways Besa is taken out of storage and further investigated for integration.
Being 3D printed in fine material, the barrel will not last long on the field. Touch it and it breaks. I decided to install an aluminum tube to help give it some more strength. The tube itself is not very strong either but both together with glue will increase the resistance of the Besa. The pre-drilled small hole for the fiber optic is carefully enlarged a bit to fit in the small metal tube.
View of the Besa bow machine gun with metal tube and planned fiber optic for flash. This simple mod gives me more confidence.
Continuing on following post.
View of the AFV Club Churchill Mk III bow machine gun and the strange driver's hatch that was later modified into the circular one that we know.
- RC 1/16 Churchill Mk III - Dieppe Raid 1942 - Build
- RC 1/16 Churchill Mk III - Dieppe Raid 1942 - Build
- RC 1/16 Churchill Mk III - Dieppe Raid 1942 - Build
- RC 1/16 Churchill Mk III - Dieppe Raid 1942 - Build
- RC 1/16 Churchill Mk III - Dieppe Raid 1942 - Build
- RC 1/16 Churchill Mk III - Dieppe Raid 1942 - Build
- RC 1/16 Churchill Mk III - Dieppe Raid 1942 - Build
- Capture6a.JPG (60.77 KiB) Viewed 1020 times
- RC 1/16 Churchill Mk III - Dieppe Raid 1942 - Build
- RC 1/16 Churchill Mk III - Dieppe Raid 1942 - Build
- Capture8.JPG (81.29 KiB) Viewed 1020 times
- RC 1/16 Churchill Mk III - Dieppe Raid 1942 - Build
- Capture9JPG.JPG (82.24 KiB) Viewed 1020 times
Last edited by lmcq11 on Sat Aug 14, 2021 10:49 pm, edited 2 times in total.
Re: RC 1/16 Churchill Mk III - Dieppe Raid 1942 - Build
View of the barrel.
Structural parts for the machine gun mount are made ready for assembly.
View of the mount with elevation pivot.
View of the mount inserted into its box shaped secondary mount for horizontal movement. This part is put aside for now until the bow plate is finished.
View of the driver's hatch on the Churchill Mk III. It would certainly be a contender for the ugliest tank hatch contest.
It also has a locking mechanism on the left that need repro.
I decided to make the hatch not operable. With such complicated hinge mechanism, it would likely not close properly and would give me a lot of trouble for limited benefits. Maybe if the hatch had been prettier, i would have been inclined to spend more time on it...These hatch were not opened at Dieppe. Parts in brass are created for the hinges.
It is actually simpler to do than it may seems. Once a builder has a good reserve of various sizes of brass strips and rods, simple solutions become possible rather than CAD design, 3D printing or trying to find something like it on the web.
The hatch parts are permanently glued.
View of the completed hatch. It took me about 3 hours of work for the hatch.
Continuing on following post
- RC 1/16 Churchill Mk III - Dieppe Raid 1942 - Build
- RC 1/16 Churchill Mk III - Dieppe Raid 1942 - Build
- Capture11.JPG (96.04 KiB) Viewed 1018 times
- RC 1/16 Churchill Mk III - Dieppe Raid 1942 - Build
- RC 1/16 Churchill Mk III - Dieppe Raid 1942 - Build
- Capture13.JPG (78.56 KiB) Viewed 1018 times
- RC 1/16 Churchill Mk III - Dieppe Raid 1942 - Build
- Capture14.JPG (94.77 KiB) Viewed 1018 times
- RC 1/16 Churchill Mk III - Dieppe Raid 1942 - Build
- Capture14a.JPG (52.02 KiB) Viewed 1018 times
- RC 1/16 Churchill Mk III - Dieppe Raid 1942 - Build
- RC 1/16 Churchill Mk III - Dieppe Raid 1942 - Build
- RC 1/16 Churchill Mk III - Dieppe Raid 1942 - Build
- RC 1/16 Churchill Mk III - Dieppe Raid 1942 - Build
Last edited by lmcq11 on Sat Aug 14, 2021 10:56 pm, edited 4 times in total.
Re: RC 1/16 Churchill Mk III - Dieppe Raid 1942 - Build
Another view of the hatch. Creating it was more fun plan anticipated.
The bow plate is permanently installed on the chassis, and the machine gun mount is installed.
Interior view of the machine gun mount. Braces were added for the horizontal pivot. The mount has many layers of movement, lots of dry fit and adjustments are required. I will install the movement servo and LED later.
The add-on supplemental armor plate is designed. It is also made of 3 layers of plasticard to achieve the 5.5mm thickness.
The add-on armor plate is ready for installation.
View of the chassis with its bow plate. Looking very good. I am happy with the results.
MG movement up is good.
Movement down is good.
continuing on following post
- RC 1/16 Churchill Mk III - Dieppe Raid 1942 - Build
- RC 1/16 Churchill Mk III - Dieppe Raid 1942 - Build
- RC 1/16 Churchill Mk III - Dieppe Raid 1942 - Build
- RC 1/16 Churchill Mk III - Dieppe Raid 1942 - Build
- RC 1/16 Churchill Mk III - Dieppe Raid 1942 - Build
- RC 1/16 Churchill Mk III - Dieppe Raid 1942 - Build
- RC 1/16 Churchill Mk III - Dieppe Raid 1942 - Build
- RC 1/16 Churchill Mk III - Dieppe Raid 1942 - Build
- RC 1/16 Churchill Mk III - Dieppe Raid 1942 - Build
- RC 1/16 Churchill Mk III - Dieppe Raid 1942 - Build
Re: RC 1/16 Churchill Mk III - Dieppe Raid 1942 - Build
Going to the right
Going to the left, looking good.
Bars seen in reference were added to the glacis.
View of the hatch with its minuscule locking mechanism on the left.
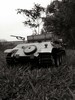
Overview of the model as it stands today.
Next step, the turret.
Regards, Louis
- RC 1/16 Churchill Mk III - Dieppe Raid 1942 - Build
- RC 1/16 Churchill Mk III - Dieppe Raid 1942 - Build
- RC 1/16 Churchill Mk III - Dieppe Raid 1942 - Build
- RC 1/16 Churchill Mk III - Dieppe Raid 1942 - Build
- RC 1/16 Churchill Mk III - Dieppe Raid 1942 - Build
Regards, Louis
-
FredtheFrench
- Corporal
- Posts: 468
- Joined: Sun Feb 09, 2014 6:13 pm
- Location: Rennes. France
Re: RC 1/16 Churchill Mk III - Dieppe Raid 1942 - Build
It is a pure wonder... 
Sorry for my spelling mistakes, I try to do better every day...

-
Model Builder 4

- 2nd Lieutenant
- Posts: 2329
- Joined: Sun Jul 26, 2015 3:46 pm
- Location: South Wales valleys
- Contact:
Re: RC 1/16 Churchill Mk III - Dieppe Raid 1942 - Build
I've run out of words to praise your work Louis so I'll start on numbers now 10/10 

Cheers,Lee.
Cheers,Lee.
Me ? Addicted ? Never !! 
