For test a Turret, Motor and glacis plate for driver and radio operator of a Panther G was taken.
The Turred later was changed by another one from a very late Panther G.
After this the Panther II was displayed some years outside and the weather do his distructional work.
Here a Pictures at the beginning 60th:
The Panther II was in 60th rebuild to runnig condition:
Your second Photo show the Panther II after this on a parade somwhere in the USA.
Here is a Photo of the Panther II with weight rings in place bevore shipped to USA:
Panther II Hybrid
-
- Sergeant
- Posts: 535
- Joined: Thu Jan 08, 2015 1:40 am
Re: Panther II Hybrid
Nice pictures, Jurgen. Thanks for the history footnote.
-
- Sergeant
- Posts: 535
- Joined: Thu Jan 08, 2015 1:40 am
Re: Panther II Hybrid
In the last chapter, the somewhat unrealistic 'weld' of the Asiatam 'Schmalturm' was chiseled out to make a channel to make way for new 'weld' created using Tamiya two-part epoxy which mixes together and rolls out easily. The Asiatam turret's weld did, however, contain pretty well defined seams which allowed the chisel to be more or less self-guiding, though that created a weld seam a little wider than I would have wished for. In hindsight, I should have guided along just one of these defined seams and sanded out the other seam. The look after chiseling from seam to seam was slightly exaggerated to scale, but not quite as noticeable when under prime.
Working once again with the estimable PatrickH, a few options presented themselves for an appropriate, if not totally hypothetical, gun mantlet. I already had a long snout hybrid 'what-if' roaming the home grounds, so this one would be a short nose variant.
To be continued...
Working once again with the estimable PatrickH, a few options presented themselves for an appropriate, if not totally hypothetical, gun mantlet. I already had a long snout hybrid 'what-if' roaming the home grounds, so this one would be a short nose variant.
To be continued...
- FredtheFrench
- Corporal
- Posts: 468
- Joined: Sun Feb 09, 2014 6:13 pm
- Location: Rennes. France
Re: Panther II Hybrid
Hi.
Just found this thread, Awesome job Mr Schwerepanzer, attention to detail is second to non.
Regards.
Sub.
Just found this thread, Awesome job Mr Schwerepanzer, attention to detail is second to non.
Regards.
Sub.
- Will01Capri
- 2nd Lieutenant
- Posts: 2704
- Joined: Tue Jul 18, 2017 5:34 pm
- Location: South Scotland
Re: Panther II Hybrid
Looks really decent and yes alot of attention to detail which is great to see
HL camo E' Tiger
HL L' Tiger
M26 Pershing WW2 project
Tam K'Tiger project
HL Walker Bulldog project?
HL Panzer IV Munitionsschlepper für Karl-Gerät
HL Sherman project?
1/24 Leopard 2 Custom mod
2 many trucks to list!
HL L' Tiger
M26 Pershing WW2 project
Tam K'Tiger project
HL Walker Bulldog project?
HL Panzer IV Munitionsschlepper für Karl-Gerät
HL Sherman project?
1/24 Leopard 2 Custom mod
2 many trucks to list!
-
- Sergeant
- Posts: 535
- Joined: Thu Jan 08, 2015 1:40 am
Re: Panther II Hybrid
Thanks for the kind words, gents. As coincidence would have it, and with many thanks and much gratitude to our own PatrickH for putting up with my pestering, a new set of correct profile 3-D produced running gear arrived in the States from Mother England yesterday. The running gear (sprockets, idlers and road wheels) will each have a resin outer assembly mated to a metal inner wheel for added stability and rigidity. As soon as I get everything sorted, I'll continue the build thread.
-
- Sergeant
- Posts: 535
- Joined: Thu Jan 08, 2015 1:40 am
Re: Panther II Hybrid
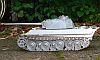
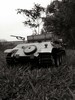
In an earlier chapter, I mentioned the possibility of creating new sets of wheels to imitate the profile of the wheels of the Panther II residing at the Patton Museum. The concern at the time was whether resin wheels would allow for model stability given it's weight. The alternative was to use the very good Tiger II wheels from Taigen and simply use modified resin wheel hubs for a more accurate historical appearance. In the end, a safe compromise I think was reached where a resin facing wheel would be mated to a companion inner metal wheel. It then became a task of creating the correct profile for the unique Panther II road wheels and coming up with measurement tolerances that would allow the resin wheel to mate closely with the companion metal wheel.
Enter our own PatrickH, who, to his undying credit, can be more anal than me. Throwing all caution to the wind, a similar process was created to achieve the correct profile for the drive sprocket. However, in this instance and in the case of the idlers both parts of the drive sprocket two of the three wheel idler sets were to be created in resin.
Here is the result so far:
The outer wheels in positions 1, 3, 5 & 7
The inner wheels in positions 2, 4 & 6
Getting the axle pin to protrude the correct length proven a bit harder than originally thought, but I think we accomplished that.
Next up, the sprockets and the idlers...
-
- Sergeant
- Posts: 535
- Joined: Thu Jan 08, 2015 1:40 am
Re: Panther II Hybrid
The sprockets posed a bit of a decision dilemma as Jentz and Doyle in their Panzer Tracts 5-4, speak to an 'original' sprocket design and an 'improved' design. All references I had seen showed what appeared to be the 'original' sprocket design which seemed to my eye to be very similar to the original Tiger II sprocket design. The shape and design of the bolts attaching various parts of the sprocket hub and the different shape of the sprocket teeth made the 3-D sprocket an attractive alternative to the original Taigen metal version. But, if choosing to create the look of the 'improved' design sprocket, I had only the line drawings found in 5-4 as a reference until Jurgen (our Corporal Jhamm), eagle eye that he is, pointed out that that an example of the 'improved' design could be found on the inner sprocket of the sprockets seen on the Patton Museum Panther II. That was proof enough that the 'improved' design actually existed and was a reasonable justification for the extra work in creating them.
Taigen sprocket and early iteration of an 'original' sprocket:
A bit obscured, but the only references I could find (with Jhamm's help):
The 'improved' sprocket by PatrickH with all position parts only loosely mated together for demonstration.
Next up, the idler set up...
Taigen sprocket and early iteration of an 'original' sprocket:
A bit obscured, but the only references I could find (with Jhamm's help):
The 'improved' sprocket by PatrickH with all position parts only loosely mated together for demonstration.
Next up, the idler set up...