My Hooben T-55 Progress
Re: My Hooben T-55 Progress
bump - please delete
Last edited by Marc780 on Sun Nov 03, 2019 3:02 pm, edited 1 time in total.
Re: My Hooben T-55 Progress
The tank while still unpainted...
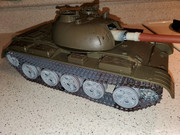
Painting time - before the winter weather gets cold, too cold for painting the T-55!
Syrian T-55 colors
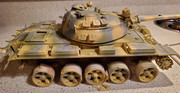
I've been wanting to do a T-55 in this pattern for some time. Base yellow is MIG Oil Ochre. The green is MIG light green khaki, with Testors medium grey.

Egypt, for instance, had many thousands of T-55's, many of which wore oil ochre, or desert sand base coat - but with brown stripes instead of green. I don't know why they picked the colors they did but I'd be interested to know the reason.

Iraq also used green stripes on their livery especially during the Iran-Iraq war. I don't know their reasoning either, but if I had a guess, it may have been because much of the fighting with the Iranians (who also used thousands of T-55's) during the 1979-1988 war took place along the Shatt-Al-Arab waterway.
Painting time - before the winter weather gets cold, too cold for painting the T-55!
Syrian T-55 colors
I've been wanting to do a T-55 in this pattern for some time. Base yellow is MIG Oil Ochre. The green is MIG light green khaki, with Testors medium grey.
Egypt, for instance, had many thousands of T-55's, many of which wore oil ochre, or desert sand base coat - but with brown stripes instead of green. I don't know why they picked the colors they did but I'd be interested to know the reason.
Iraq also used green stripes on their livery especially during the Iran-Iraq war. I don't know their reasoning either, but if I had a guess, it may have been because much of the fighting with the Iranians (who also used thousands of T-55's) during the 1979-1988 war took place along the Shatt-Al-Arab waterway.
Last edited by Marc780 on Sun Nov 03, 2019 3:06 pm, edited 1 time in total.
-
Rad_Schuhart
- Warrant Officer 1st Class
- Posts: 1983
- Joined: Tue Jan 19, 2016 9:22 am
- Location: Spanish living in Graz, Austria. Heart in UK.
- Contact:
Re: My Hooben T-55 Progress
My godness, you work fast... But there are indeed many more things you can add. I am adding RC rotating cuppolas, working cuppola AA machine gun, more lights, of course fixing that crappy recoil, and the use of propper hobby electronics with my own motor sounds, voices and so on. So far it is taking 12 channels but I guess it will use even more. Tank crew are a must too. It will take me a year but I hope it will be well worth it.
Dont take it like a critic but as ideas for your tank!
Dont take it like a critic but as ideas for your tank!
My RC tanks website, loads of free info for everybody:
https://radindustries.wordpress.com/
https://radindustries.wordpress.com/
Re: My Hooben T-55 Progress
Even though I'm in southern california it is getting cold here too, that is, cold for this area. And there was a cold spell of sorts, the night before last -and I watched the first coat of oil ochre get fish-eye even though it was barely below 70 F...this alarmed me enough that I thought I'd better at least get the base coat down before it turned "cold" for months instead of days!Rad_Schuhart wrote:My godness, you work fast... But there are indeed many more things you can add. I am adding RC rotating cuppolas, working cuppola AA machine gun, more lights, of course fixing that crappy recoil, and the use of propper hobby electronics with my own motor sounds, voices and so on. So far it is taking 12 channels but I guess it will use even more. Tank crew are a must too. It will take me a year but I hope it will be well worth it.
Dont take it like a critic but as ideas for your tank!
Oh I absolutely am looking for ideas. And... since Ali Express has an "11-11" sale, I'm actually getting another T-55 - the price is too low to resist! Perhaps this one will be an Enigma T55? i have the Stephen Zaloga book on the T55, he claims some NATO officers somehow got a chance to shoot at an Enigma with AT weapons and that the Enigma armor (which is mostly hollow, sandwiching thin armor outside with resin plates inside - and that turret armor actually proved more or less effective at stopping RPG's and even the TOW when fired against it...
12 channels, wow! Where will you fit all the wiring?
-
Rad_Schuhart
- Warrant Officer 1st Class
- Posts: 1983
- Joined: Tue Jan 19, 2016 9:22 am
- Location: Spanish living in Graz, Austria. Heart in UK.
- Contact:
Re: My Hooben T-55 Progress
Technology evolves quickly. Look at this, this is a 16ch receiver.

Anyway I agree and the T55 is very tight inside. I even had to make my own battery back with 2 18650s li ion cells.
Anyway I agree and the T55 is very tight inside. I even had to make my own battery back with 2 18650s li ion cells.
My RC tanks website, loads of free info for everybody:
https://radindustries.wordpress.com/
https://radindustries.wordpress.com/
-
General Jumbo01
- Warrant Officer 1st Class
- Posts: 1763
- Joined: Sat Jul 14, 2018 8:06 pm
- Location: I'm a Londoner that moved to Essex. Says it all really...:(
Re: My Hooben T-55 Progress
Then add 16 channels worth of wiring! Hard wired it would be a soldering nightmare. Using plugs the sockets would be far bigger than the circuit board! 
Sent from my ASUS_T00G using Tapatalk
Sent from my ASUS_T00G using Tapatalk
Owner - Fuckleburgh Tank Collection
-
Xiaoshan_Sailor

- Sergeant
- Posts: 706
- Joined: Thu Apr 12, 2018 3:04 pm
- Location: Hangzhou, China
Re: My Hooben T-55 Progress
That is some amazing progress! Hate to say this but having known Bill Feng, Hooben's laoban for more than 14 years, this sure makes for some fun reading. I'll see him at an event in a couple weeks so let me know if you want me to pass along your regards, gents. 
Re: My Hooben T-55 Progress
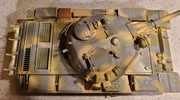
After the first session painting, trying to get the right amount of feathering between colors I realized it hadn't come out how I wanted so it was time for a do-over.

Once I started spraying the colors, a problem soon popped up: if I used masking tape, the lines between colors would be too sharp and would look "wrong". But if I sprayed the green holding the airbrush free-hand, the lines between colors would blur too much. So finally I read about a product that would fix this very problem, something called "Blue tack". This is a clay that's normally used for hanging paintings on a wall without hammering nails. But the Blue Tack can be molded and then stuck onto the surface you want to spray. It will result in lines neither too sharp nor too blurred and fuzzy.
I rolled each piece of blue tack between my hands and placed them onto the tank and just sprayed the green around it. This made color lines that look just how i wanted them to.


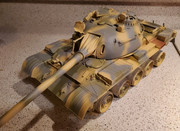
I also installed the rubber tires (a very nice touch to this tank actually).
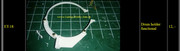
But then a mini-disaster happened, my fault unfortunately and it happened when I wasn't paying close enough attention...with the tracks removed, the hull could roll and roll it did, right off the box I was using (in place of a proper table) and crashed back-end first onto the ground!!! ARRGGH!
My only consolation is the turret was not in place when it hit the ground - so it could have been a lot worse...

Well ...while there's not a lot good to say about that... except the back end of the model was sturdy enough so that only the exterior fuel drum mounts + the tank fording snorkel broke off the back of the hull...
Anyway after a bit of cursing like a demon at this I gathered up the broken parts and decided it was a swell opportunity to order the detailed tank mounts from Ludwigs-de. Having come this far, and expended this many hours of labor plus parts, paint and glue, putty, tools and clamps, et. al Executive summary, in for a penny, in for a pound is what goes for this project!
€12 (or $13.30 US for 4, plus some other part, $34.23 US)
So that upgrade will take a week or two for the parts to arrive. In the meantime more weathering (I'm planning to weather lightly for my prize tank, fresh out of the Kharkov factory, perhaps with pilfered bottles of alcoholic brake fluid hidden in the engine compartment, or even one drum filled with ditto lol) with the back of the hull exposed I can tidy up that weathering some! Hook up a tail light, geting hold of a volume control to make the speaker work; adding Arabic turret decals, painting the cables, plus - another test drive soon!
Once I started spraying the colors, a problem soon popped up: if I used masking tape, the lines between colors would be too sharp and would look "wrong". But if I sprayed the green holding the airbrush free-hand, the lines between colors would blur too much. So finally I read about a product that would fix this very problem, something called "Blue tack". This is a clay that's normally used for hanging paintings on a wall without hammering nails. But the Blue Tack can be molded and then stuck onto the surface you want to spray. It will result in lines neither too sharp nor too blurred and fuzzy.
I rolled each piece of blue tack between my hands and placed them onto the tank and just sprayed the green around it. This made color lines that look just how i wanted them to.
I also installed the rubber tires (a very nice touch to this tank actually).
But then a mini-disaster happened, my fault unfortunately and it happened when I wasn't paying close enough attention...with the tracks removed, the hull could roll and roll it did, right off the box I was using (in place of a proper table) and crashed back-end first onto the ground!!! ARRGGH!
My only consolation is the turret was not in place when it hit the ground - so it could have been a lot worse...
Well ...while there's not a lot good to say about that... except the back end of the model was sturdy enough so that only the exterior fuel drum mounts + the tank fording snorkel broke off the back of the hull...
Anyway after a bit of cursing like a demon at this I gathered up the broken parts and decided it was a swell opportunity to order the detailed tank mounts from Ludwigs-de. Having come this far, and expended this many hours of labor plus parts, paint and glue, putty, tools and clamps, et. al Executive summary, in for a penny, in for a pound is what goes for this project!
€12 (or $13.30 US for 4, plus some other part, $34.23 US)
So that upgrade will take a week or two for the parts to arrive. In the meantime more weathering (I'm planning to weather lightly for my prize tank, fresh out of the Kharkov factory, perhaps with pilfered bottles of alcoholic brake fluid hidden in the engine compartment, or even one drum filled with ditto lol) with the back of the hull exposed I can tidy up that weathering some! Hook up a tail light, geting hold of a volume control to make the speaker work; adding Arabic turret decals, painting the cables, plus - another test drive soon!
