Jake's WeCoHe Panther Ausf. G (MAN) Early '44
Filling more seams on paniers very tight a.jpg[/attachment]This is a long-running project I've been working on...quitting the hobby...going back on...quitting hobby again...coming back to hobby...etc, etc, etc since 2007. I've been documenting the build over on Willy's website Customrcmodels.com in the sections of 'Jake's Werkstatt'. Anyway, I'm in final detail painting, so it's probably a good idea of going down lobotomy lane to remember this project. I've scratch-built and cast turrets, upper hulls, etc, nothing comes close to the pain this thing was and the big reason was not because of the detail, but because it wasn't completed as a kit by WeCohe, and they bailed out not long after producing what they did. When we got the kit, they were still producing parts and just had about 1/3 of the instructions completed. They never would finish them, so you had to 'get educated' into what parts were provided, how they went together, etc. Some stuff, you had to engineer in as it was structurally lacking, like you couldn't mate the upper hull to the lower without some sort of cross brace above the gearsets to spread it apart, and had to make a hull plate as the metal pan provided was lacking in strength. My buddy Aaron had built their Jagdtiger when it initially came out and went through even more hiccups and no instructions. Constant calls to WeCohe helped get through it. It's all part of modeling right? I haven't got the electronics for it yet, but plan to use an MF/DMD set out of a Tiger I until I do. Anyway on to the first set of photos.
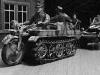
The first set of photos shows the kit laid out. This photo was taken by buddy Willy Loewer when three of us got the initial kit. This photo shows one kit, and it's all not there. Like they hadn't developed the early mantlet yet. Then onto cutting angles into all the hull plates. Fun, fun, fun. This took about a month working each night after work with about half a dozen tools. Then onto fitting and gluing the panels, and filling the seams. In this case with Evercoat automotive putty. One photo shows getting the underside of the panniers filled in very tight. Onto installing a machined 3mm plate in order to give the Panther a more stable hull with little flex (big problem with KT and Panthers). This plate was subsequently acid treated for paint prep and the next photo show how all the metal that's not photo-etched got the same acid treatment. The piece on the right is untreated and the piece on the left is treated. The next photo shows magnets installed into pieces of pattern-makers foam. I wanted to make the upper hull able to be lifted straight off without unscrewing anything. Love those rare earth magnets, all shapes and sizes. The last photo shows commencing the installation and gluing of the 672 metal screws into each of the outer 16 road wheels (42 each).
Re: Jake's WeCoHe Panther Ausf. G (MAN) Early '44
Having seen where she's upto now on Facebook I look forward to witnessing the original journey on here! Those wheel bolts would try the patience of a saint!
- c.rainford73
- Major
- Posts: 6104
- Joined: Thu Aug 25, 2016 7:34 pm
- Location: Connecticut USA
Re: Jake's WeCoHe Panther Ausf. G (MAN) Early '44
Awesome modell!
Re: Jake's WeCoHe Panther Ausf. G (MAN) Early '44
I forgot something pretty big when I was looking at the first photo of WeCohe parts, you also had to get an entire Tamiya Tiger I full option kit, as the engineered a log of those kit parts for their Panther. All that was left was the hull, turret, road wheels, tracks, and stuff like that. Nothing goes to waste as I got to use the turret for the VK4501 (P). All in all, it was about a $2400-2500 investment, but at the time it was the only Panther in town (Tamiya came out shortly after).
Re: Jake's WeCoHe Panther Ausf. G (MAN) Early '44
This next set of photos were taken over a period of 7 years. I got out of the hobby twice, sold off about 12-15 tanks, and wound up buying more. Got into classic cars (real ones) and the Panther was wrapped in plastic and every few years I would do something else until about 2012, then started knocking a lot out. When I got the tank, the two others that got one with me, one of them couldn't get past shaping the armor panels so sold it to another guy who hasn't done anything with it, and the other guy is just collecting it, and probably will never be built. So I knew of no one over here in the states that was building one, whereas I knew of a few WeCohe Jagdtigers in contrast.
Anyway, these photos cover the initial test fit of the road wheels and hull together, rear deck and rear glacis fittings (many more screws of many different sizes). Initial interior and exterior painting, and marking the side panels for tools and fittings, then some zimmerit work.
- HERMAN BIX
- Brigadier
- Posts: 10311
- Joined: Sun Jan 12, 2014 12:15 am
- Location: Gold Coast,Australia
Re: Jake's WeCoHe Panther Ausf. G (MAN) Early '44
Glorious
You can just tell by looking at it that its a rare & quality piece.
Do you have a unit specific vehicle in mind to replicate ?
You can just tell by looking at it that its a rare & quality piece.
Do you have a unit specific vehicle in mind to replicate ?
HL JAGDPANTHER,HL TIGER 1,HL PzIII MUNITIONSCHLEPPER, HL KT OCTOPUS,HL PANTHER ZU-FUSS,HL STuG III,HL T34/85 BEDSPRING,
HL PZIV MALTA,MATORRO JAGDTIGER,HL F05 TIGER,TAMIYA KT,HL PANTHERDOZER,HL EARLY PANTHER G,TAIGEN/RAMINATOR T34/76,
HL AN-BRI-RAM SU-85
HL PZIV MALTA,MATORRO JAGDTIGER,HL F05 TIGER,TAMIYA KT,HL PANTHERDOZER,HL EARLY PANTHER G,TAIGEN/RAMINATOR T34/76,
HL AN-BRI-RAM SU-85
Re: Jake's WeCoHe Panther Ausf. G (MAN) Early '44
Wardog, I know it does look bigger, and I took my micrometer to it today just to be sure, and it's spot-on 3mm. I had beveled it on my mill to reduce the look and normally you can't see it unless you try. It's a big benefit at keeping the hull from twisting that Panthers, KT's, and Jagds all have.
Herman, thanks for the compliment. When I primered it, I still didn't have a unit/paint scheme for it, then I remembered I had this all planned out the year I got it with a photo I had, but I never knew the unit. So it's just some Heer division. A lot of them didn't have unit markings. Right now I'm doing filters and washes. Got the balkenkruzes and tactical numbers all hand-painted on. As you know, painting a vehicle with lots of crap on it just sucks the time out of the week. BTW, I really like your work. Been following the burned out T-34 with interest.
Re: Jake's WeCoHe Panther Ausf. G (MAN) Early '44
Somehow, I had separated the Panther photos I was going to post into three installments, and this set didn't get on, but all the ones from the second were divided. Yeah, new job sucks right now and my mind in plastered at the end of the day so I'll blame that Anyway, here were the intended third set, and before anyone asks, I've got about 2 weeks more of detail painting before the final photos are posted. Can't F&^%ing wait either. I've already pulled the next project, the Puma and the first FAMO I'm going to get upgraded out.
Well, these photos are a mix of the last half of the Panther-build showing some test shots at Danville, preparing the turret for zimmerit, the tols involed, and the results, and doing micro-weld seams with a syringe filled with Nitro-Stan thinned down with lacquer thinner.The other two are just primering and basecoating.
- c.rainford73
- Major
- Posts: 6104
- Joined: Thu Aug 25, 2016 7:34 pm
- Location: Connecticut USA