Good Morning,
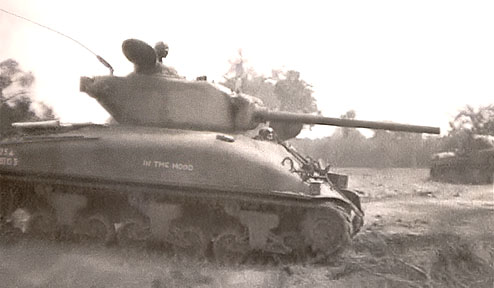
Starting a middlin' to serious redo on my venerable Mato M4A1 or as Alpha likes to call it, Crazy Joe's Sherman. ;o) I have some detail parts set aside and thanks to Sass and Alpha, I have a Mato 2.4 GHz board and TX and a turned aluminum airsoft barrel coming to replace the existing electronics and the overly large stock barrel. I also have a new gun to replace the intermittently functioning one it came with. I plan on leaving the existing running gear in place but would like to source a new pair of stock tracks and use the existing set as spare links. They are getting a little worn from running on concrete. A thorough paint job is also in the works and I am aiming to replicate what Mato was shooting for, the last Sherman commanded by Sergeant Lafayette Poole. This work will be spaced out between ordering and beginning an anticpated by me, KV-2A. It will take some time to finish but will fill in the waiting periods for parts and delivery on the KV-2. Here are some previous pics to show what I am beginning with, a mostly stock, Mato M4A176(W)
Crazy Joe's Sherman Rehabilitation
-
PainlessWolf

- Lieutenant-Colonel
- Posts: 7405
- Joined: Sun Feb 26, 2012 9:09 pm
- Location: Southern Colorado Rocky Mountains
Crazy Joe's Sherman Rehabilitation
- Attachments
-
- Solid
-
- M4A176(W)
-
- Radio Ops Rear Quarter
-
- 1944 M4A176W
-
- Sherman Bow
...Here for the Dawn...
-
PainlessWolf
- Lieutenant-Colonel
- Posts: 7405
- Joined: Sun Feb 26, 2012 9:09 pm
- Location: Southern Colorado Rocky Mountains
Re: Crazy Joe's Sherman Rehabilitation
Took it apart today and learned some interesting things about Mato's Sherman. There are a lot of things held together by screws which is good and a lot of the soldering is spidery and weak which is not. Pictures:
- Attachments
-
- I noted an unused screw hole and used a small screw to fix the toe-in. It made it worse so I removed a little material instead
- I noted an unused screw hole and used a small screw to fix the toe-in. It made it worse so I removed a little material instead.JPG (71.02 KiB) Viewed 6338 times
-
- Idler mounts are screw mounted in tandem with the hull brace
- Idler mounts are screw mounted in tandem with the hull brace.JPG (84.24 KiB) Viewed 6338 times
-
- Two piece original Mato idlers have a unique mount. Small metal washers on the contact surfaces will help a lot.
- Two piece original Mato idlers have a unique mount. Small metal washers on the contact surfaces will help a lot..JPG (86.32 KiB) Viewed 6338 times
-
- Lower hull with toe-in on the idlers noted
-
- Original turret and newer one with the replacement gun. Paint is slightly better on the newer turret
-
- Upper hull with all tools, tow cable and etc. removed
-
- Upper removed from the lower hull. I had to cut the soldered white antenna wire
-
- Extremely weak solder job. This wire broke off right after I took this shot.
- Extremely weak solder job. This wire broke off right after I took this shot..JPG (91.75 KiB) Viewed 6338 times
-
- A hodgepodge of wiring...at least this older version uses 2 pin plugs
-
- Removed the tracks by pulling one pinned connector and opened the tank up by removing eight screws
...Here for the Dawn...
Re: Crazy Joe's Sherman Rehabilitation
Here you go Painless...
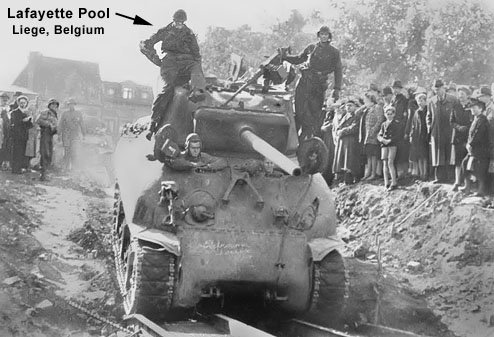

to inspire your build
Carpe Diem Sir
ALPHA
to inspire your build
Carpe Diem Sir
ALPHA
-
PainlessWolf
- Lieutenant-Colonel
- Posts: 7405
- Joined: Sun Feb 26, 2012 9:09 pm
- Location: Southern Colorado Rocky Mountains
Re: Crazy Joe's Sherman Rehabilitation
Morning, Alpha,
Thank you, Sir. ;o) Since I have two turret bottoms to work with, I am going to try to lower the height by removing most of the extra rIng that Mato added. I will save a lot of depth inside the hull by going to 2.4 and removing the receiver board. I'll need to fabricate a non working antenna at the mount but you did so with excellent results here recently. Looks like 'In The Mood' was sporting some kind of movable antenna mount in that one picture. That, or Poole bent it out of the way.
regards,
Painless
...Here for the Dawn...
Re: Crazy Joe's Sherman Rehabilitation
No Problemo Painless... the pictures are the same ones as when you initially decided to do the In the mood... I just transferred them for easier access lol....it helps... reason I post a lot of G&P pics on my builds ... as I don't really care flipping though pages of a book unless I have too... or search for things on the internet...PainlessWolf wrote:Morning, Alpha,
Thank you, Sir. ;o) Since I have two turret bottoms to work with, I am going to try to lower the height by removing most of the extra rIng that Mato added. I will save a lot of depth inside the hull by going to 2.4 and removing the receiver board. I'll need to fabricate a non working antenna at the mount but you did so with excellent results here recently. Looks like 'In The Mood' was sporting some kind of movable antenna mount in that one picture. That, or Poole bent it out of the way.
regards,
Painless
The turret mod is pretty easy.... and I don't think you have as much clearance problem as the HL... the gun mech on the Mato is a little smaller and doesn't "protrude" like the HL... so the only clearance issue is the gun mech clearing the bottom of the turret and the rotation ring once you mod it ...I haven't been able to test mine because I haven't done the electricals yet... but if there is a problem ..it doesn't seem like it will be a major thing... just a few swipes with a dremel and she should be clear
I think you are correct about the antenna on Poole's tank... can't see it that well...but it looks to have one of those ball knuckle joints...that allow it to pivot like that...and it looks like you'll have to add some mud flaps
Good luck with the build... it'll be a good warm up leading into your Kv2
Carpe Diem Painless
ALPHA
-
PainlessWolf
- Lieutenant-Colonel
- Posts: 7405
- Joined: Sun Feb 26, 2012 9:09 pm
- Location: Southern Colorado Rocky Mountains
Re: Crazy Joe's Sherman Rehabilitation
Alpha,
Thanks again, my Friend. Tonight I took apart the old turret and gun to see how it mounted and what was wrong with it over the years. I couldn't see anything obviously wrong other than the spidery soldering again but I noted that the spring return on the loader was very tight so maybe that was it, i.e., the loading slot just never opened up to accept a round. Hopefully the new gun will work better. I won't move it over until the new barrel arrives. Now I have to go get a new plastic saw to cleanly cut the bottom of the turret apart and use a sanding block to evenly and smoothly sand it down. I note that the mounting points will have to be shortened a commensurate amount as well. Good thing that they are deep well construction. Pictures:
Thanks again, my Friend. Tonight I took apart the old turret and gun to see how it mounted and what was wrong with it over the years. I couldn't see anything obviously wrong other than the spidery soldering again but I noted that the spring return on the loader was very tight so maybe that was it, i.e., the loading slot just never opened up to accept a round. Hopefully the new gun will work better. I won't move it over until the new barrel arrives. Now I have to go get a new plastic saw to cleanly cut the bottom of the turret apart and use a sanding block to evenly and smoothly sand it down. I note that the mounting points will have to be shortened a commensurate amount as well. Good thing that they are deep well construction. Pictures:
- Attachments
-
- An opportunity to put something over the vision block slots presents itself.
-
- Turret underside showing elevation spring and hardware mounts
-
- Two screws hold on the gun mantlet and plastic barrel sheath.
-
- Broken and spidery soldering. The wiring came apart easily with slight tugs.
- Broken and spidery soldering. The wiring came apart easily with slight tugs..JPG (98.26 KiB) Viewed 6253 times
-
- Left to right, Turret screws, Ammo tray screws and Elevation gears screws.
-
- Gun removed from old turret. Held in by a pressfit on the plastic trunnions, ammo tray and elevation motors used three screws
-
- Old and new turrets and wiring
...Here for the Dawn...
Re: Crazy Joe's Sherman Rehabilitation
BRRRRRRRRRR.. that hole gave me the hee bee jeebies when I saw it
 ...the only thought that ran in my mind was "AIR LEAK!"
tossed it out right away
ALPHA
tossed it out right away
ALPHA
-
PainlessWolf
- Lieutenant-Colonel
- Posts: 7405
- Joined: Sun Feb 26, 2012 9:09 pm
- Location: Southern Colorado Rocky Mountains
Re: Crazy Joe's Sherman Rehabilitation
Good Morning,
That is a good question. The inner airsoft barrel has a set of these holes opposite each other in the same location. I discovered them after I pulled the mantlet and outer barrel forward. What purpose would they serve? They look machined in (beveled edges, etc.) Any suppositions are welcomed.
regards,
Painless
...Here for the Dawn...
Re: Crazy Joe's Sherman Rehabilitation
There's a recent thread about this here: http://www.rctankwarfare.co.uk/forums/v ... 38&t=12505 Three are a lot more considerations than I would have thought, (including these vent holes), and I learned a lot. I'm waiting for Alpha and/or Saxondog to design a super-duper new firing mechanism for our tanks! -Mike
Re: Crazy Joe's Sherman Rehabilitation
They are odd Painless... I've seen similar in early Heng Longs.. but usually on one side only... and it had a purpose... the plastic outer had a pin that would secure the inner barrel to the outer... those don't do anything... they are just there... which would cause a disruption or turbulence in the barrel as the bb exited it ... strange concept for surePainlessWolf wrote:Good Morning,
That is a good question. The inner airsoft barrel has a set of these holes opposite each other in the same location. I discovered them after I pulled the mantlet and outer barrel forward. What purpose would they serve? They look machined in (beveled edges, etc.) Any suppositions are welcomed.
regards,
Painless
ALPHA
