Comet A34- Ludwig kit

This section is for builds that are not strictly Tamiya or Heng Long. For instance, replacing the electronics from a WSN or Matorro, or even a scratch-build.
User avatar
43rdRecceReg
Major
Posts: 6294
Joined: Fri Jul 31, 2015 11:38 am
Location: North West Highlands, Scotland

Re: Comet A34- Ludwig kit

Post by 43rdRecceReg »

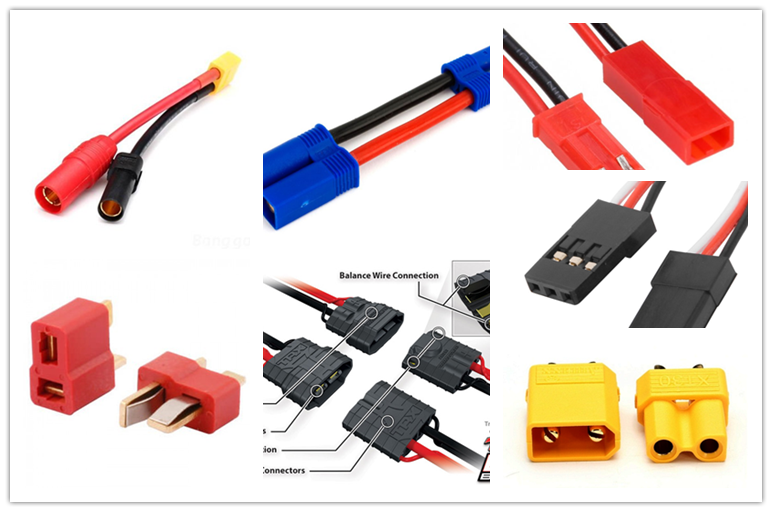
Meantime, I found this quite useful webpage dealing with RC battery connectors. I was actually looking for the power ratings of blue/red crimp-type bullet connectors. They're towards the bottom of the page:
https://blog.ampow.com/rc-battery-connector-types/
Image
"Get your facts first, and then you can distort them as much as you please"- Mark Twain.
User avatar
Jimster
Lieutenant
Posts: 3058
Joined: Mon Dec 10, 2018 1:51 am
Location: Illinois

Re: Comet A34- Ludwig kit

Post by Jimster »

The interior is so clean! Beautiful job. I like the idea of making your own custom smoker fittings.
User avatar
43rdRecceReg
Major
Posts: 6294
Joined: Fri Jul 31, 2015 11:38 am
Location: North West Highlands, Scotland

Re: Comet A34- Ludwig kit

Post by 43rdRecceReg »

Jimster wrote:The interior is so clean! Beautiful job. I like the idea of making your own custom smoker fittings.
Thanks, Jim :thumbup: As for the smoker fittings, it's easy to mitre some pipe and join it, so long as it's the right diameter. Styrene tubing, in a range of diameters, should be an essential in any tanks customiser's kit. I believe Louis (Imcq11) is also a regular, and enthusiastic user.
You can also use it as a drinking straw, for a large celebratory cocktail, when the project's going well. ;)
Last edited by 43rdRecceReg on Wed May 12, 2021 10:22 pm, edited 1 time in total.
"Get your facts first, and then you can distort them as much as you please"- Mark Twain.
User avatar
43rdRecceReg
Major
Posts: 6294
Joined: Fri Jul 31, 2015 11:38 am
Location: North West Highlands, Scotland

Re: Comet A34- Ludwig kit

Post by 43rdRecceReg »

Fitted some mesh inside the Normandy Cowlings. You can just see the styrene exhaust tubes peeking through. I'll paint them later to conceal them. Both the Cromwell and the Comet had a mesh screen inside the exhaust cowls. Apart from concealing the occasional flames that spat out of the exhaust (which would draw the attention of anti-tank and tank units), the cowls made it possible for soldiers to ride on the engine deck without being killed by carbon monoxide gasses, as the gasses were deflected away from the deck.
In 'Tigers in the Mud', Otto Carius mentions the fact that there were cases of Tiger tank riders being snuffed out by exposure to deadly monoxide, after prolonged periods on Tiger engine decks. 8O
The turn motor is now in place, after I fitted some styrene in the crevice below the air filter intake, to support the third mounting standoff.

I'm just waiting for the servo extension now, before tests begin.
Image
Image

All those fittings, by the way (smoke dischargers, intercom box etc..) on the rear panel, were scratch-made. I'm actually quite pleased with them :thumbup:
"Get your facts first, and then you can distort them as much as you please"- Mark Twain.
User avatar
Model Builder 4
2nd Lieutenant
Posts: 2329
Joined: Sun Jul 26, 2015 3:46 pm
Location: South Wales valleys
Contact:

Re: Comet A34- Ludwig kit

Post by Model Builder 4 »

Very nice work Roy :clap: you've done a fine job with the smoker pipes, nice and neat and will look great with the smoke coming from the cowls :thumbup:

Cheers,Lee.
Me ? Addicted ? Never !! :crazy:
User avatar
43rdRecceReg
Major
Posts: 6294
Joined: Fri Jul 31, 2015 11:38 am
Location: North West Highlands, Scotland

Re: Comet A34- Ludwig kit

Post by 43rdRecceReg »

Model Builder 4 wrote:Very nice work Roy :clap: you've done a fine job with the smoker pipes, nice and neat and will look great with the smoke coming from the cowls :thumbup:

Cheers,Lee.
:D Many, many thanks, Lee!. :thumbup:
Feel free to imitate them ;) To be honest, I'm amazed that it took me so long to think of bonding mitred pipes together. :/ :/ It just makes the process so simple: saw, mitre box, cement and styrene tubing. I also bought several sets of HL smoker pipes from Forgebear, as the new units are sometimes supplied without them (translucent tubing and black outlet cap)
I'd spent ages looking at aquarium accessories, but could never find anything that quite fitted the bill.
An internal arrangement like this would also work well in your Cromwell. I spent ages making a recoil setup for my Crowmell- almost from scratch; in the end, though, and I wish I'd had access to these HL bits, and the new MFU then, as they have helped simplify the whole process. I really like the compact nature of the new smokers, as well- and they're cheap. :thumbup:
"Get your facts first, and then you can distort them as much as you please"- Mark Twain.
User avatar
43rdRecceReg
Major
Posts: 6294
Joined: Fri Jul 31, 2015 11:38 am
Location: North West Highlands, Scotland

Re: Comet A34- Ludwig kit

Post by 43rdRecceReg »

:/ :/ Well, there's always a wee oversight in these unscripted builds. When fitting the smoker pipes, I completely forgot that the engine deck rear panel actually slots into the lower hull, but below deck level. I'd fitted the smoker outlet pipes roughly level with the deck. That's a big- but not difficult to correct OOOPS!!.
If the Comet looks a tad odd in the following shots, it's because the upper hull is almost a cm above where it should be (because of offending exhaust pipes...)
Anyway, great progress- and the first switch on!!
Here's the switch, and below that, a pic of the exhaust oversight!.
Image
Image
:{

I took a guess, and fitted the LEDs (which DON"T have the polarity marked on the metal-cased Tk 6.1s) as : + ive on the Right, and - ive on the left. That's how it is on the
TK 6.0 and TK 6.0s.


Interestingly, the radio controller supplied with this model had "6.0s edition" on the back. All the others I've received just have plain old "2.4Ghz". I'm wondering whether the 's' series controllers are configured differently in the firmware dept. That would explain why the 6.1s MFU is supplied with the 6.0s controller, and not the bog-standard two-button (A + B) controller we get these days.
Have a look:
Image
The 6.0s edition radio is the one supplied with the 6.1s MFU. The bagged one was supplied with a tk6.0 MFU.

Anyway, here's the big moment after having paired the MFU and controller (Again, to pair: 1. Switch radio on 2. Press and HOLD the start button 3. With your third hand, switch the tank's power switch on. You almost need three hands...)

Lights, camera- action:
Image
Image
Front light were fittef to LED ch 4
Turret light was connected to LED Ch 3 (taillights). Note to self: must add one red rear convoy light to that circuit.

Smoker on:
Image
Image

After a quick drive gear test on the wooden block, I had the tank performing FLAWLESSLY on the carpet and wooden floor. Until, that is, the Hennec tension collapsed when the tracks hit a raised edge on the carpet. 8O Luckily, no harm was done to the motors or MFU (it's capable of 160 A, and seemingly as tough as old boots), and the tracks were still able to move, forwards and backwards! Quel relief! I had the same issue on the Cromwell, when a track then locked up- absolutely solid- and I think cooked one of the Clark tk60 circuits. I've yet to retest that.

This is how much it had collapsed:
Image
Yanked back into place:
Image
I'm going to need some Loctite, or something else to ensure that the tensioner can't undo (twist) like that. @) I thought I'd got the grub screws pretty tight on there. Maybe something else is needed, especially as this was only on carpet.

Anyway, the turret turned smoothly, and the elevation unit was fine :thumbup: The recoil refused to budge (and I didn't linger on it, lest it cause a stall). I think the paint on the barrel had glued it up. :/

All in all, it's a great start!. Apart from the Henntec slippage, the tank drives and turns well- especially in 'slow' mode (6.1s has the best performance in the 'slow' dept of the TK 6.0 series). The springs are a tad weak, but I knew that already. However, the return rollers help keep things moving smoothly. I've also bought uprated springs.

I need to adapt the rear deck to accommodate the pipes, and then fine-tune the servo recoil (I freed the gun up from it's stuck-fast position)
other than that- it's Mission Impossible made Possible!. :thumbup:
Oh, yes, when all the teething troubles are sorted, I'll try to make a video of it in action. It will be my first (possibly my last- if I screw it up :haha: )
Last edited by 43rdRecceReg on Wed May 12, 2021 10:26 pm, edited 1 time in total.
"Get your facts first, and then you can distort them as much as you please"- Mark Twain.
User avatar
Peter W
Recruit
Posts: 25
Joined: Mon Sep 11, 2017 6:06 pm
Location: Kent

Re: Comet A34- Ludwig kit

Post by Peter W »

Have you filed the idler shaft to a flat ? Would that help with the slippage. Also have you mentioned previously where you got the uprated springs from ? About to get onto the suspension and running gear on mine.

Peter
HL/Taigen Tiger 1 mish mash in progress
HL Super Pershing in progress
HL M4A3 105mm
Ludwig Comet
User avatar
Jimster
Lieutenant
Posts: 3058
Joined: Mon Dec 10, 2018 1:51 am
Location: Illinois

Re: Comet A34- Ludwig kit

Post by Jimster »

Great progress photos and that smoke looks awesome! You're definitely putting good effort into it.
User avatar
43rdRecceReg
Major
Posts: 6294
Joined: Fri Jul 31, 2015 11:38 am
Location: North West Highlands, Scotland

Re: Comet A34- Ludwig kit

Post by 43rdRecceReg »

Peter W wrote:Have you filed the idler shaft to a flat ? Would that help with the slippage. Also have you mentioned previously where you got the uprated springs from ? About to get onto the suspension and running gear on mine.

Peter
I've yet to determine how the slippage could have occurred, Peter. :problem: Henntec tensioner kits don't have any flats machined in them, at least, not the ones I've used.
It may be that friction and the grip of a grub screw are insufficient to prevent slippage, especially when the weight of metal tracks adds to the (torque) load on the shaft.
That's what I need to check on. With no load- on the wooden block- or even on the floor, there's no problem. It was the carpet that induced the slippage. :/
However, this is simply the 'switch on' stage. I always laugh when ships are launched, and they can't even crack a bottle of champers over the bow. :D
As for the as yet unfitted stronger springs, there's a reference to them earlier in this thread; but since you missed it- here it is again:
Image
and the unobscured web address:
https://springsandthings.me.uk/product- ... n_springs/
"Get your facts first, and then you can distort them as much as you please"- Mark Twain.
Post Reply

Return to “Other Builds”