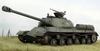
Which basically has metal tracks, Asiatam 3:1 gearboxes, internal ariel, modified HL recoil with LED flash.
I did plan to convert to a KV-2 but seen a lot of them recently so after some reading I've decided to go for 1941 model with simplified reinforced welded turret and late production ZIS-5 (longer 76.2mm main gun).
So today I started. Couple of illustrations so I know what work needs to be done. One on left target version and right is the ekranami version which i'm starting with.

Spare turret to start work on.

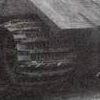
Side armour removed

Rear periscopes removed and turret top detail removed.

Weld lines added, rear periscopes relocated nearer the back to avoid blind spots, perscope details and holes smoothed out.

Next up is research the mantlet and rear panel of the turret.
Ian.