Finishing the turret stowage bin

- The stowage box from Build Your Own Tiger complete with photo-etch from the same series and Voyager.jpg (32.49 KiB) Viewed 6328 times
The rear turret stowage bin was a distinctive part of the Tiger's look. Without it the turret always looks a little unbalanced with the massive gun at the front - although in reality, since it was made of thin sheet metal - it obviously added no real weight at all.

- An overall view with the turret stowage box primed and temporarily installed.jpg (23.67 KiB) Viewed 6284 times
I had started this a long while ago, using the Hachette
Build Your Own Tiger magazine parts in place of the Heng Long bin, which I was able to remove once I had switched to the Taigen recoil unit (because this also takes care of the elevation, the plastic motor and cog installed at the rear of the HL turret are no longer needed).
The other alternative would have been to use the Tamiya bin. However, the attraction of the Hachette version was the opening bin lids and the associated photoetch which came with them.
The first step was to thin down parts of the inside to enable me to make realistic shrapnel / bullet holes - these were simply done by stabbing the outside with a sharp blade and twisting it. I also added a corner dent with a rounded needle file. As you can see from my photos of the venerable Bovington Tiger 1 (taken at the recent Tankfest) these sheet metal bins were particularly prone to such damage.

- The somewhat battered stowage box on the Bovington Tiger 131 showing latches, locks and rivets.jpg (22.91 KiB) Viewed 6328 times
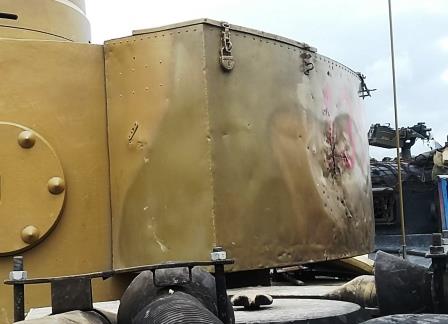
- A close-up shows the multiple shrapnel holes.jpg (29.31 KiB) Viewed 6328 times
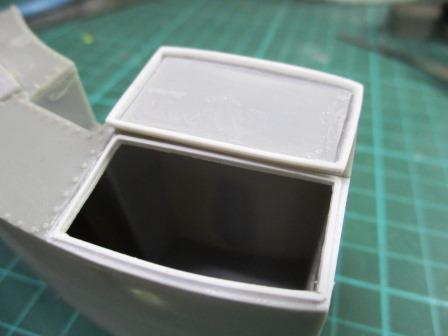
Although dimensionally pretty accurate, the Hachette bin also lacks the distinctive rearward slope of the real thing, so I sanded the sides and rear down a little to make the top sit at the correct angle. So far so good. Then I realised that the top of the bin was far too thick so I had to sand this down to a whisker of its actual thickness. On the Hachette version the tops of the lids sat at the same level as the bin roof - but they should actually sit
above it.
Then came the opening lids. This was, I thought, the main advantage of using the Hachette parts, but then I realised that the lids, which were moulded as thick solid pieces of plastic, should actually be thin with even thinner sides. See this pic of a Tiger knocked out in Italy...
 Viewed 6328 times")
I almost admitted defeat but since I had come this far i took the trouble to sand one of them down and used plastic card to make the sides. At this point I thought that using the Tamiya bin (although you would have to cut away the moulded lids) and the Aber metal lids might have been a better idea - but since (I believe) these only come with the full Aber photoetch set this would have been an expensive option. Besides, what I had started I felt i had to finish! The lids also fit over an internal lip around the bin aperture and this I made from more thin plastic card. By this stage I had resolved to only keep one of the bins workable in order to save my sanity (or what's left of it). You will see that I had marked the lids with 'port' and' 'star' to avoid muddling them up - they are different but look almost the same.
- A lot of work was needed to get the opening stowage box lid looking like this....jpg (27.77 KiB) Viewed 6328 times
The hinges that came with the Hachette set were then added without any further trouble. Most importantly, on the opening bin lid they worked just like the real thing. Note that, aside from Aber, there is no other source for these hinges because the Voyager set (of which see more in a moment) does not include them.
Sadly this was not the end because next you have to add the distinctive lid clamps. Oh god... Thankfully this is where Voyager come to the rescue yet again. These clamps are not unlike those used to fasten the front mounted jack block which means they can be made to work just like the real thing by clamping down the lid. However, once again I decided that making these workable was unfeasible and unrealistic on a working tank - so I cheated and glued them into place. This is another reason I decided to stop with only one opening lid - you can't properly close it without fastening the clamps and, if they're not workable, then this cannot be done. It seems feasible that the crew might forget to fasten one lid before driving off into battle - but not both...

- Hinges and clamps now in place and a dark coat of paint added to the interior.jpg (33.91 KiB) Viewed 6328 times

- One of the clamps on the port side.jpg (25.46 KiB) Viewed 6328 times
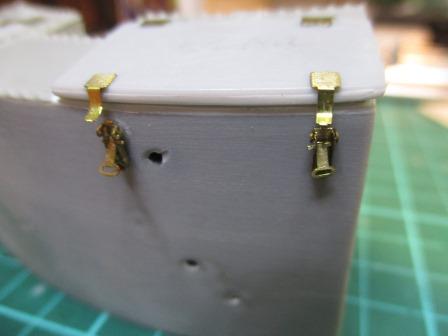
- I admit that my assembly of the Voyager clamps is far from perfect - but they should look OK with a coat of paint.jpg (25.7 KiB) Viewed 6328 times
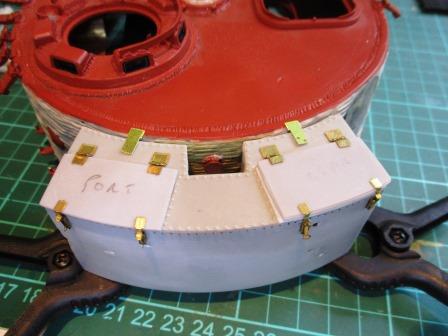
The final step was to add the brackets which hold the bin to the turret. These come with the Voyager set and were supplemented with Masterclub hexagonal bolts. There are two underneath as well but I had simply made these with bent brass strip many moons ago and, since they can hardly be seen, I left them as they were. Finally, as I have already noted above, it is important to remember that the zimmerit was already applied to the turret rear
before the stowage box was attached. These boxes could (and frequently were) lost in combat and it wouldn't have made much sense to leave a gaping hole in the anti-magnetic paste on the back of the turret. In fact I only applied the Magicsculp where it could be seen around the edges but I took the precaution of pressing the stowage box into the putty whilst it was still wet to make sure it sat right... All I have to do now is add a coat of primer.
- Stowage box finished and test-fitted against the rear of the turret.jpg (36.44 KiB) Viewed 6328 times
Oh yes, I almost forgot the extra rivets. I will deal with these in the next post. Let's just say for now that it involved an old trick with PVA glue and a cocktail stick which I had last used over 30 years ago...