ABE'S EARLY TIGER 1 BUILD

This section is to 'show and tell' about any customizing or re-modeling you have done (or are doing) to a Heng Long tank.
Forum rules
This section is for posting a build log of your Heng Long tank.
Questions relating to issues you are having with your tank(s) should be posted in the General Questions forum here: viewforum.php?f=14
Post Reply
User avatar
jarndice
Colonel
Posts: 8018
Joined: Mon Sep 03, 2012 11:27 am
Location: the mountains of hertfordshire

Re: ABE'S EARLY TIGER 1 BUILD

Post by jarndice »

You I see have found the job that will take you to your retirement!
The Jack is an easy fix, just fill the void with (in my case)"Squadron White Putty"and let it dry then sand it flat and paint.
As to the starting handle, there were as far as I know two types, the later one was a two piece component which was stored just in front of the left hand engine grille (viewed from the front) near the radio aerial, the early one was clipped on the rear panel to the side of the towing pin. Hope that helps. :thumbup: :thumbup: shaun
I think I am about to upset someone :haha:
Abe Froman
Lance Corporal
Posts: 153
Joined: Wed Feb 11, 2015 10:00 am

Re: ABE'S EARLY TIGER 1 BUILD

Post by Abe Froman »

Thanks for the info Shaun. Will get the putty out. :thumbup:
Abe Froman
Lance Corporal
Posts: 153
Joined: Wed Feb 11, 2015 10:00 am

Re: ABE'S EARLY TIGER 1 BUILD

Post by Abe Froman »

Its official....I hate Aber etch :problem:
User avatar
jarndice
Colonel
Posts: 8018
Joined: Mon Sep 03, 2012 11:27 am
Location: the mountains of hertfordshire

Re: ABE'S EARLY TIGER 1 BUILD

Post by jarndice »

ABE, What's wrong? I am sure we can come up with a solution.Talk to us.shaun
I think I am about to upset someone :haha:
User avatar
jarndice
Colonel
Posts: 8018
Joined: Mon Sep 03, 2012 11:27 am
Location: the mountains of hertfordshire

Re: ABE'S EARLY TIGER 1 BUILD

Post by jarndice »

ABE, sorry I gave you some bum information early.
I told you where the handle went, being an idiot I was talking about the starting handle.
The jack handle is fitted into the hole on the side of the jack and the jack is mounted on the right hand side of the rear panel underneath the Feifal air cleaner, you swing the handle toward the rear panel so that it is nestled between the exhaust stack and the air cleaner, I use a small cable clamp (Painted leather brown) to hold it in place.
Once again sorry for any confusion. :{ :{ :{ shaun
I think I am about to upset someone :haha:
Abe Froman
Lance Corporal
Posts: 153
Joined: Wed Feb 11, 2015 10:00 am

Re: ABE'S EARLY TIGER 1 BUILD

Post by Abe Froman »

Shaun, no worries with the jack handle info, will be a while before I get round to that!

With regard to Aber, its just so bloody fiddly and as for soldering it!!! I have never soldered so I go CA route which obviously i not as good. The periscopes and delicate to say the least for my clumsy fingers and the instruction diagrams often need many looks before orientation is nailed.

As as for working hinges on the periscopes... :haha: not going there at all..no point to it on my model.

Jeez I only want to be able to open the hatch periodically and see some detail in there. So with regard to the Aber Cupola set I will in fact will be doing some of the etch and some scratch styrene.
User avatar
jarndice
Colonel
Posts: 8018
Joined: Mon Sep 03, 2012 11:27 am
Location: the mountains of hertfordshire

Re: ABE'S EARLY TIGER 1 BUILD

Post by jarndice »

ABE, Hallo my friend, There is a well kept secret to soldering, it will require a small financial outlay and a little practice, (Surprisingly little) first you need to buy a butane soldering torch (I USE A NIMROD SOLDERPRO 50K) and FRYOLUX PAINT, the paint is VERY TOXIC, keep it away from children and animals, what you do is brush the paint on the area that is to be soldered and using the Butane torch on the paint watch in amazement how your PE is soldered almost professionally, The paint is actually a mixture of solder and flux plus some very nasty chemicals. You can get the paint from,
www.maplin.co.uk
and the butane torch from,
www.cromwell.co.uk
the price of the paint is about £35 and the torch about £50 it really is money well spent if you work with PE. :thumbup: shaun
FIRST OF ALL PRACTICE THEN PRACTICE ONCE MORE :haha: :haha:

`
I think I am about to upset someone :haha:
billpe
Warrant Officer 2nd Class
Posts: 1144
Joined: Tue Jan 29, 2013 1:59 pm
Location: The bowels of Kent

Re: ABE'S EARLY TIGER 1 BUILD

Post by billpe »

I hear you on the photo etch stuff. The Aber stuff is the best around but it's also the most fiddly. Definitely get a torch and use solder paint though, a soldering torch also has more uses than just melting solder as well. The Dremel one I got had all sorts of attachments for cutting and casting.
User avatar
HERMAN BIX
Brigadier
Posts: 10300
Joined: Sun Jan 12, 2014 12:15 am
Location: Gold Coast,Australia

Re: ABE'S EARLY TIGER 1 BUILD

Post by HERMAN BIX »

Good advice on the solder paint Mr Jarndice, I will go in search of the same type of stuff asap.
HL JAGDPANTHER,HL TIGER 1,HL PzIII MUNITIONSCHLEPPER, HL KT OCTOPUS,HL PANTHER ZU-FUSS,HL STuG III,HL T34/85 BEDSPRING,
HL PZIV MALTA,MATORRO JAGDTIGER,HL F05 TIGER,TAMIYA KT,HL PANTHERDOZER,HL EARLY PANTHER G,TAIGEN/RAMINATOR T34/76,
HL AN-BRI-RAM SU-85
Abe Froman
Lance Corporal
Posts: 153
Joined: Wed Feb 11, 2015 10:00 am

Re: ABE'S EARLY TIGER 1 BUILD

Post by Abe Froman »

I am liking the sound of the solder paint and blow torch...sounds like it could be easier.

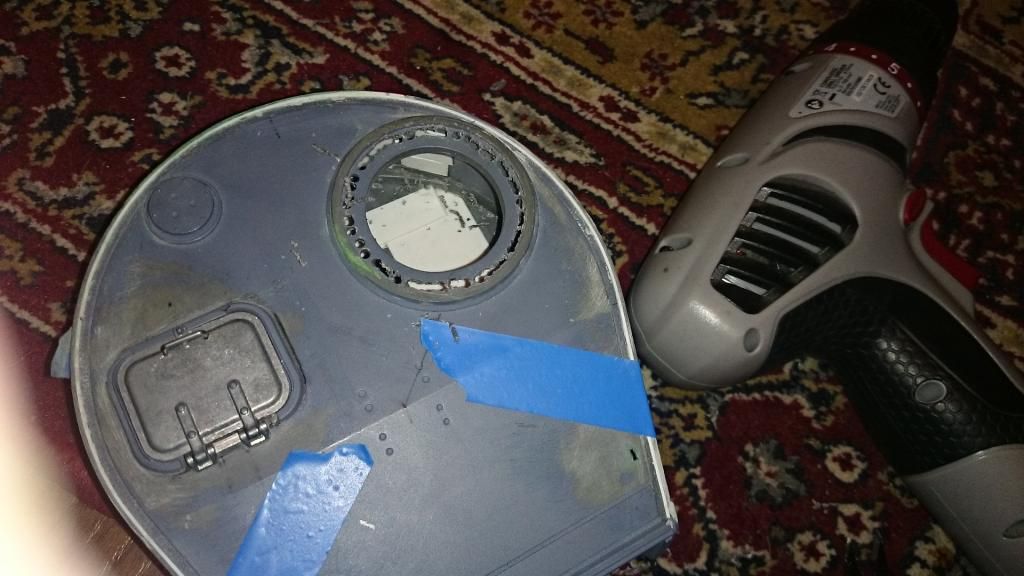
In the meantime, since I added the internal ring in the cupola, it now does not fit in the hole, so out with the drill

Image

Now it slots in just fine.

Just a quickie before bed time..

Night all
Post Reply

Return to “Heng Long Builds”